  |
| |
![]() ... The Alpha Hero
... The Alpha Hero
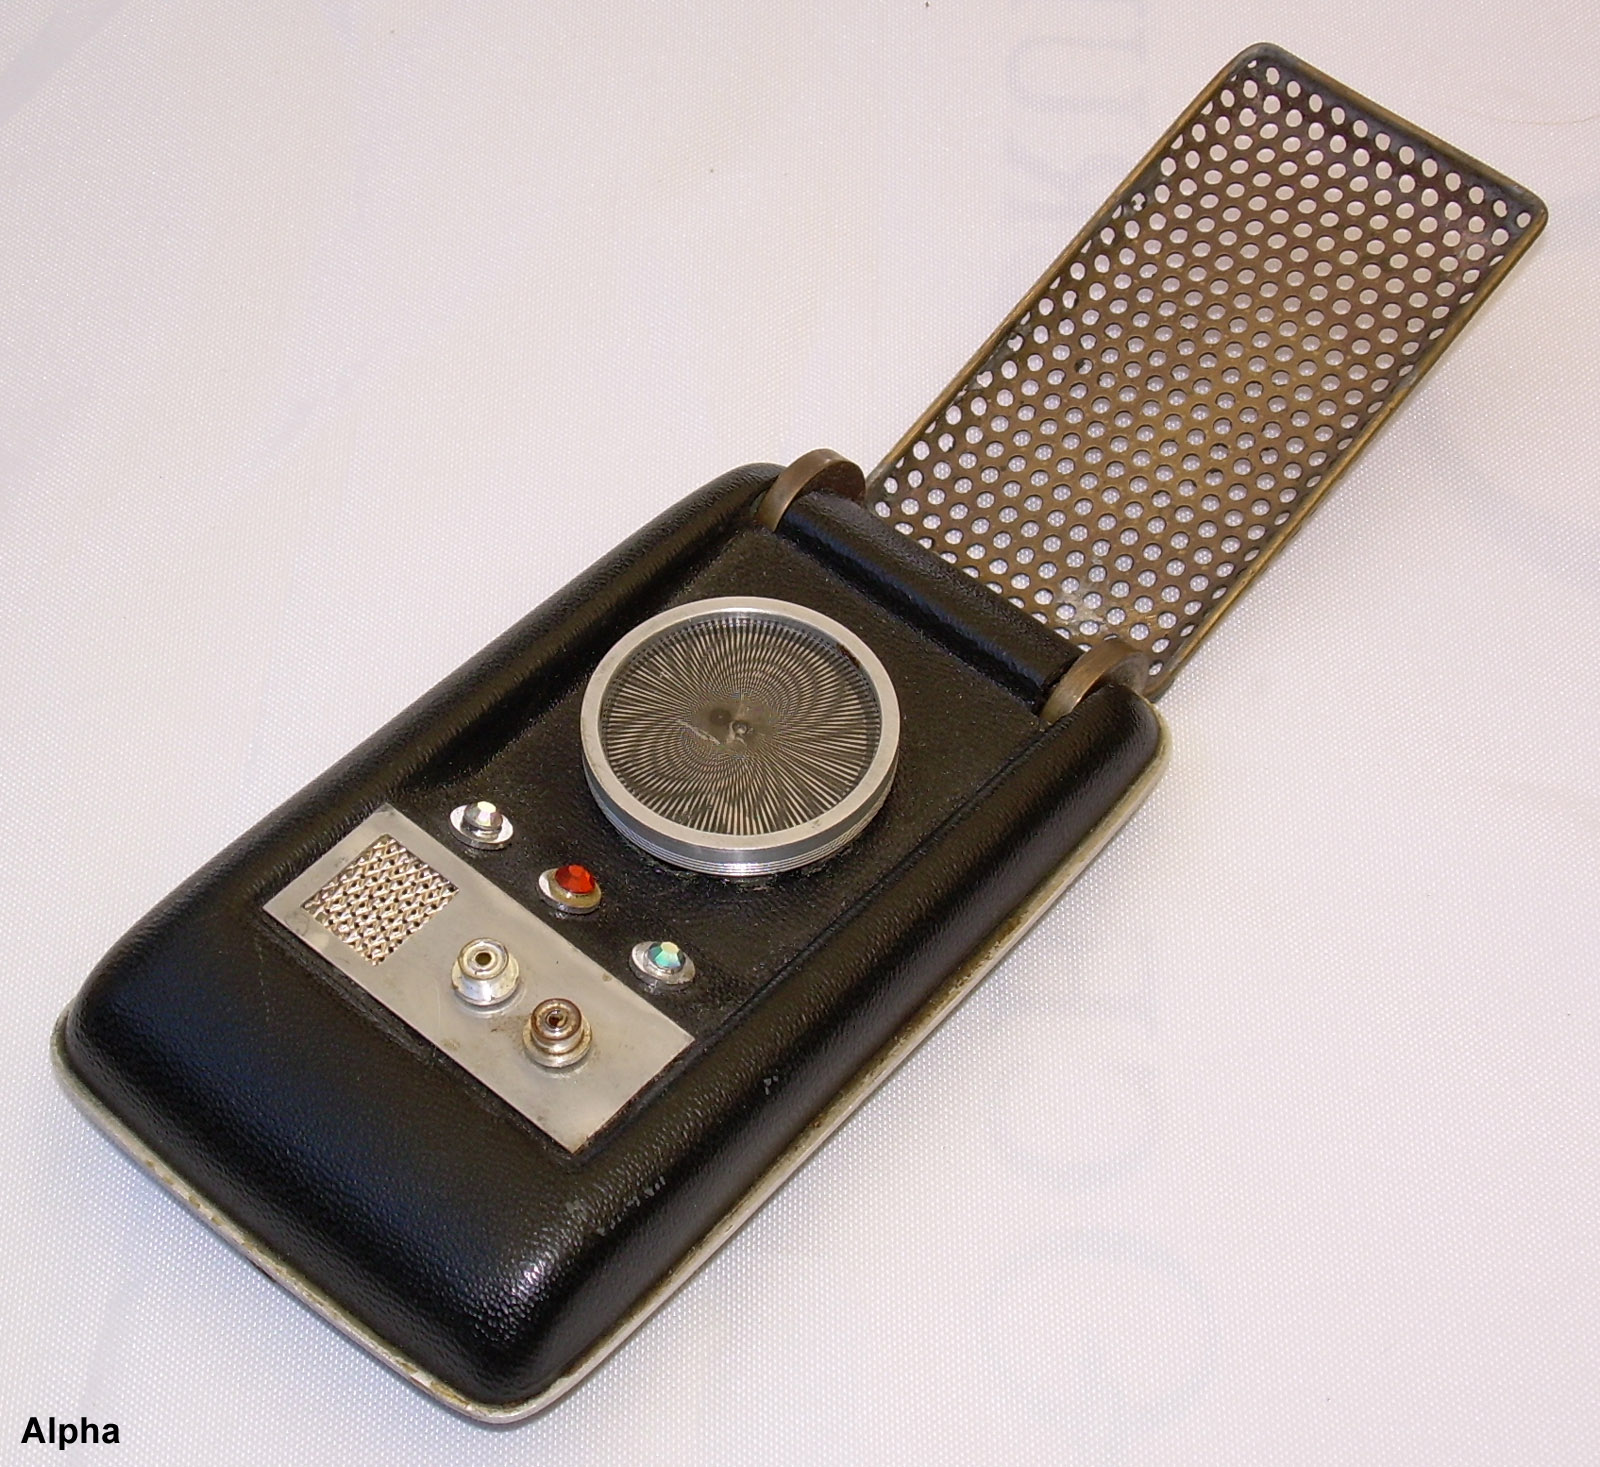
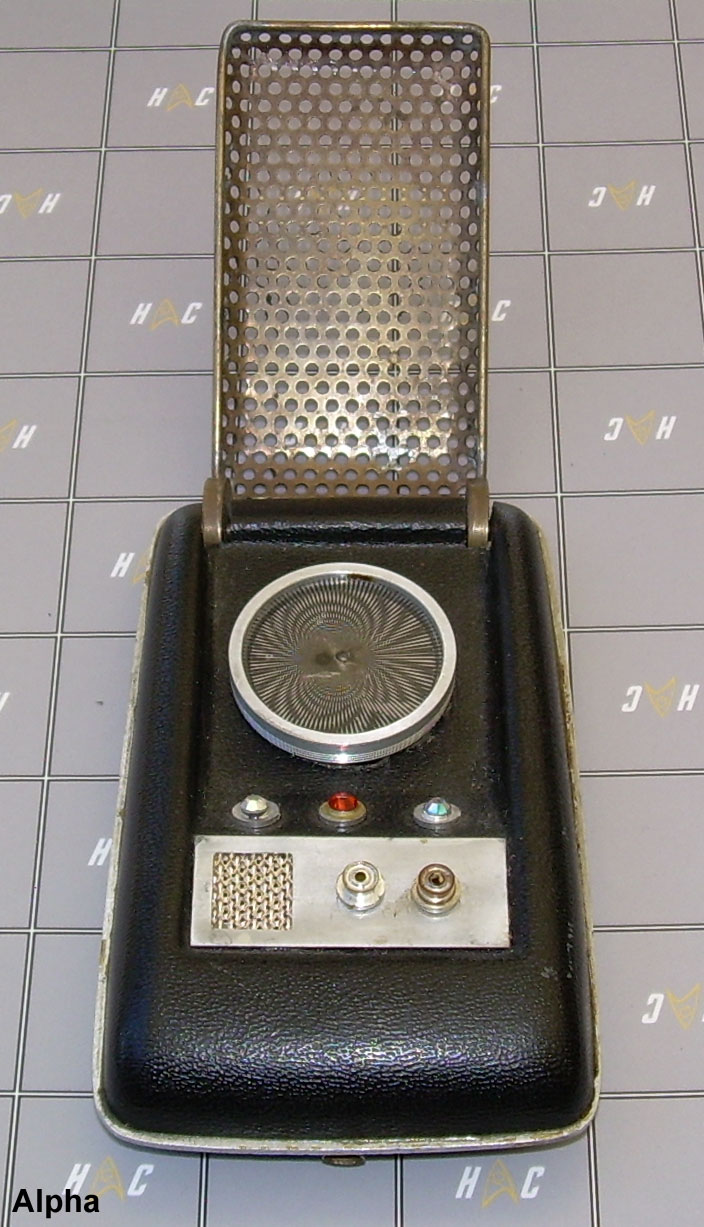
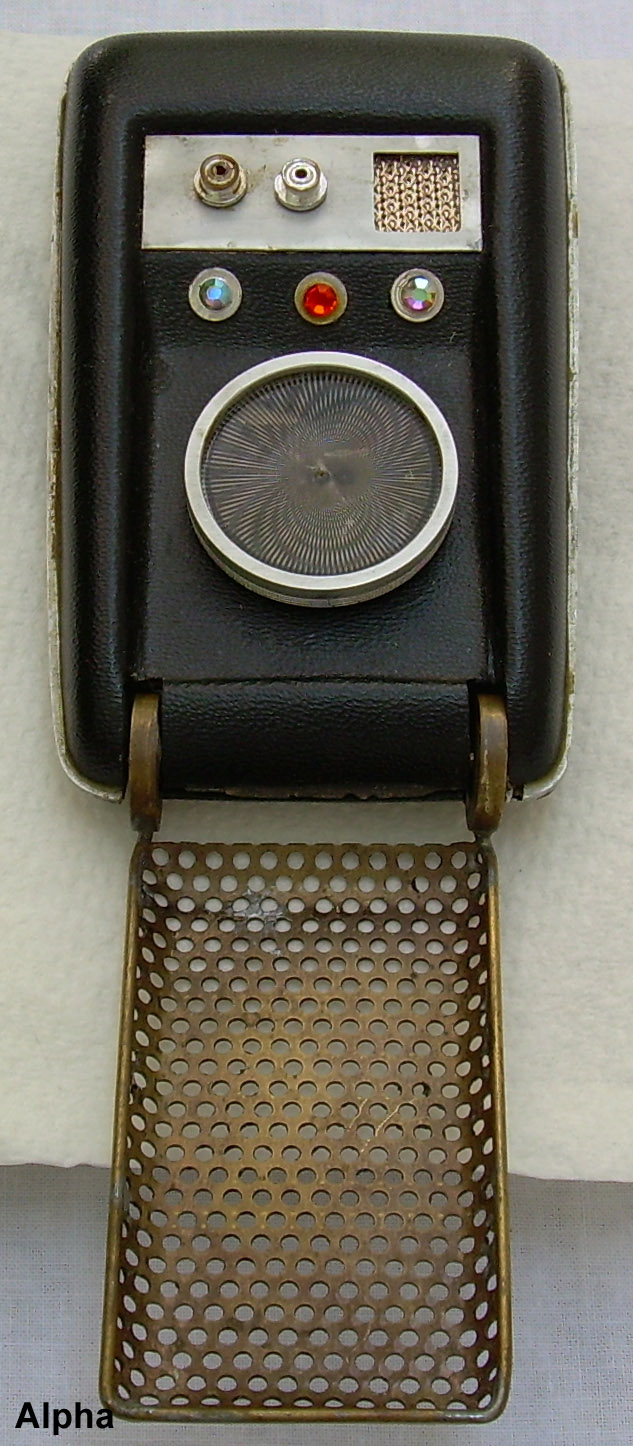
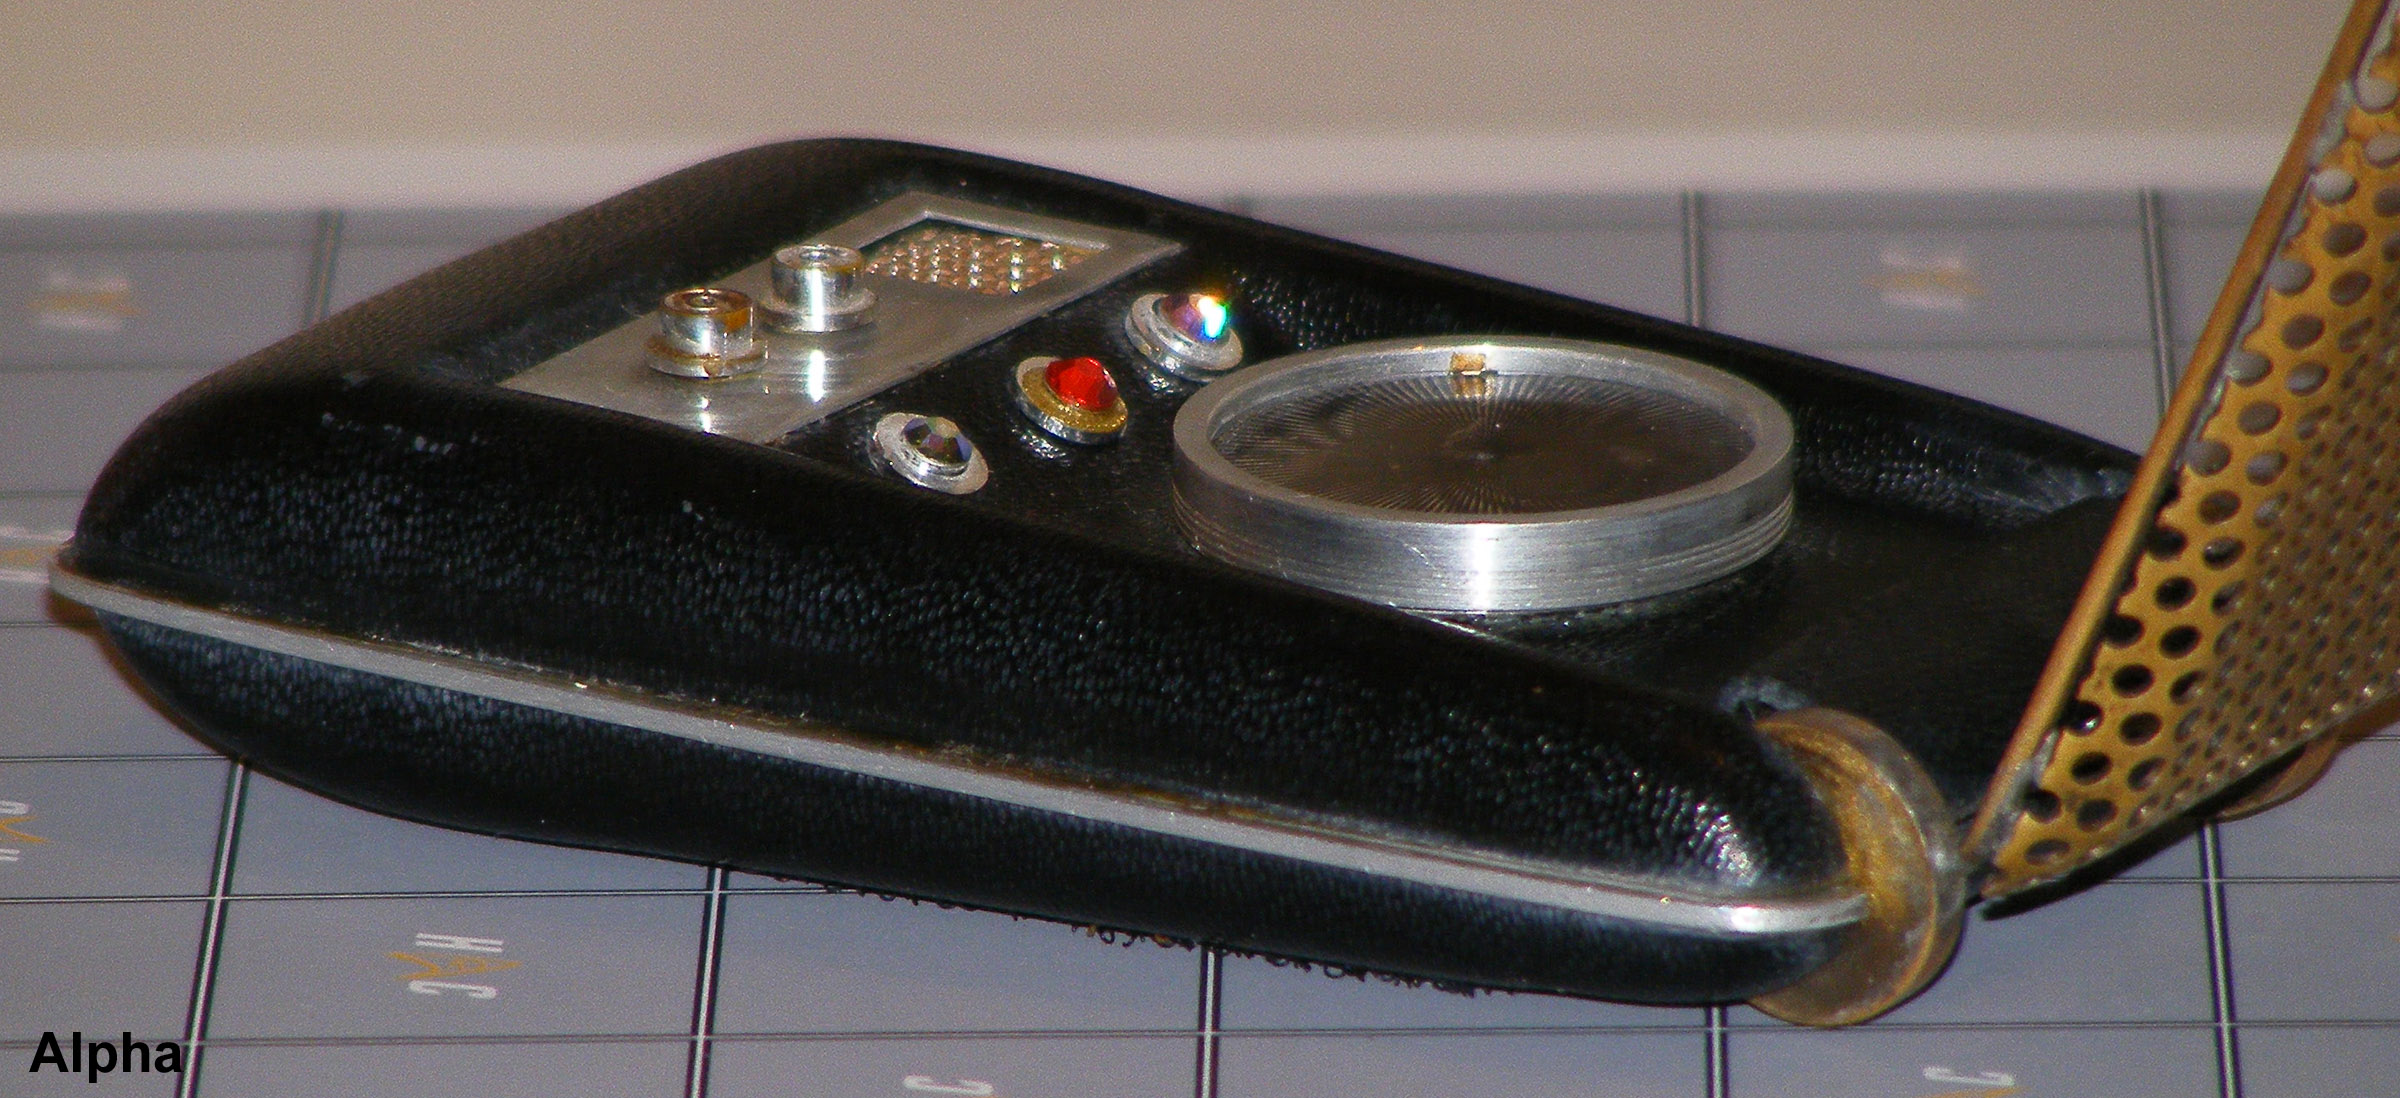
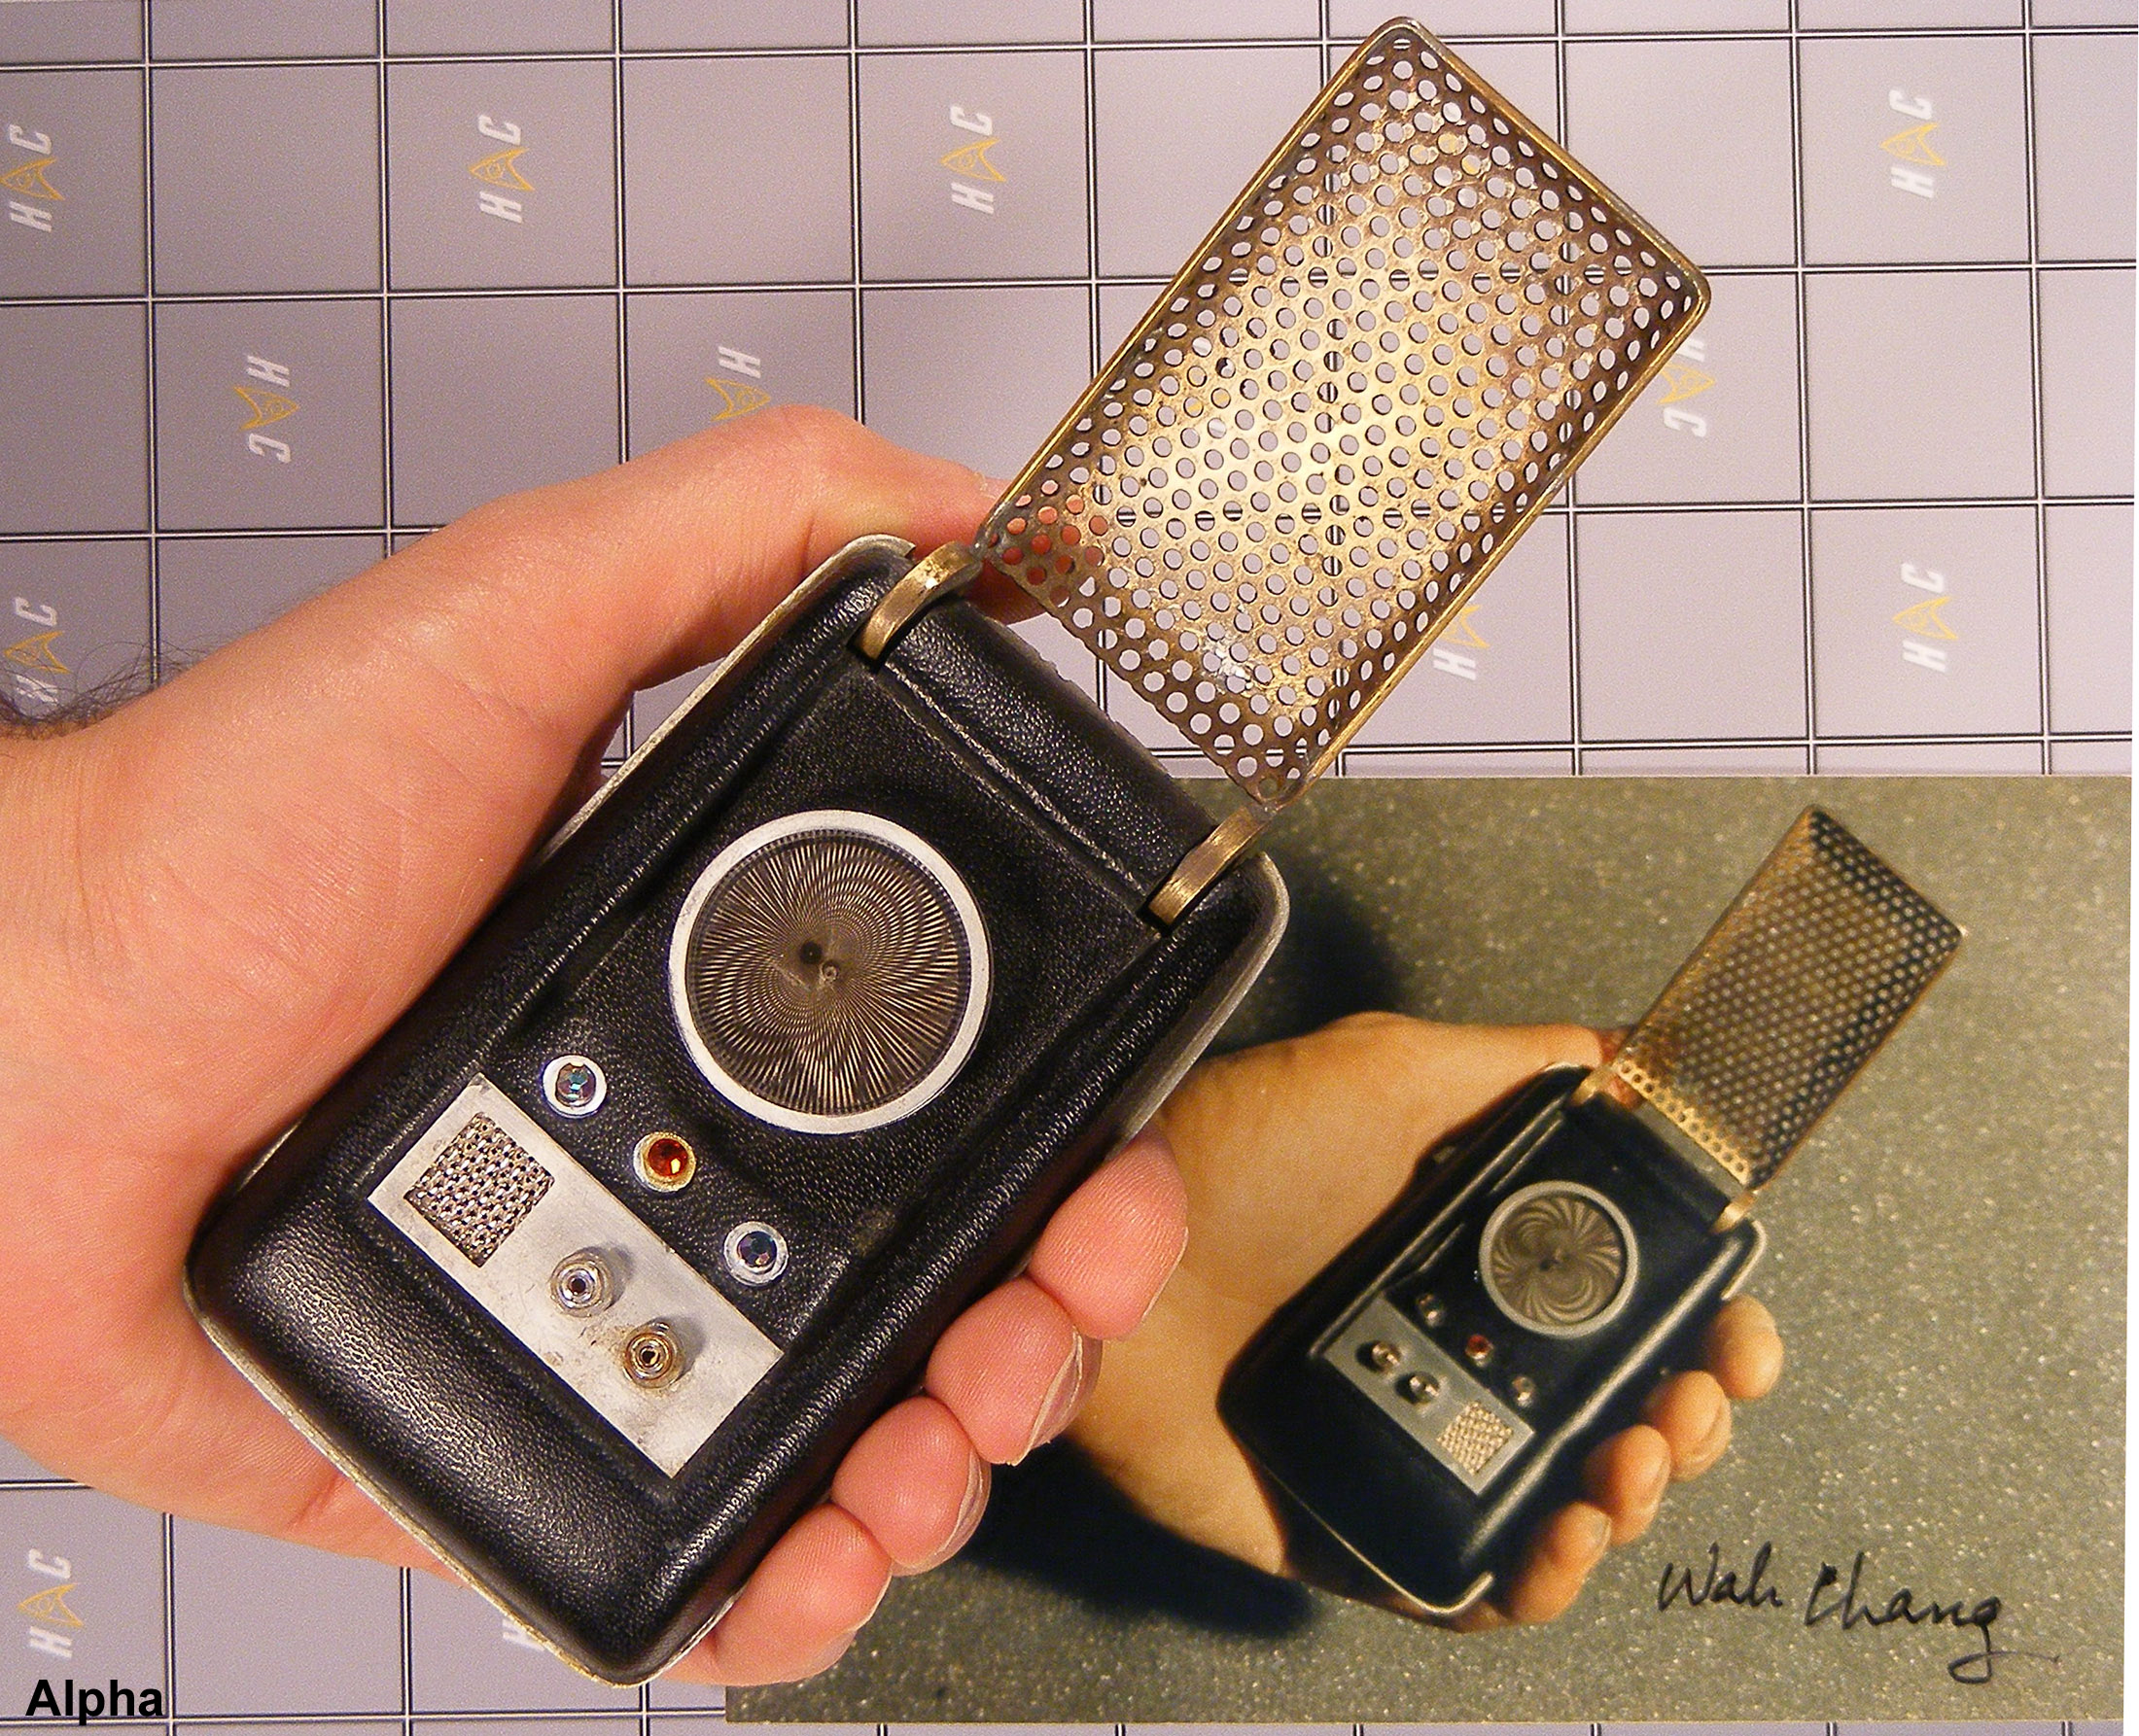
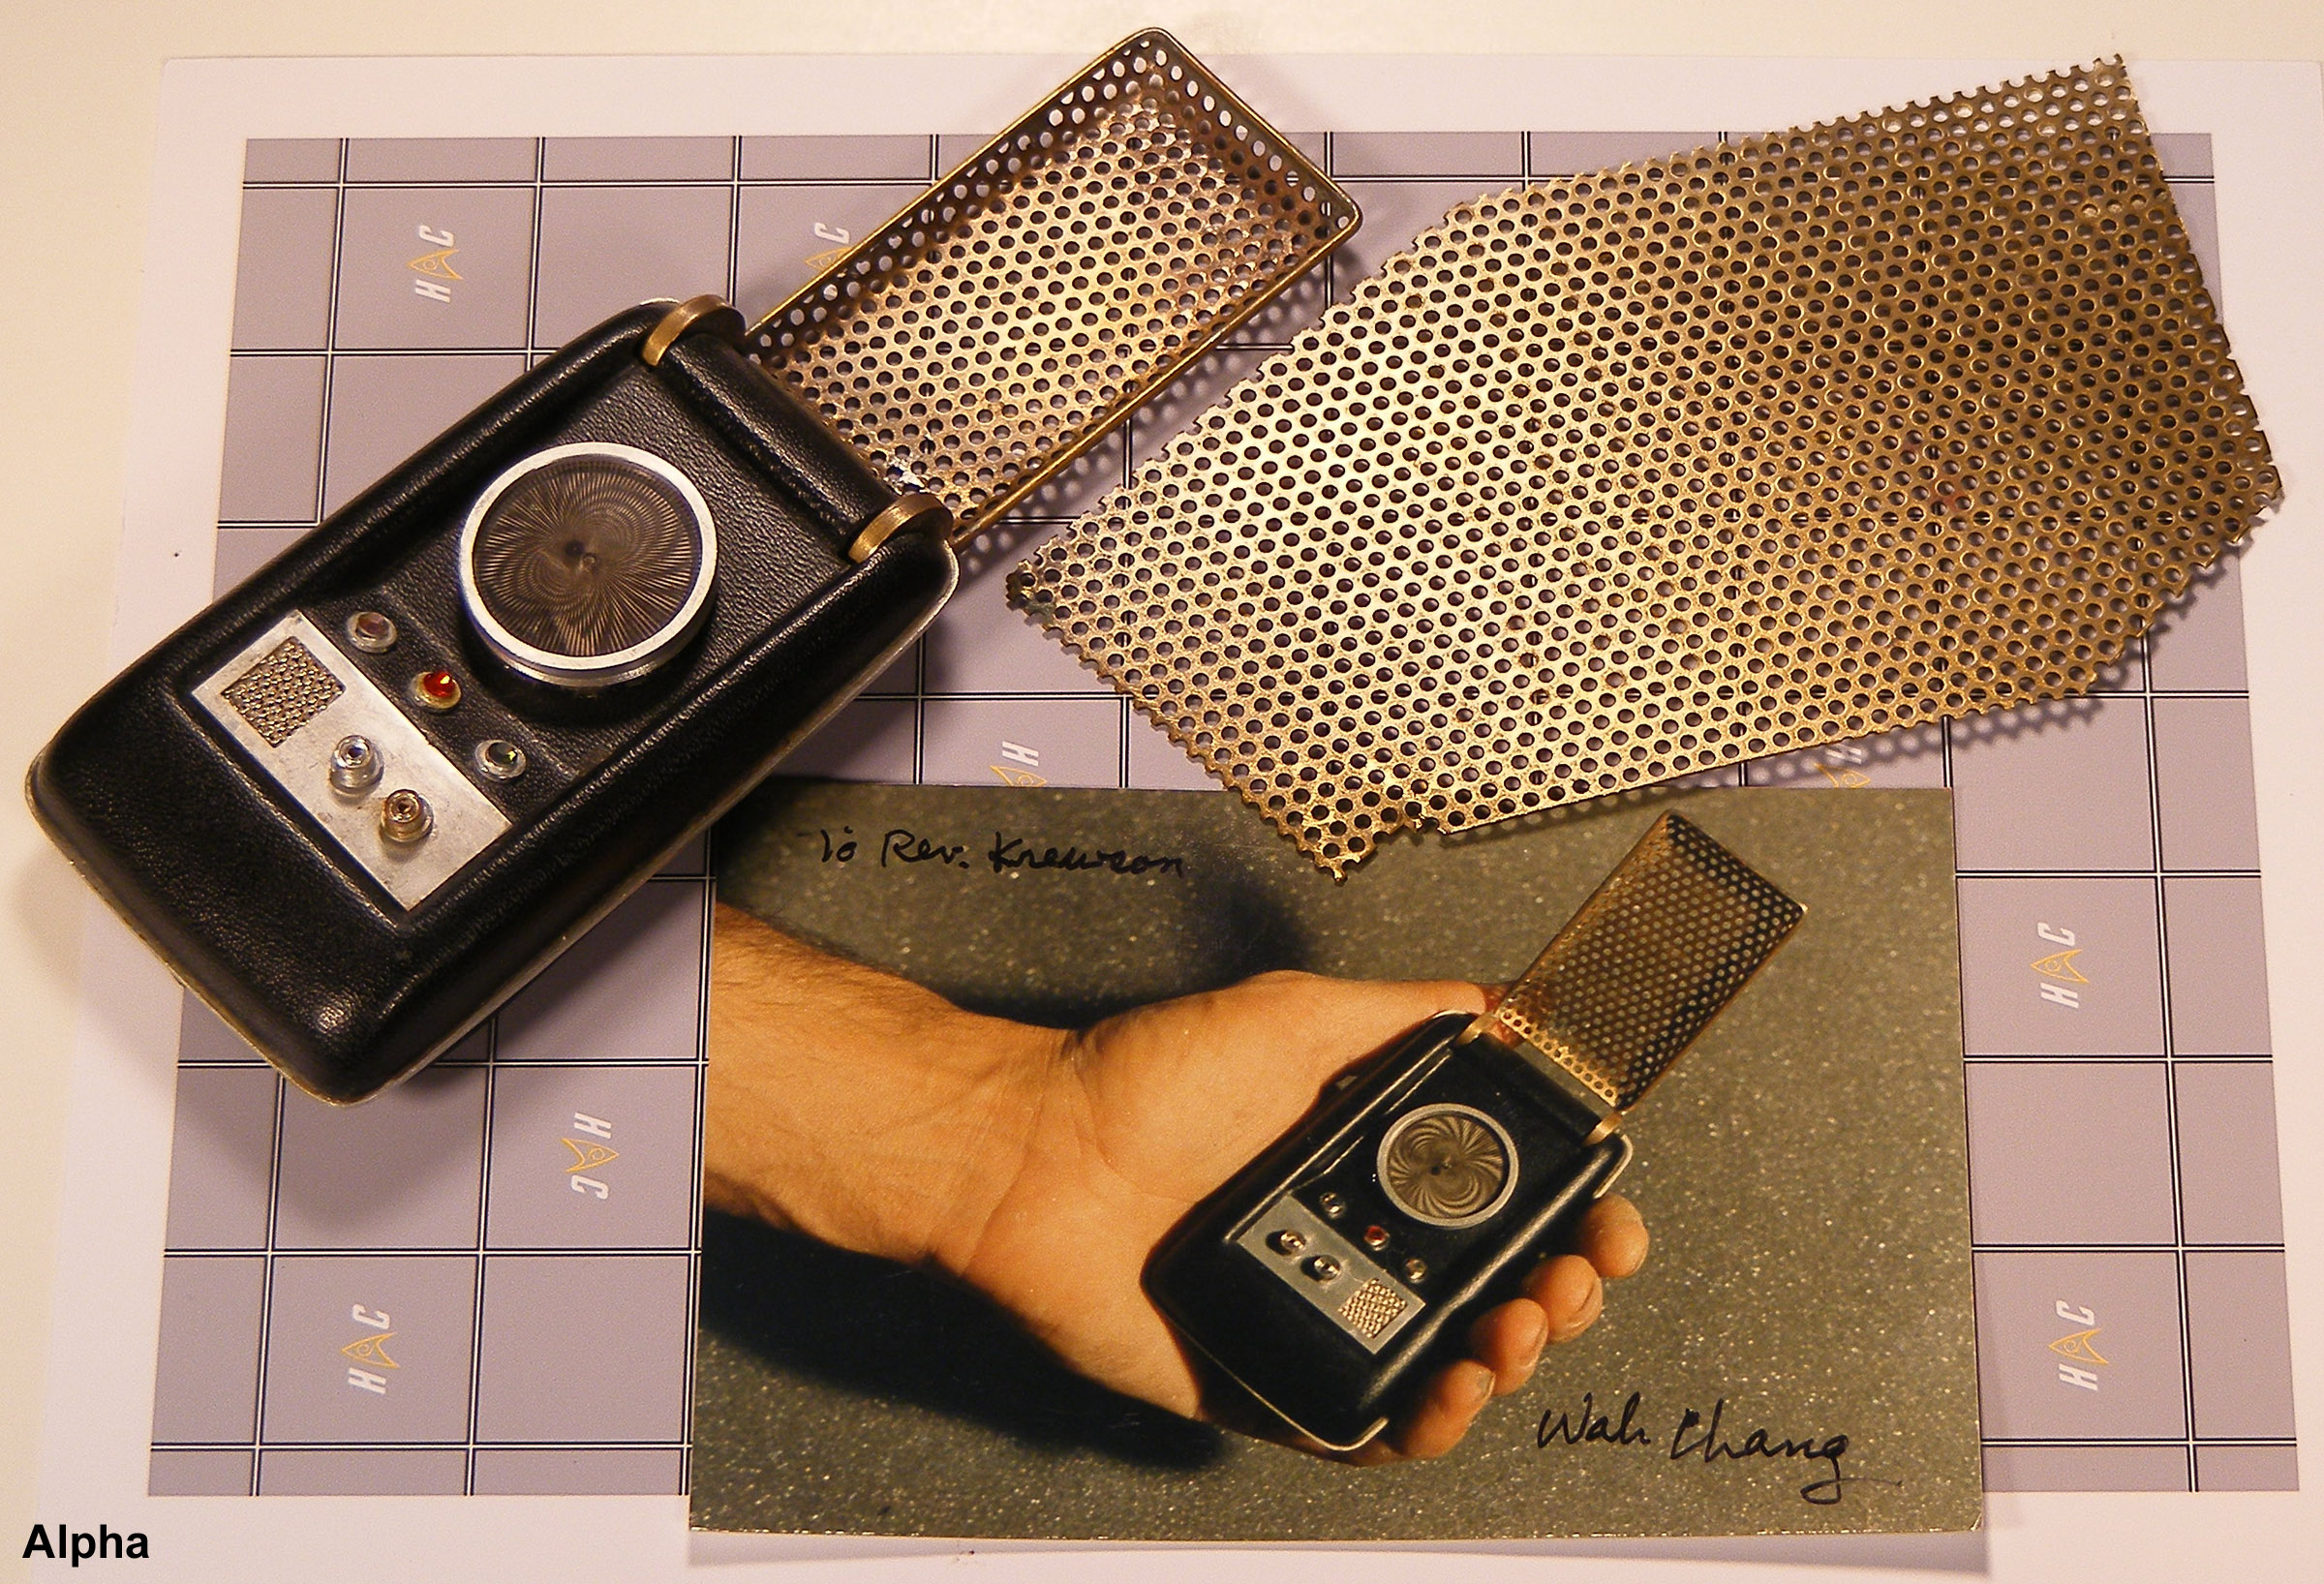
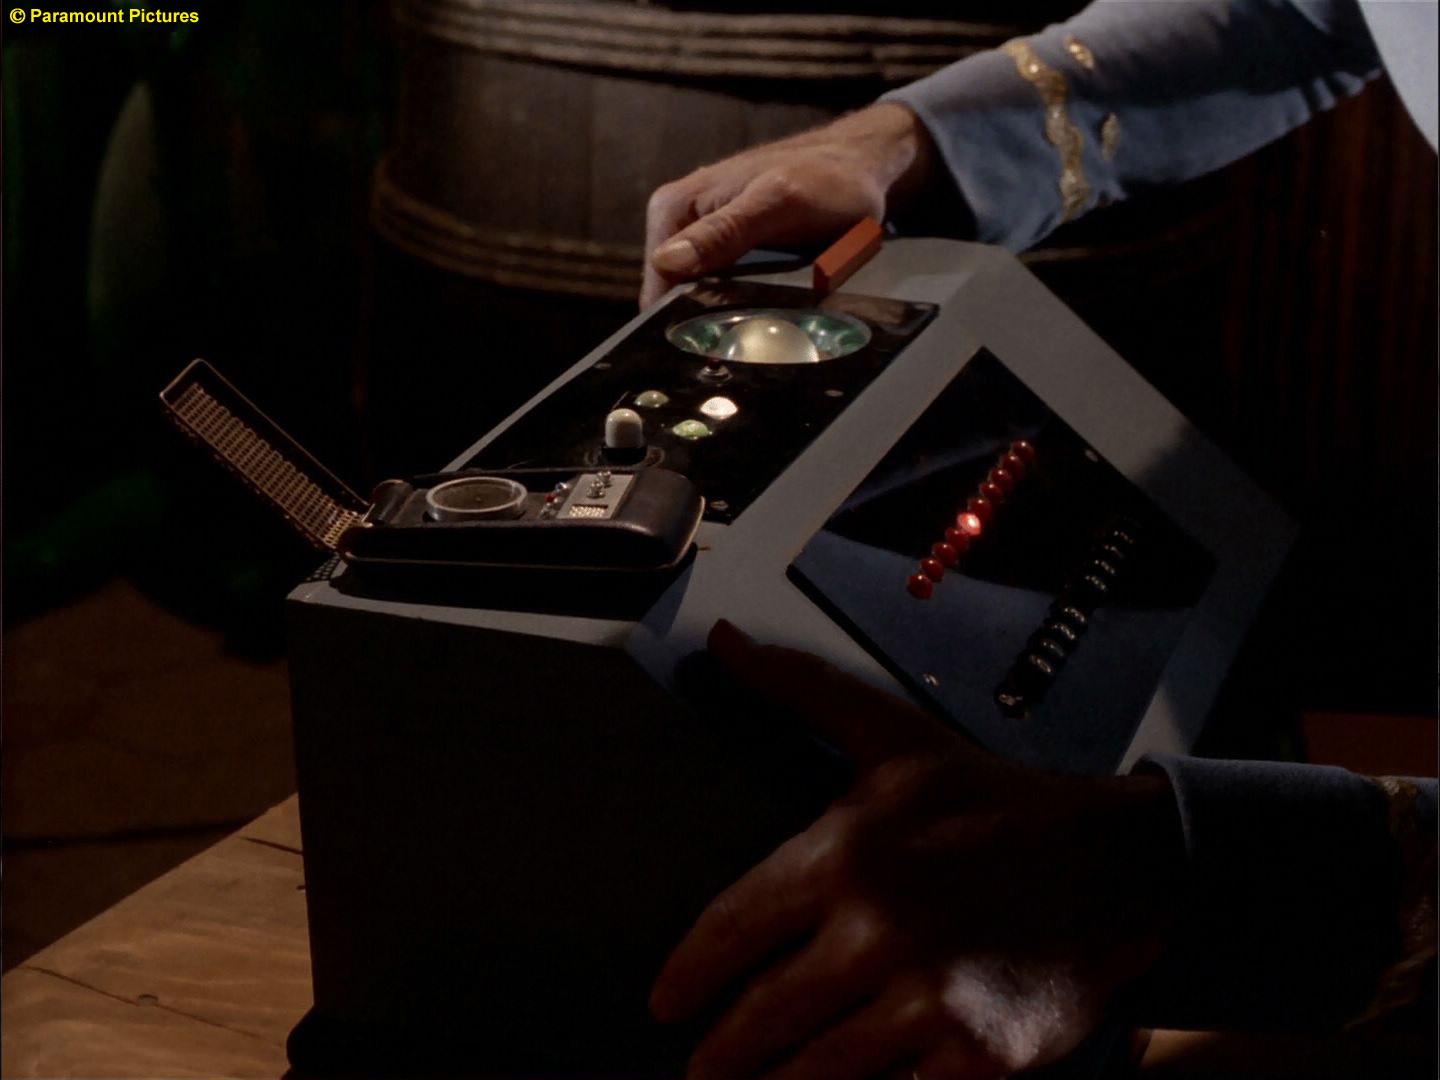
| Here it is - the more famous of Wah's two hero communicator props, up close and personal: |
||
 (1600 x 1467) |
 (1600 x 1284) |
 (1600 x 1405) |
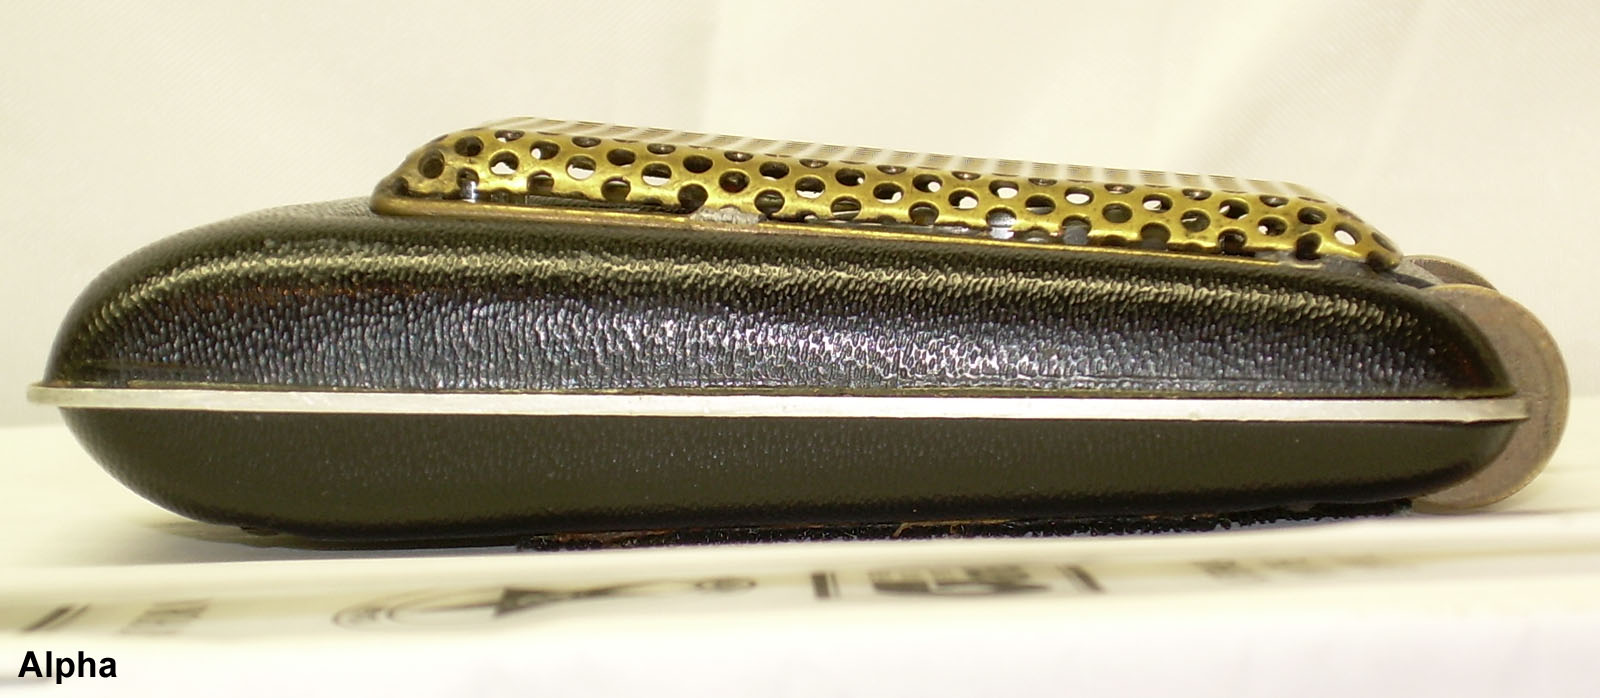
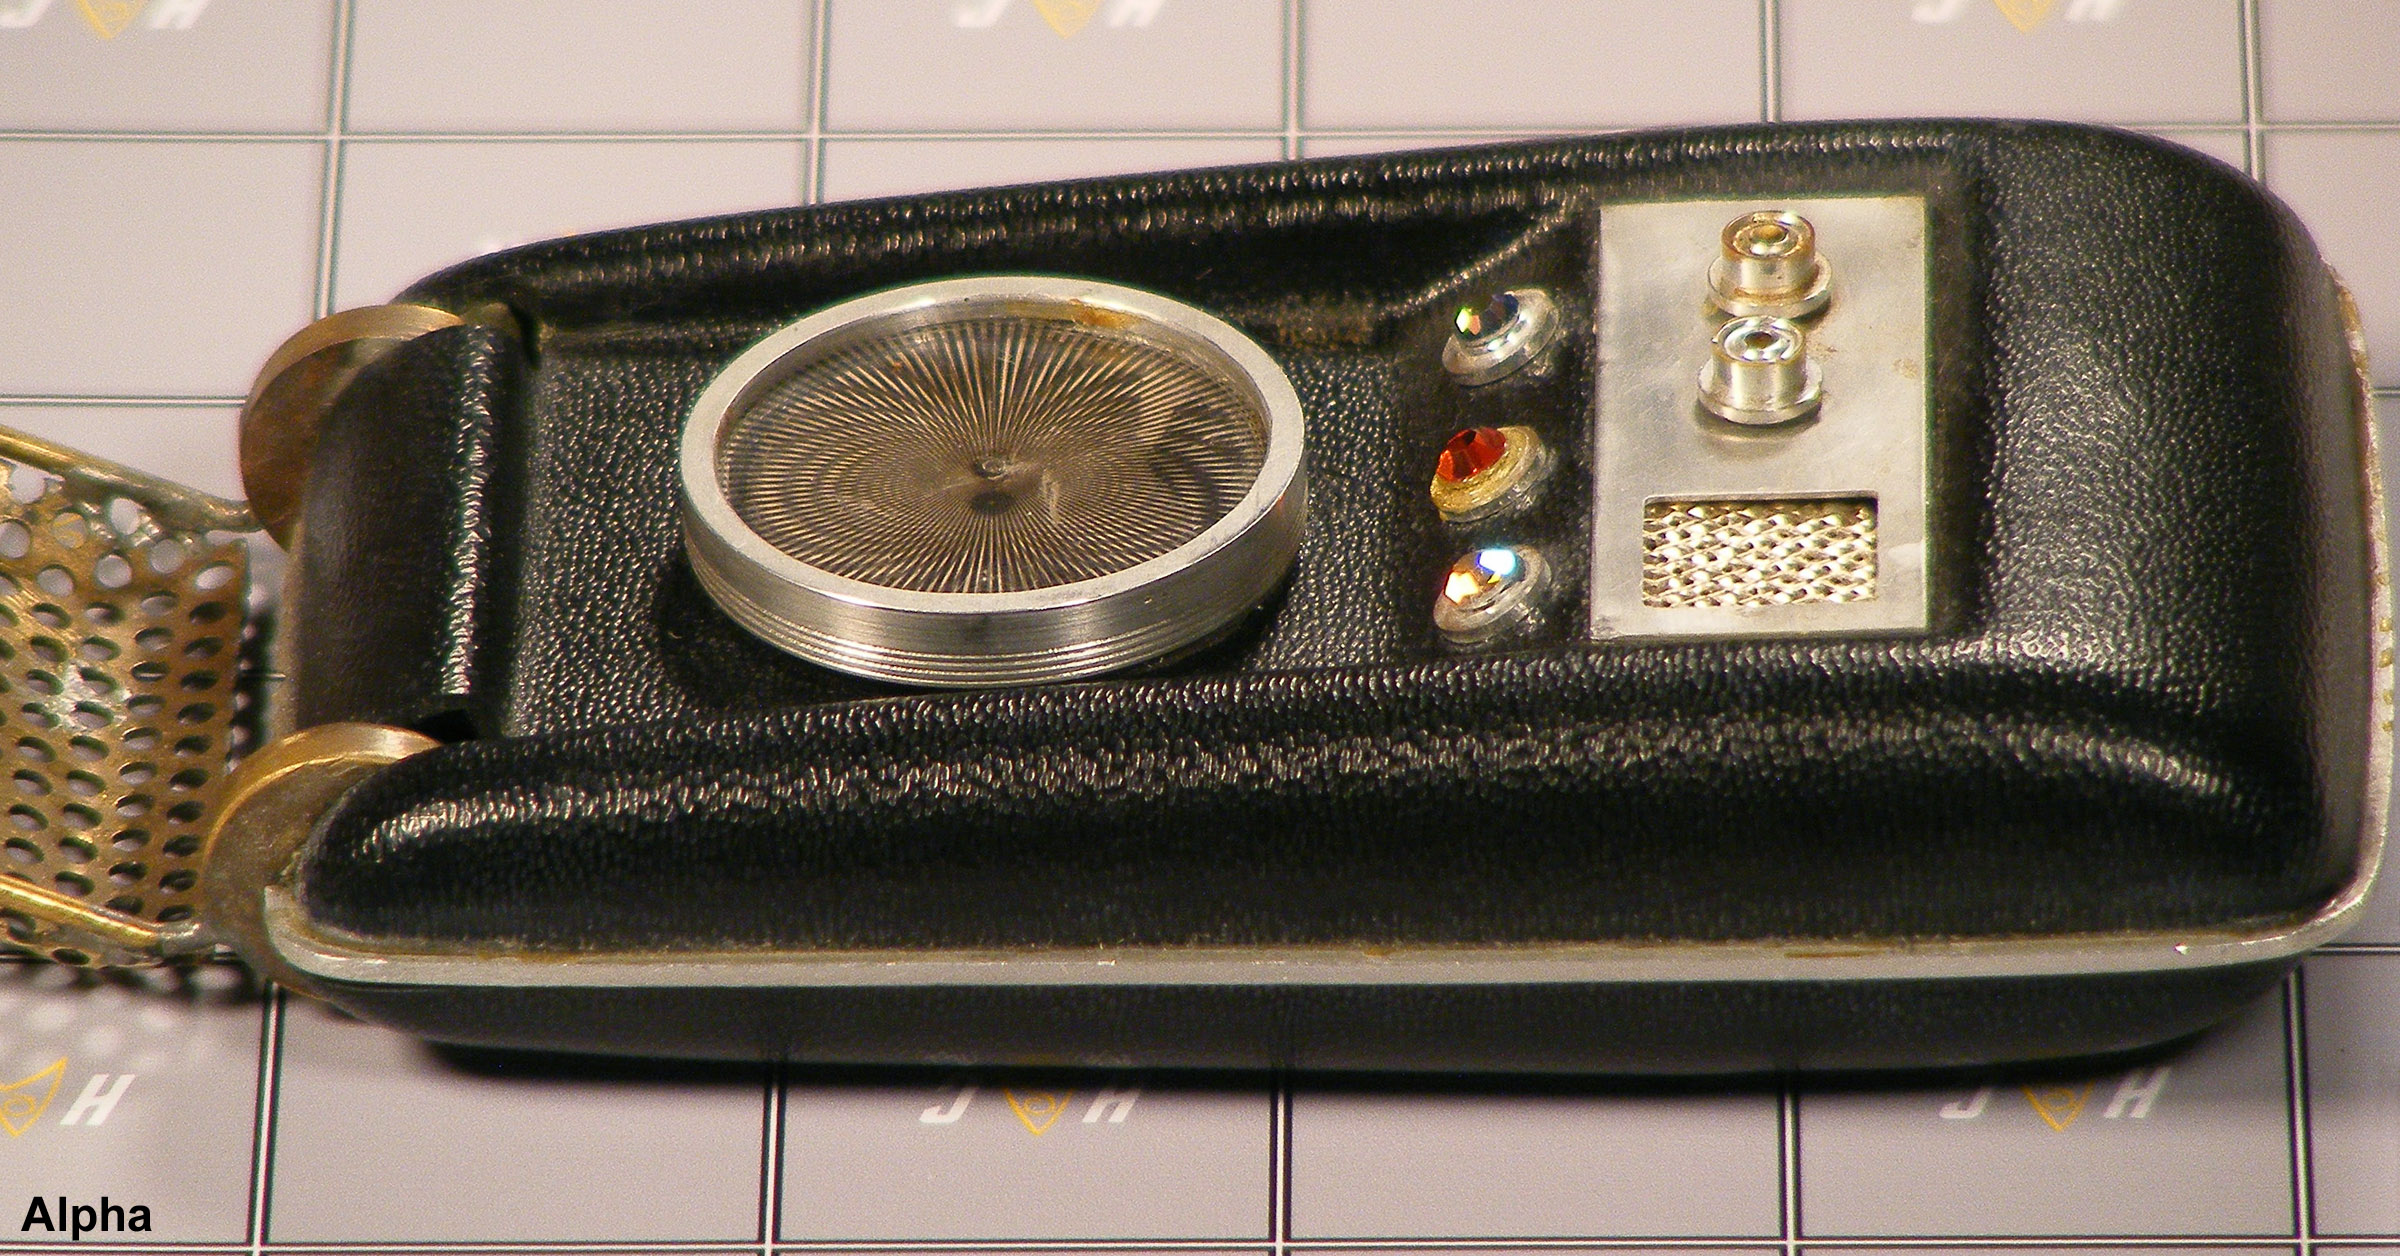
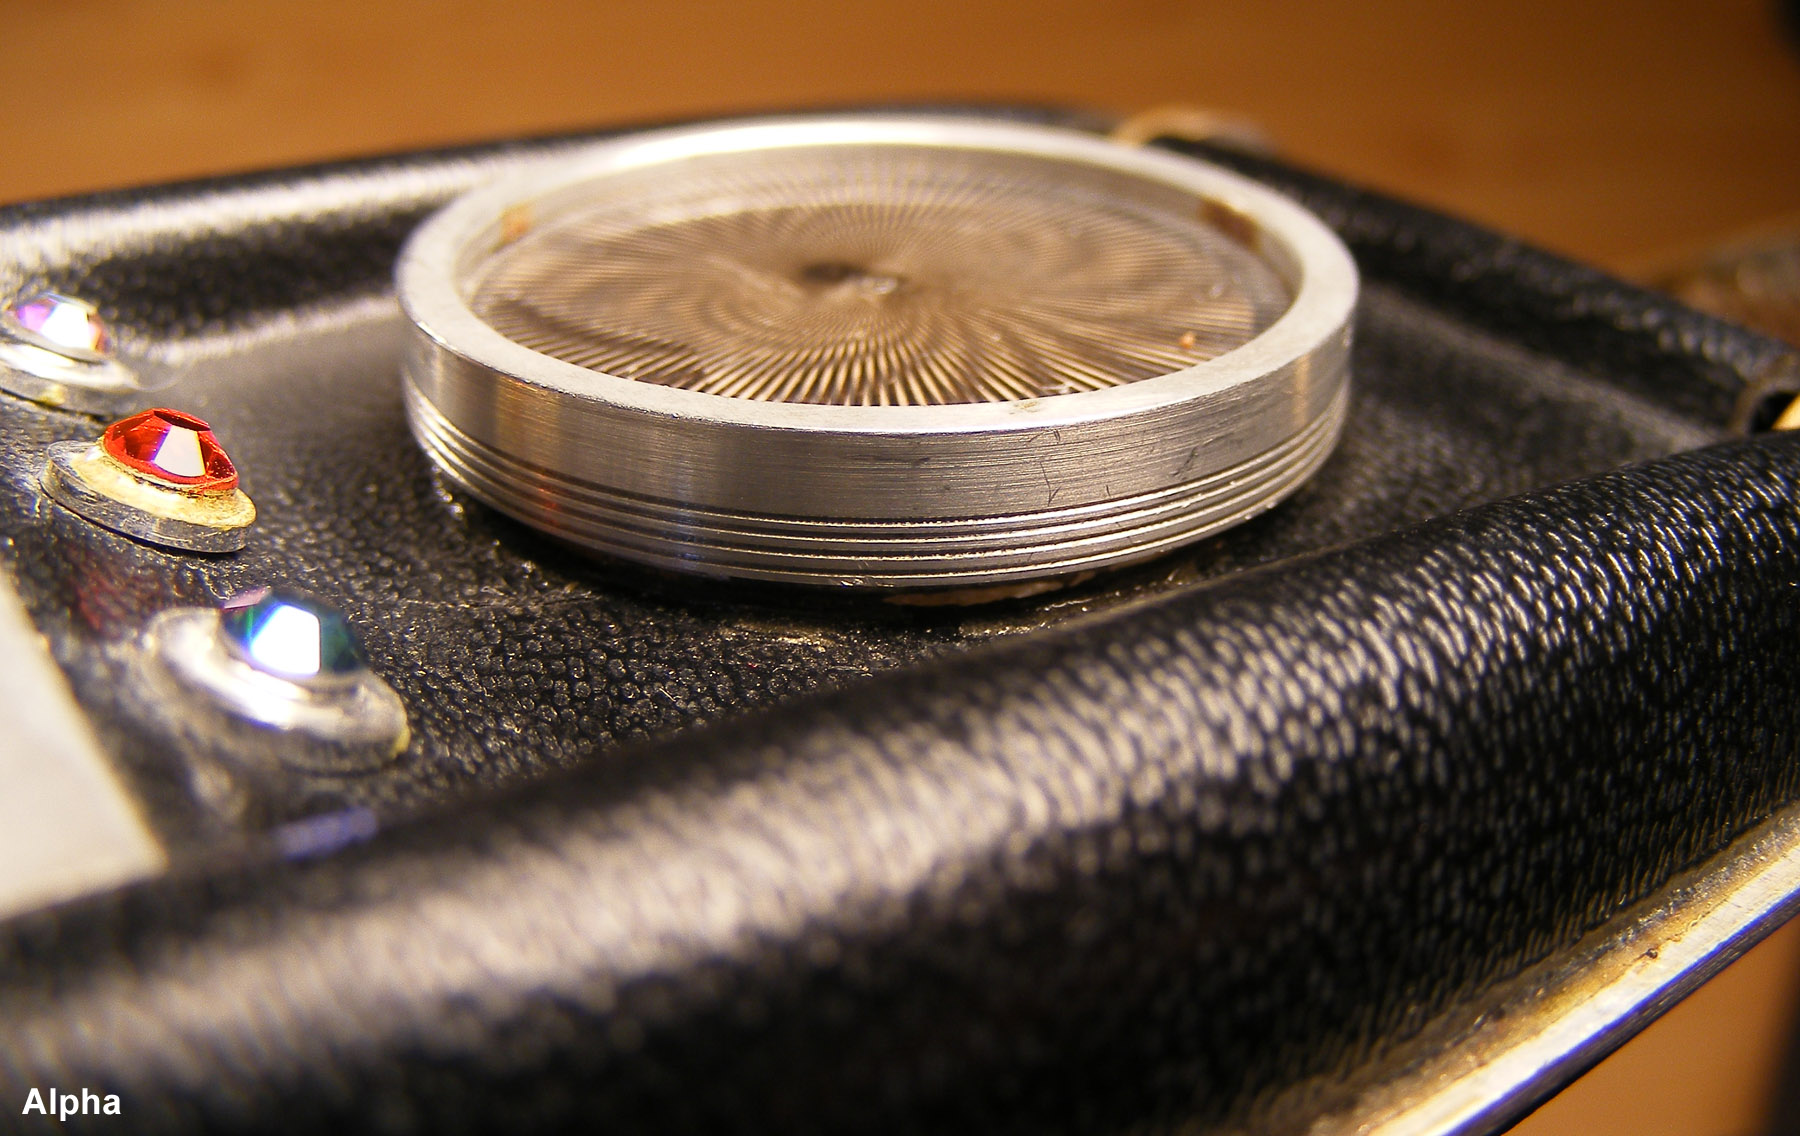
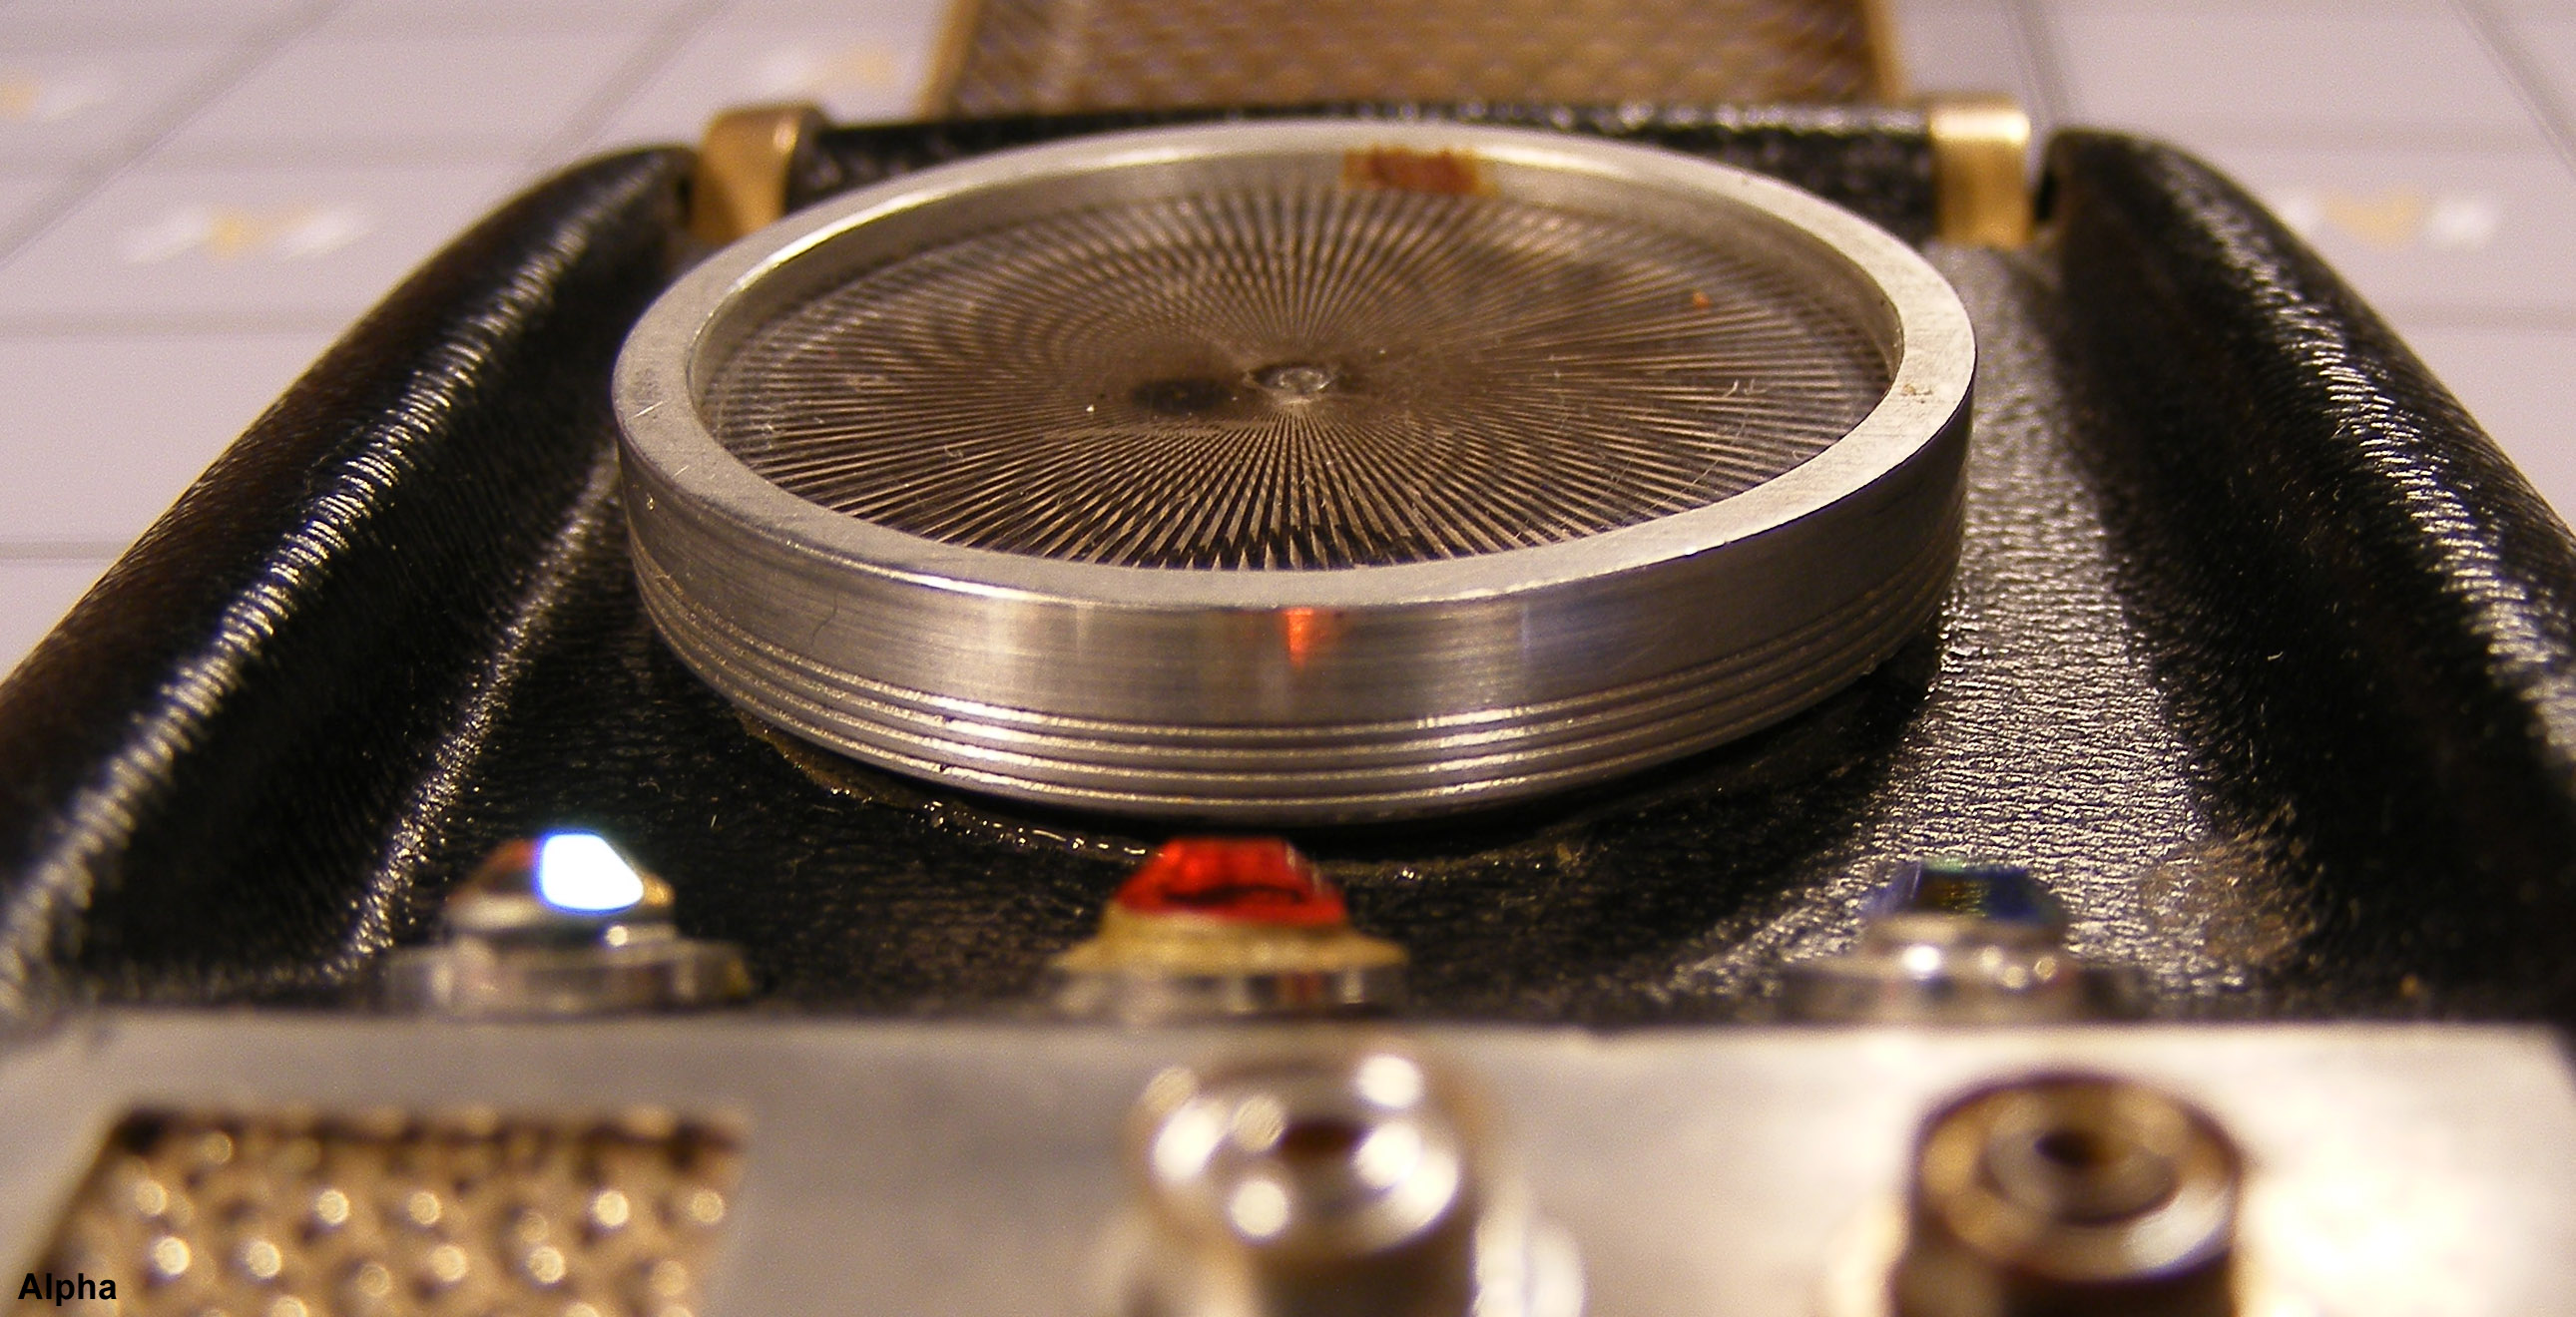
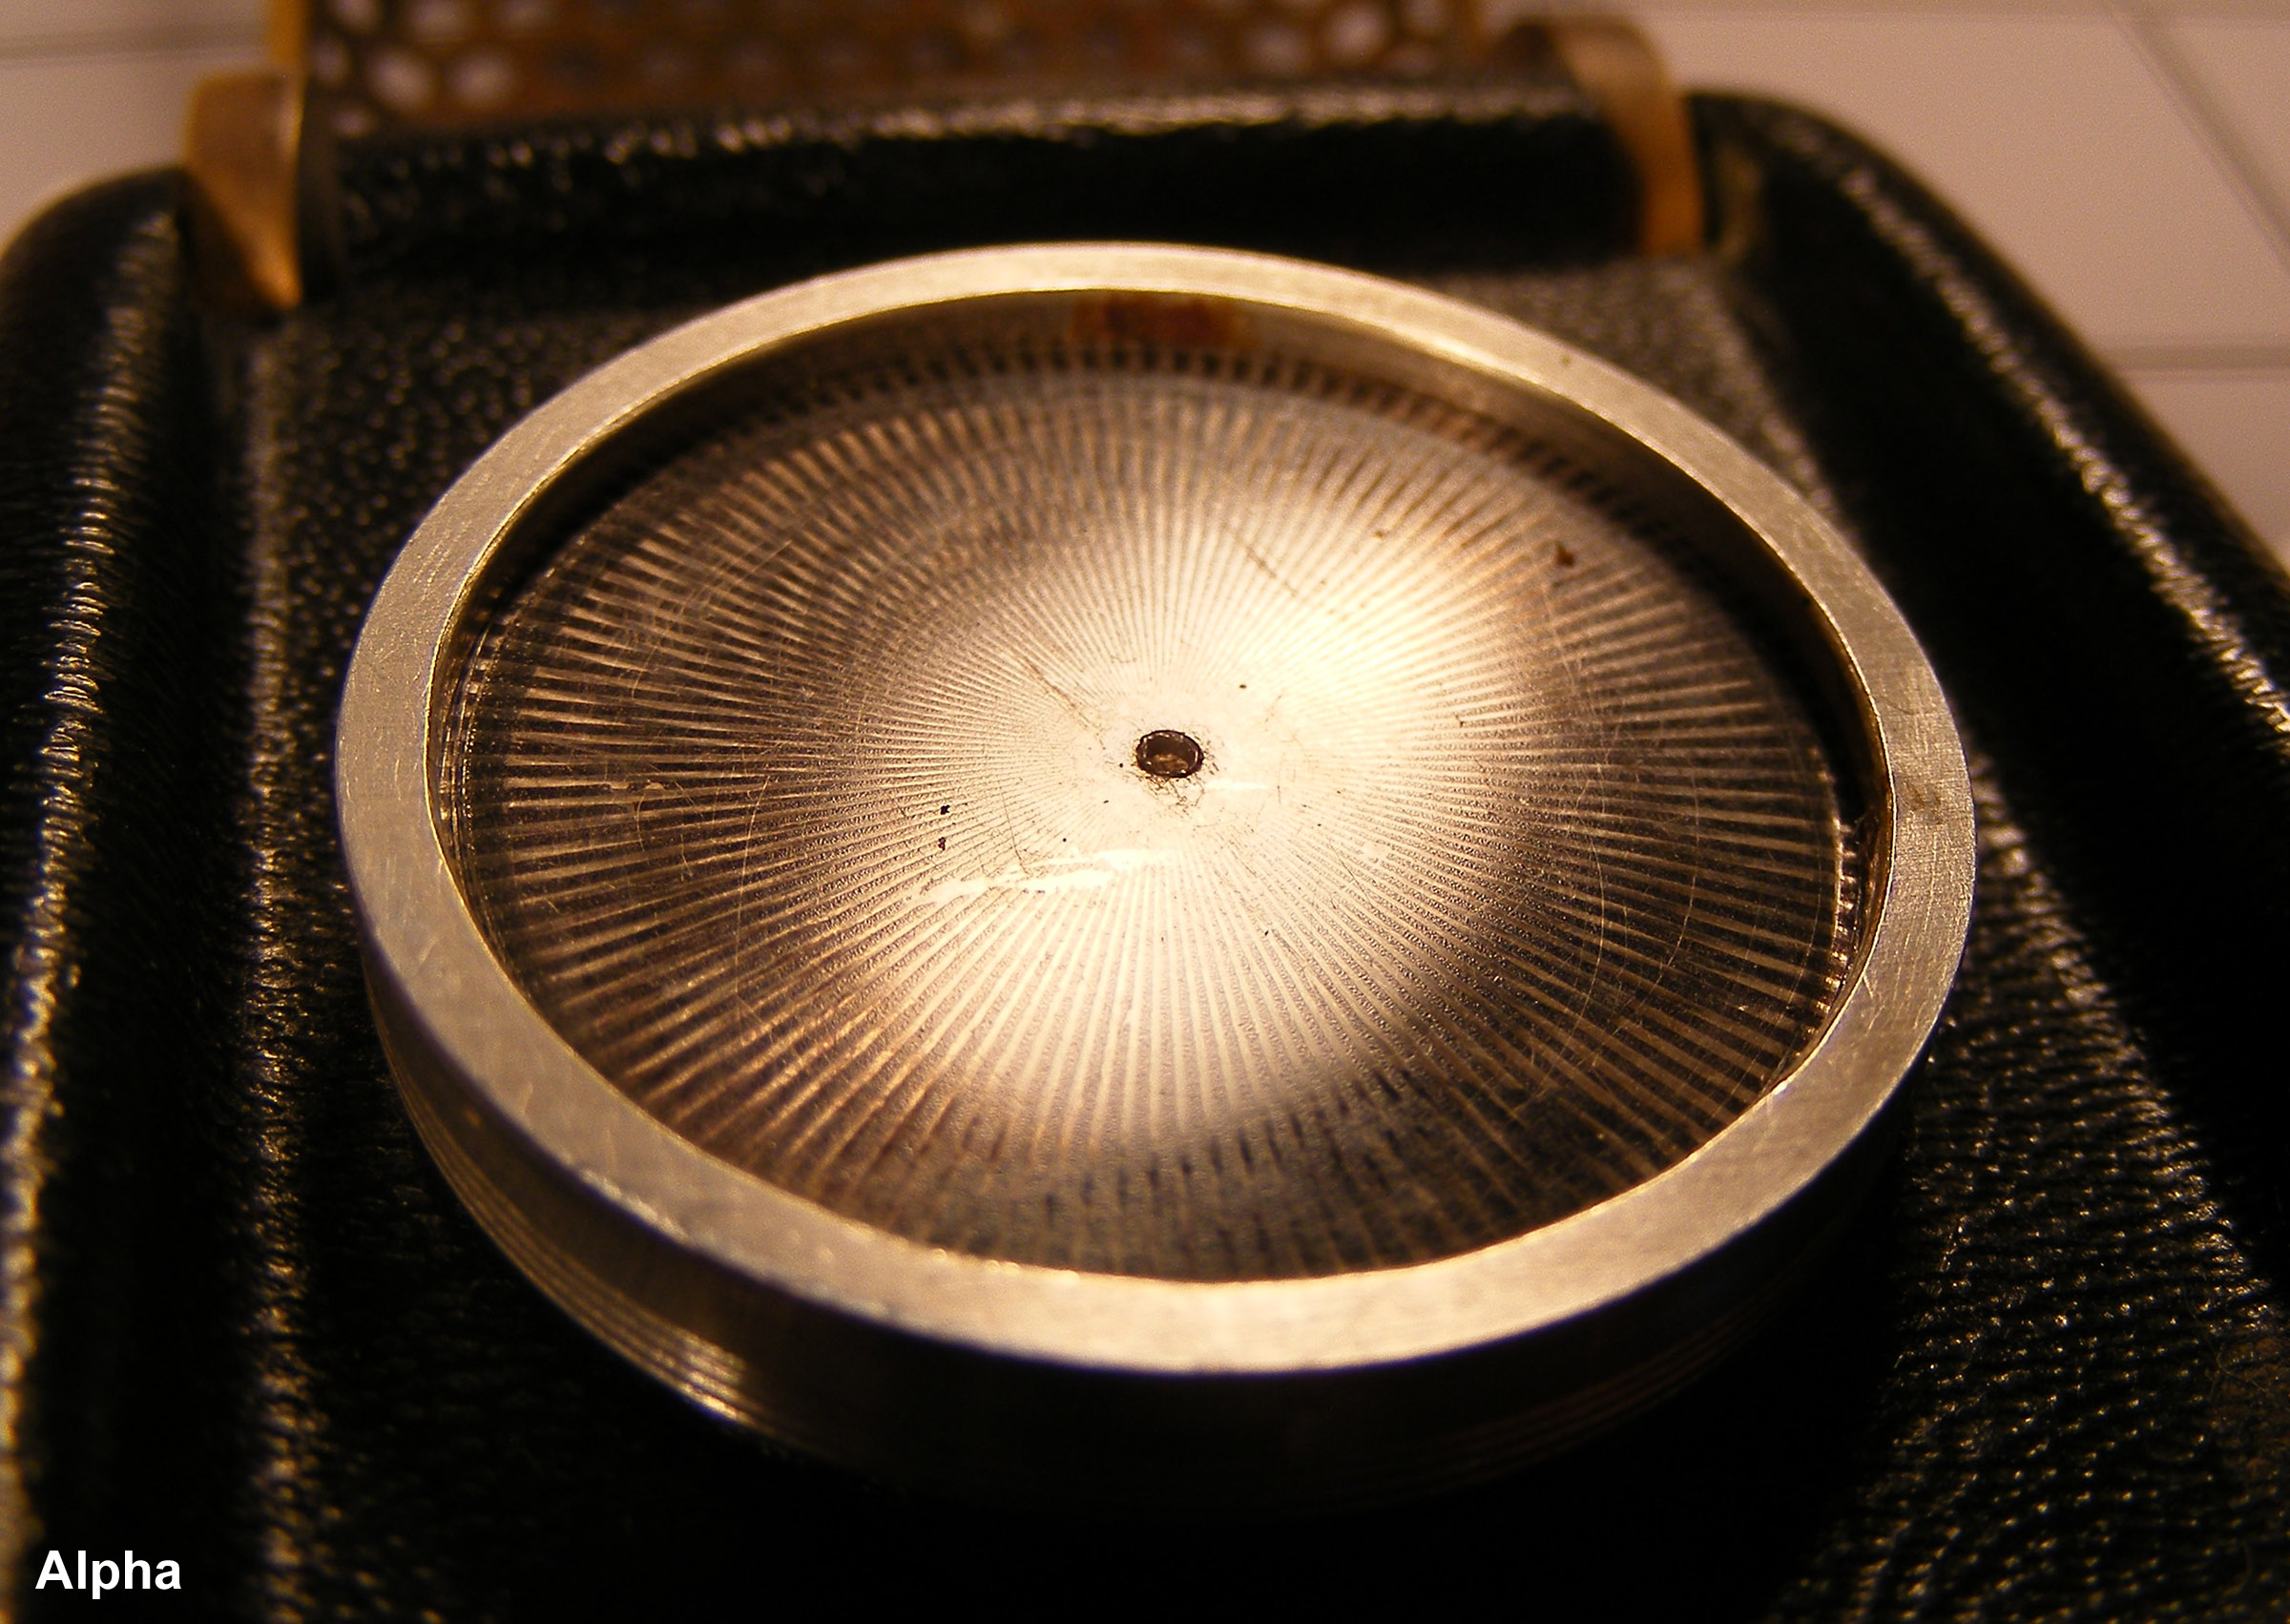
| Wonderfully, this comm is very well-preserved. With it being a hero, the first thing you'll want to know is that the stopwatch is still in running condition. The connection between it and the bottom moiré layer, however, has been severed, so at this point the pattern does not spin. The side of the moiré bezel ring has four tiny grooves, though oddly only on the lower half. While impossible to determine definitively by eye, it appears that this aluminum ring is made from two separate parts; a very thin inner ring and a thicker outer sleeve. The transparent #4 pattern layer looks to be held captive between the two. The outer ring bezel ends before it reaches the shell, exposing the inner ring beneath. Thus only the inner ring is in contact with the shell. The moiré ring is glued 1/32" to the left of center. This off-position is a perfect match with screen caps, meaning it was originally built that way. The bezel ring is also not glued down tight against the shell. It is raised up ever so slightly - and a bit unevenly - from the shell's surface by a layer of a thick cream-colored epoxy. However, there is no pronounced evidence of a re-glue anywhere, so all parts are likely in their original spot. |
||
 (1400 x 963) |
 (704 x 1227) |
 (1400 x 831) |
 (1600 x 1200) |
 (633 x 1446) |
 (2200 x 1541) |
 (1200 x 1170) |
 (1600 x 823) |
 (1600 x 698) |
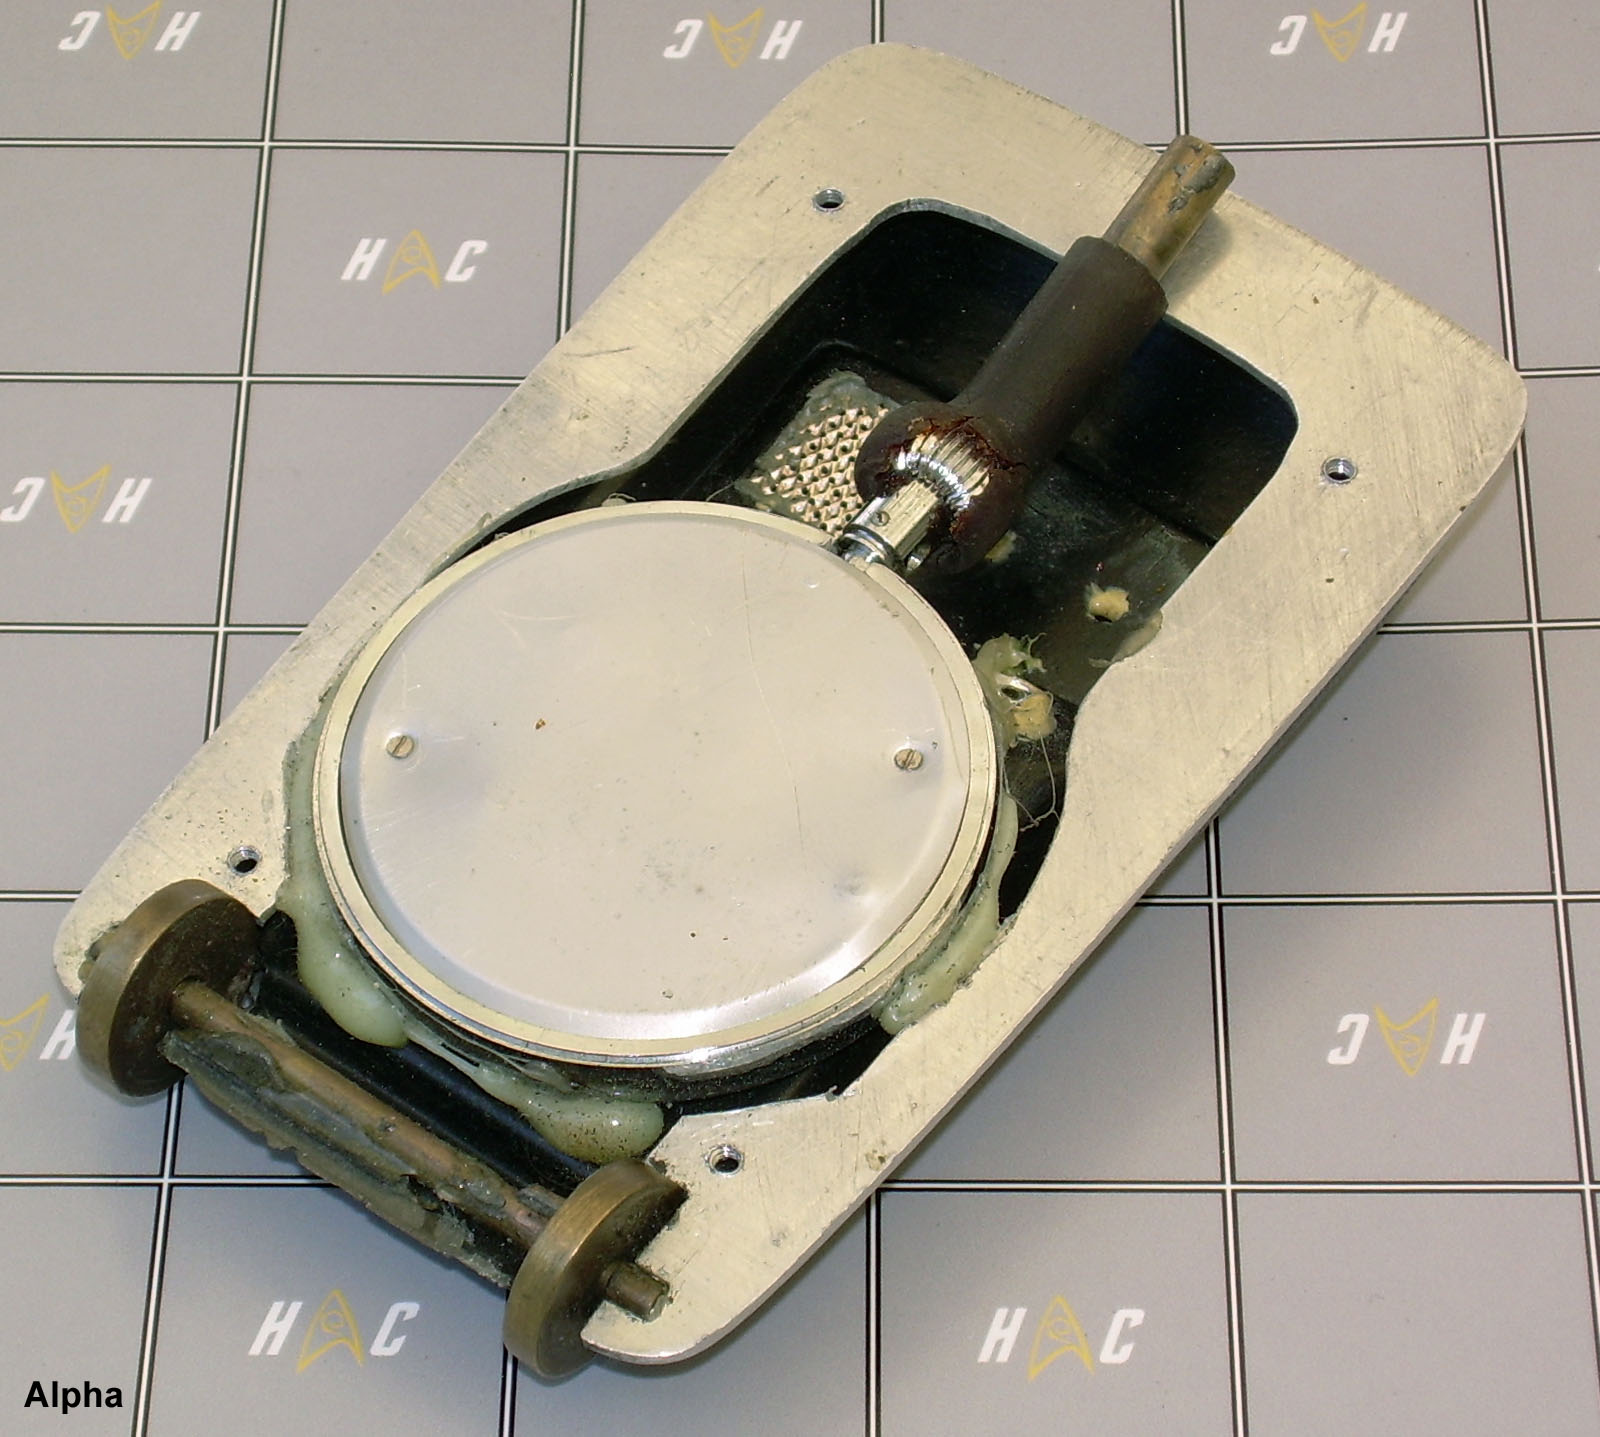
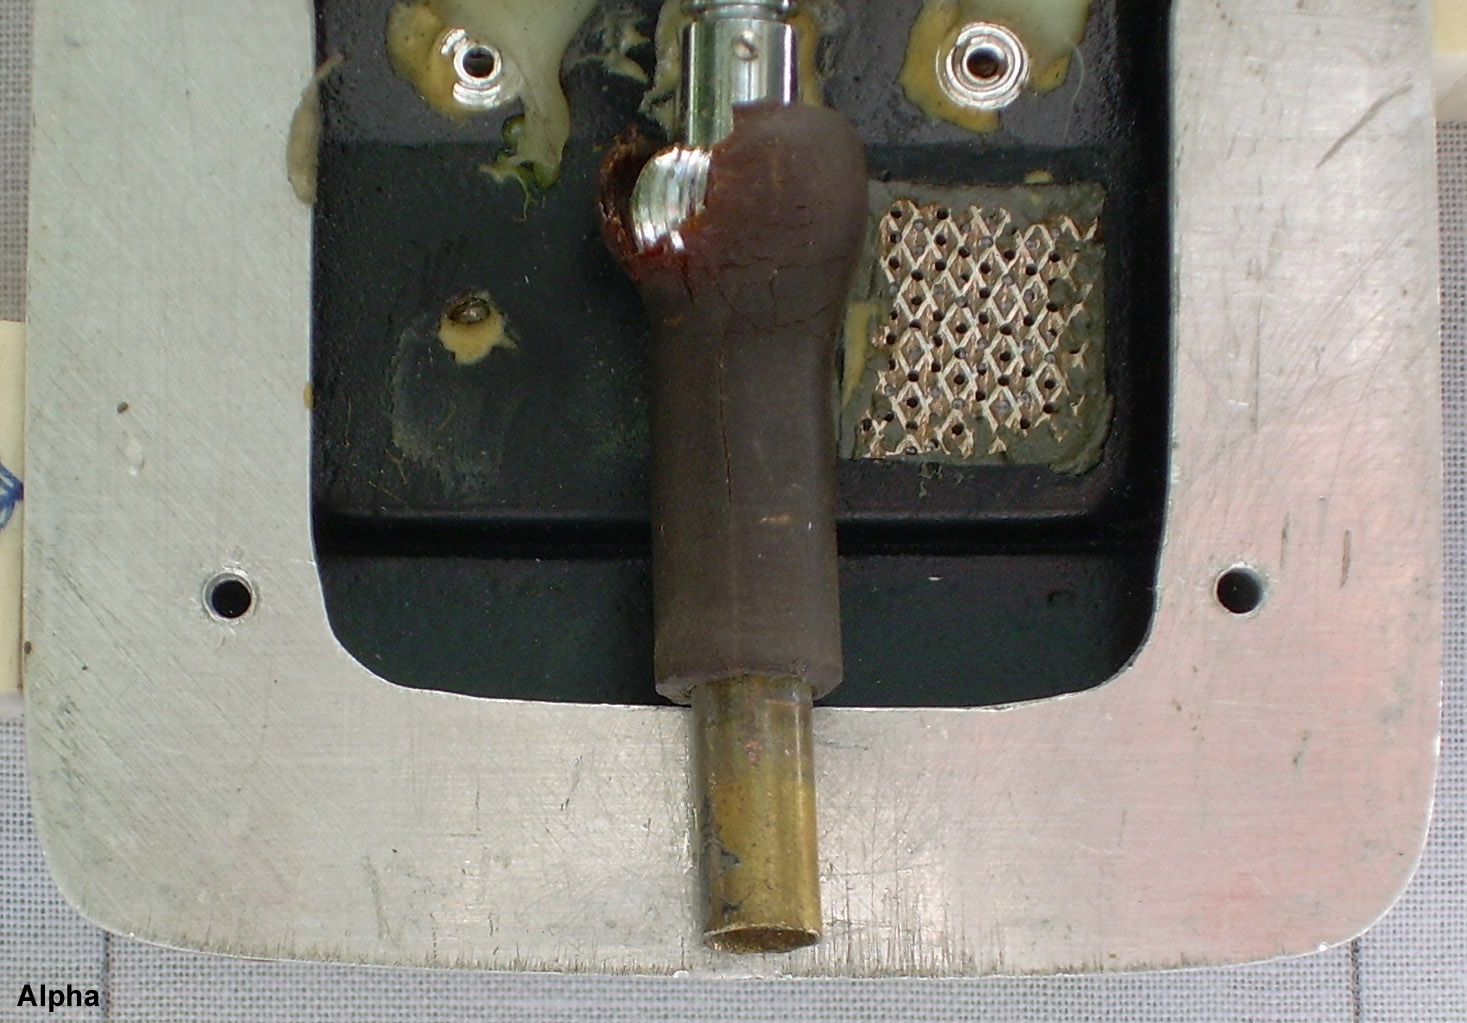
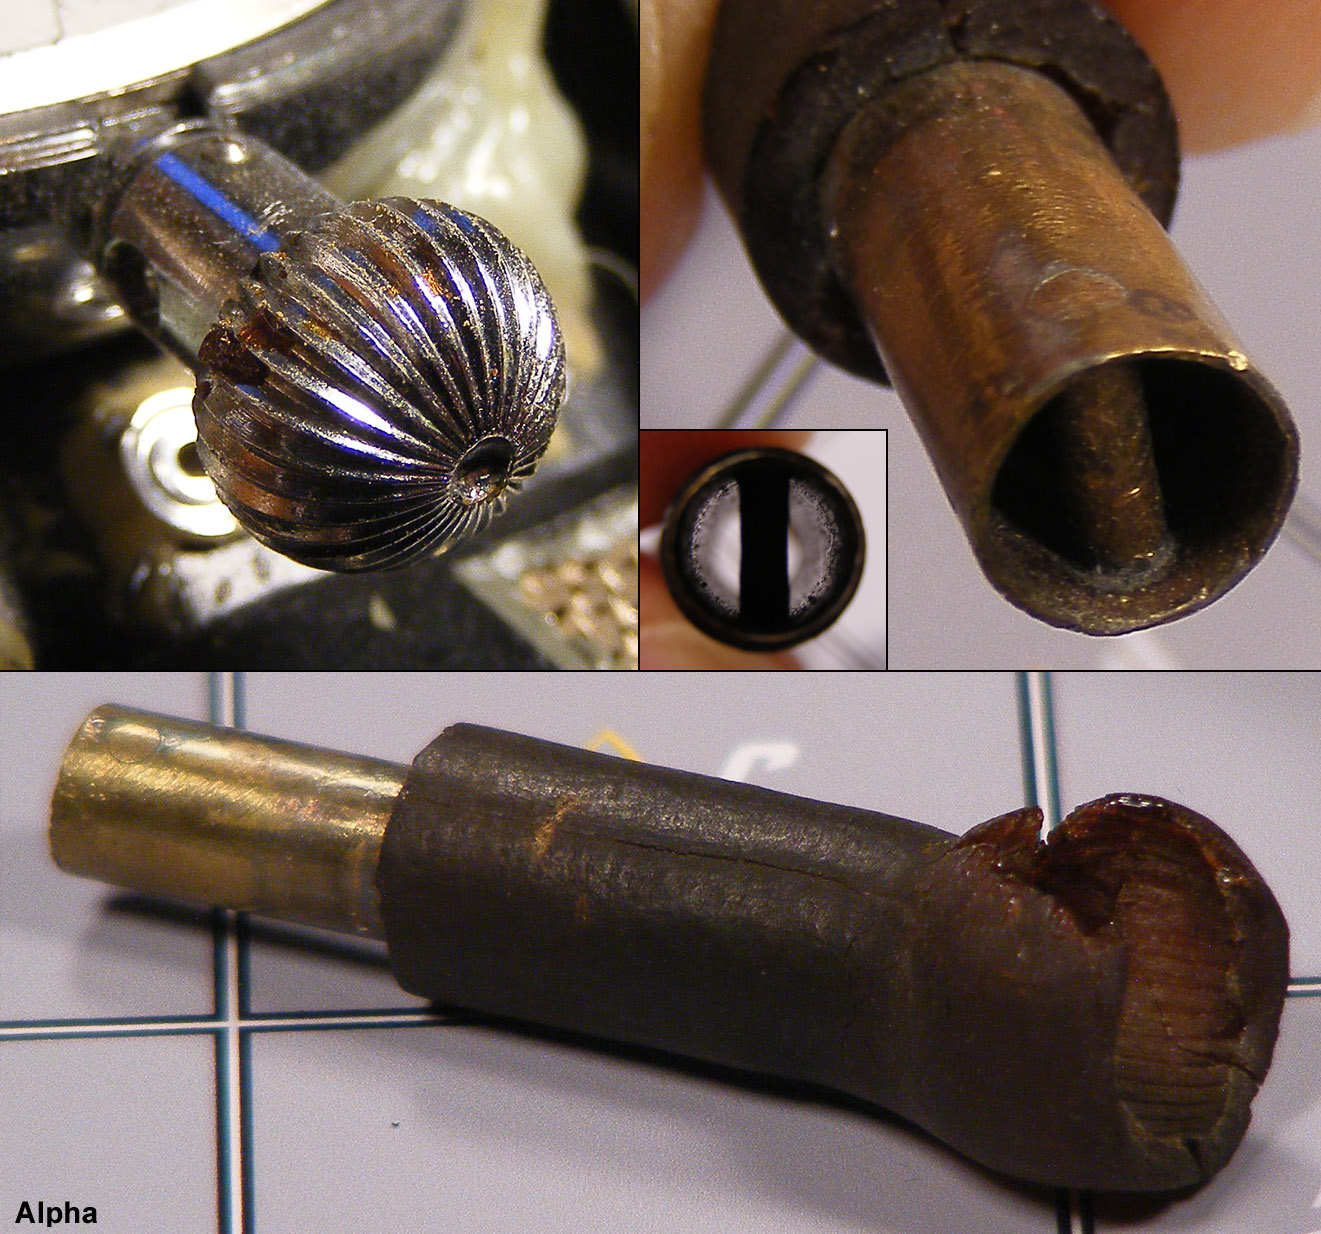
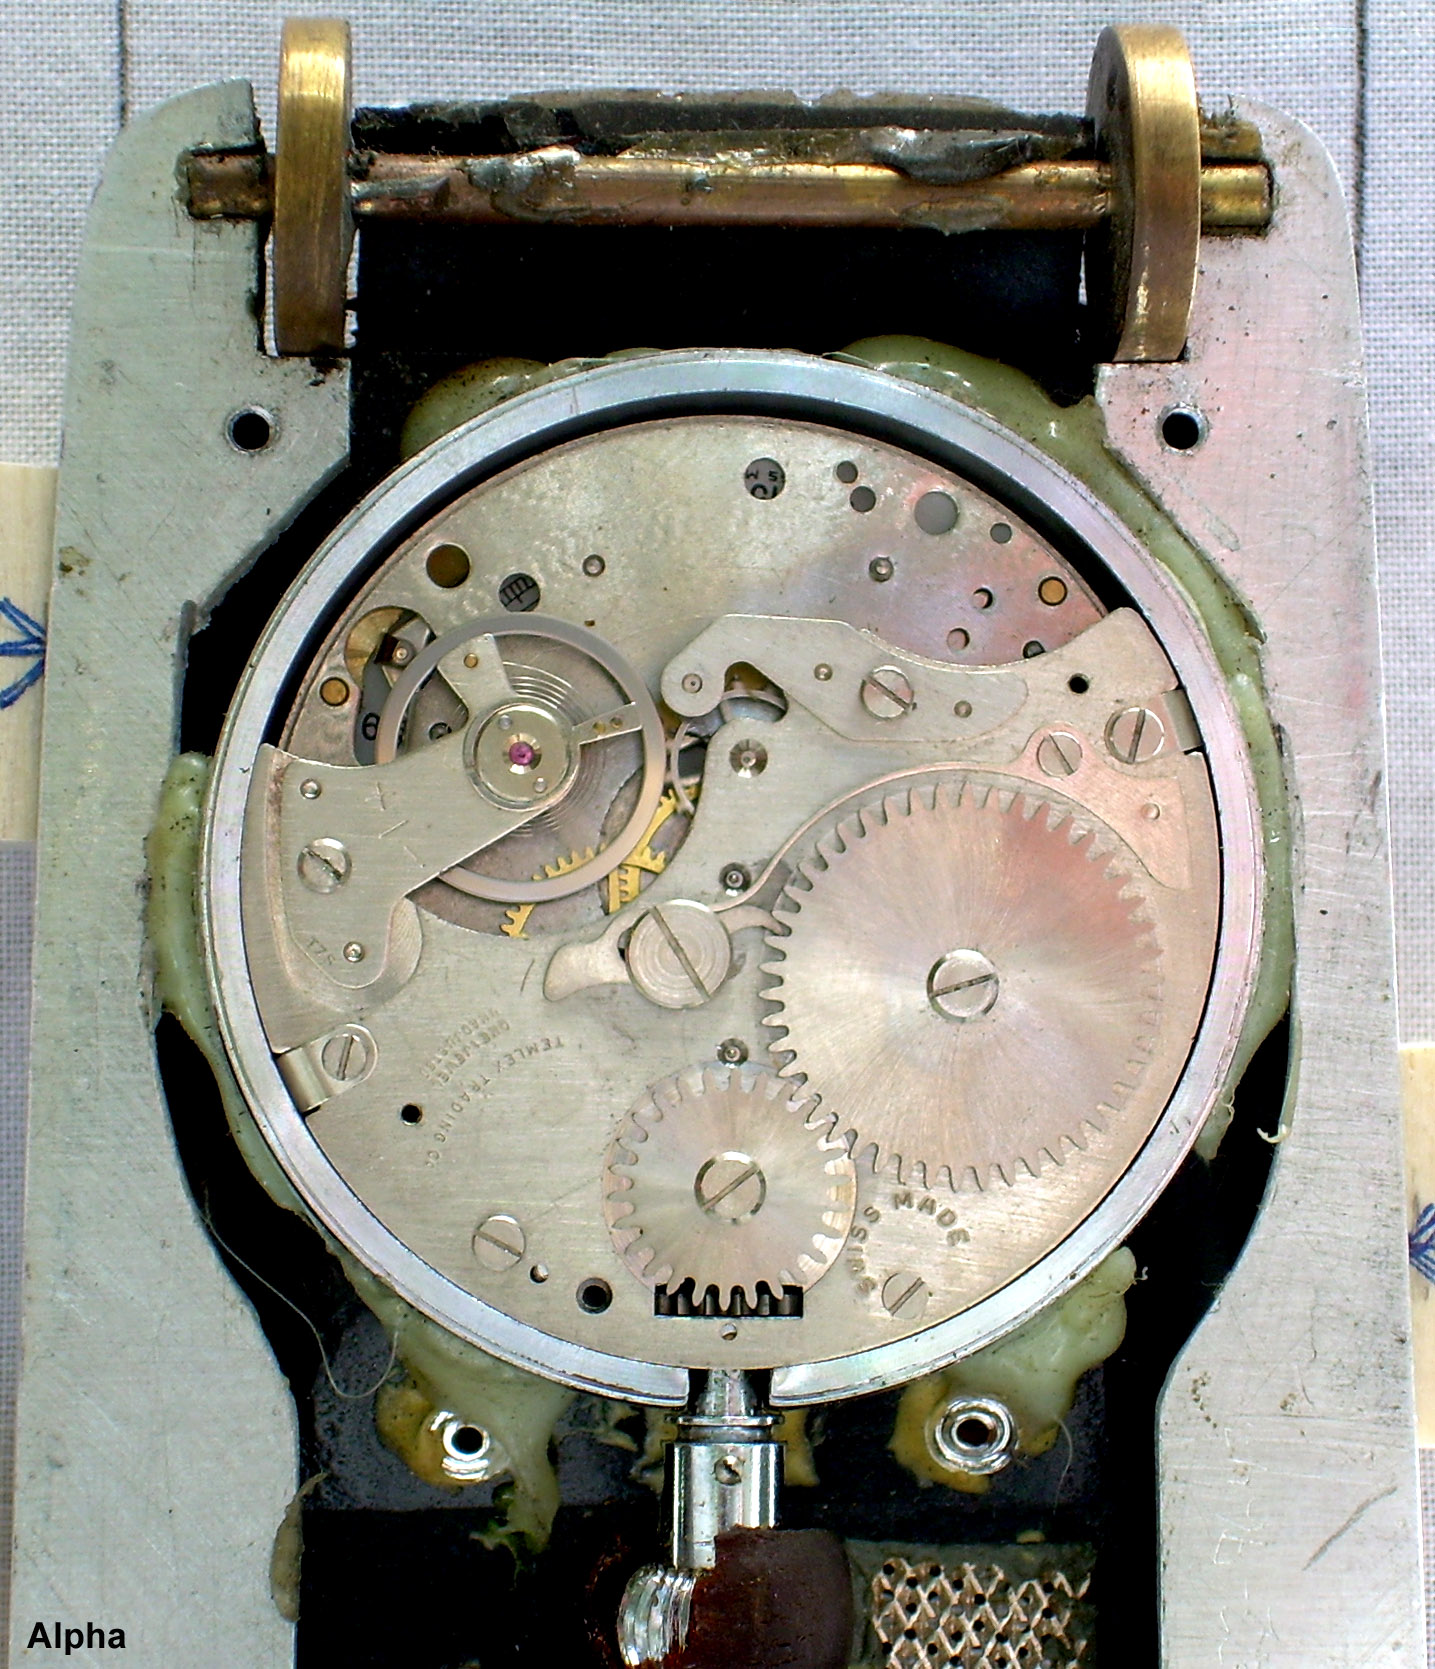
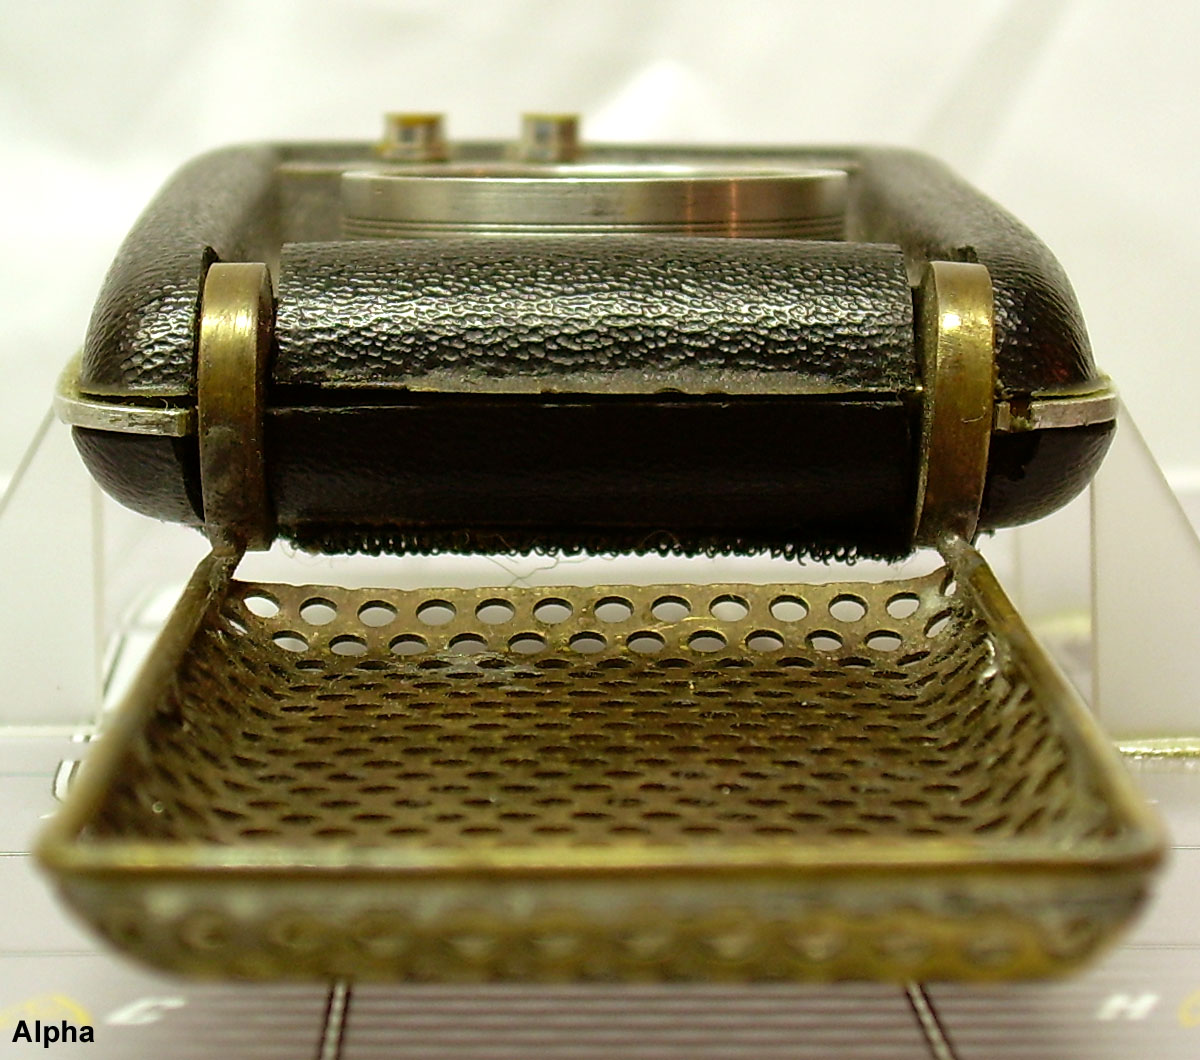
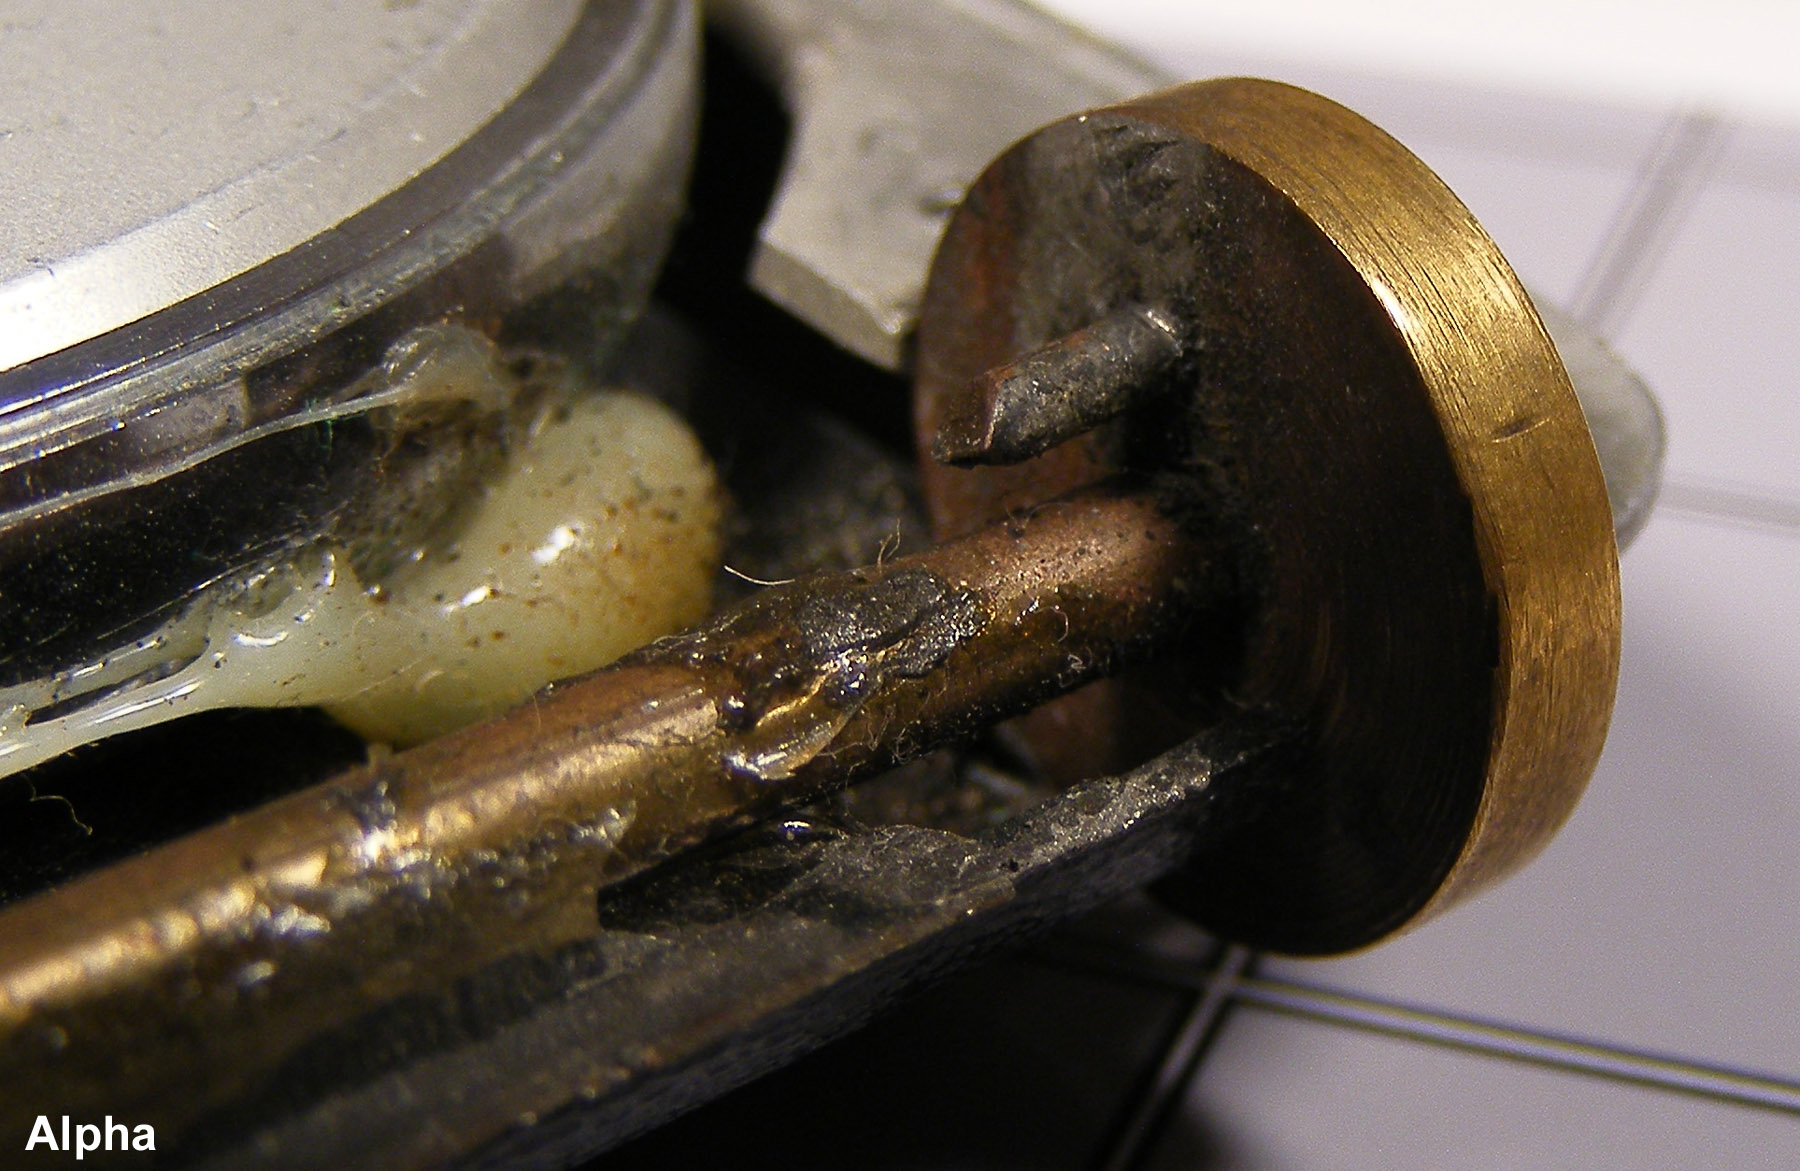
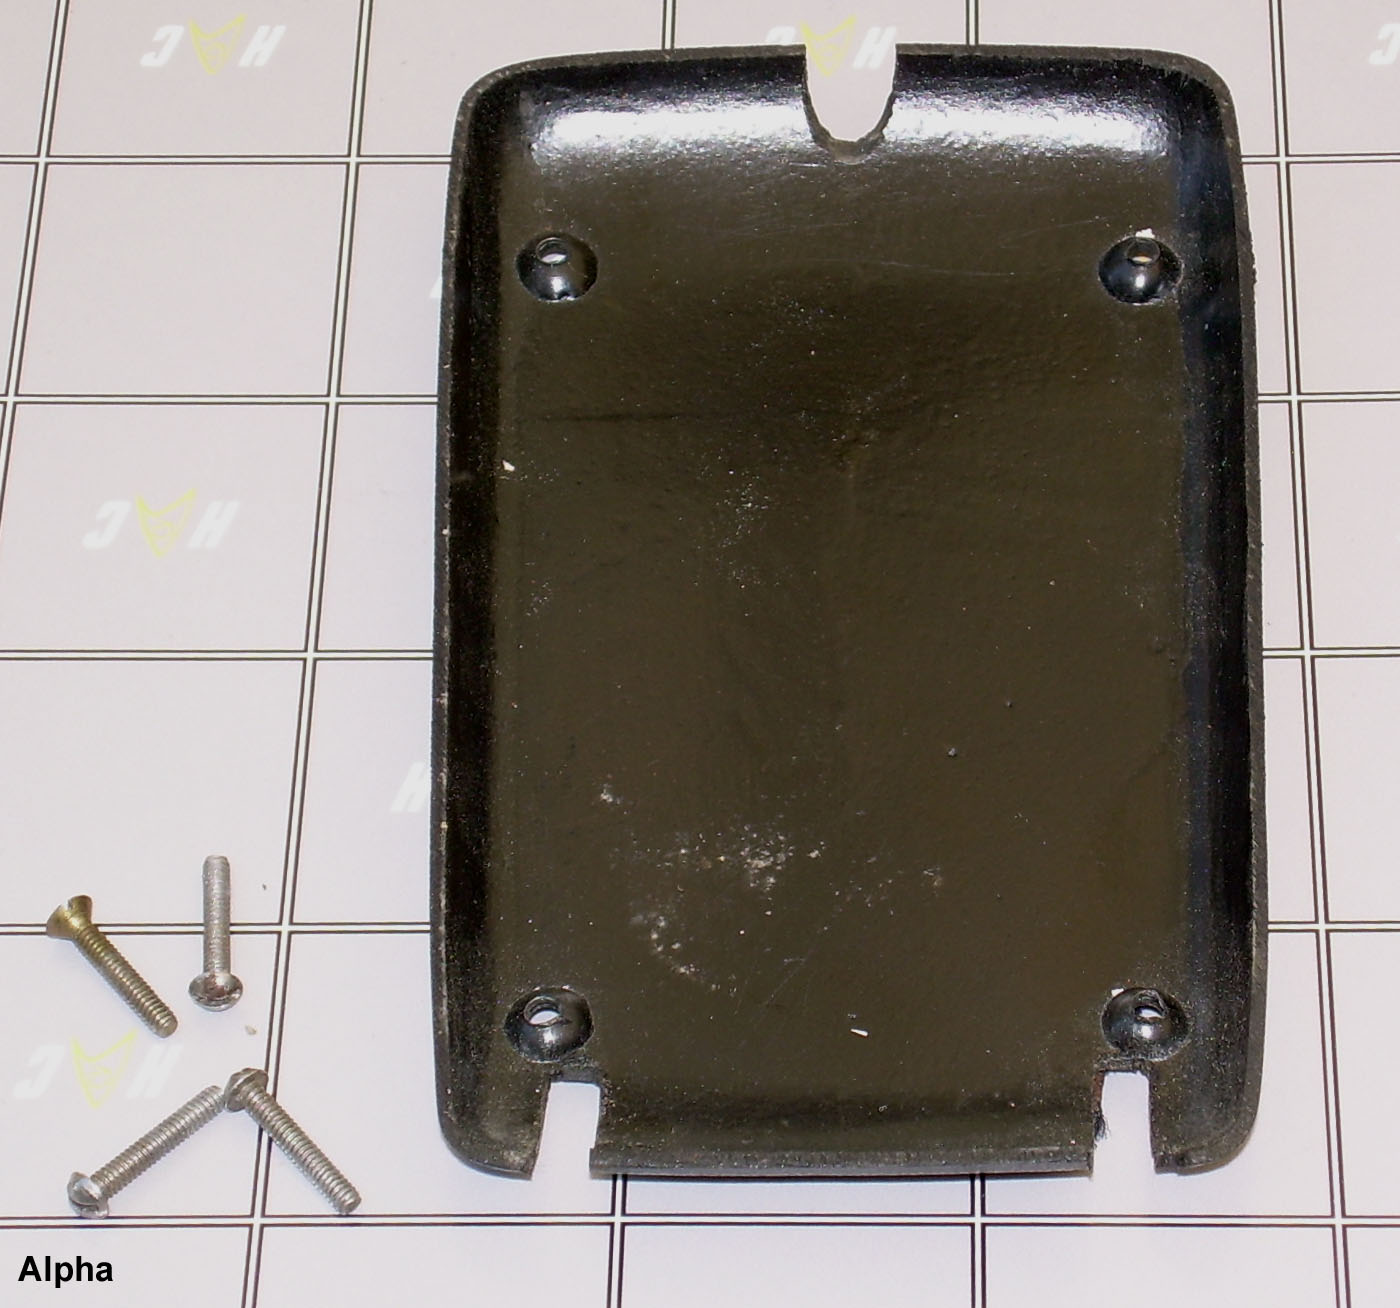
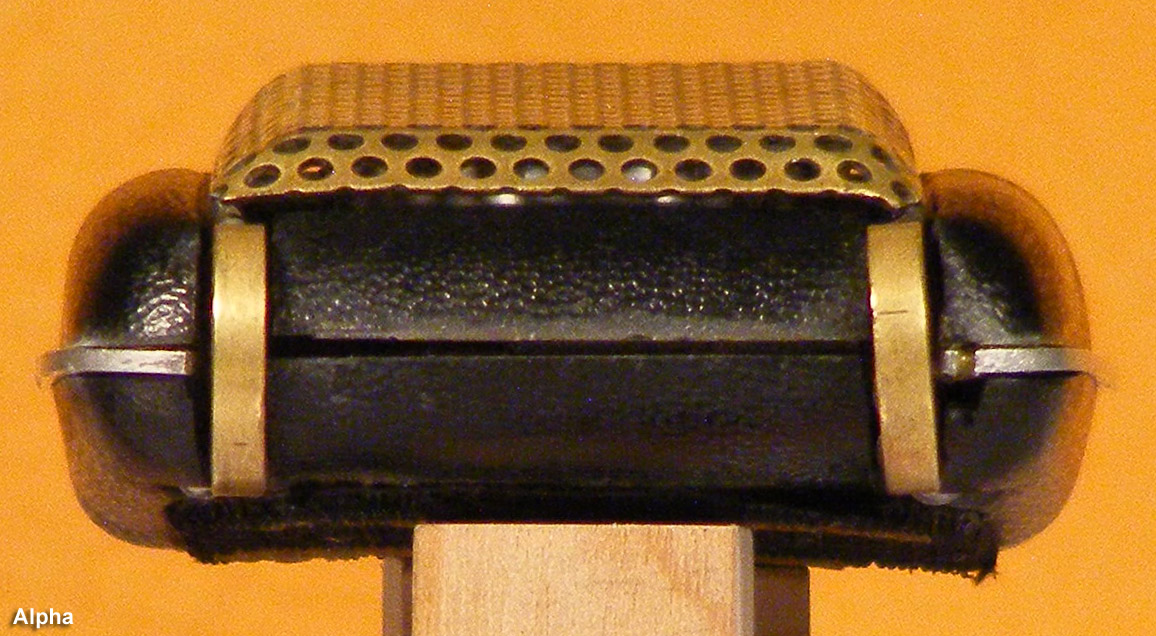
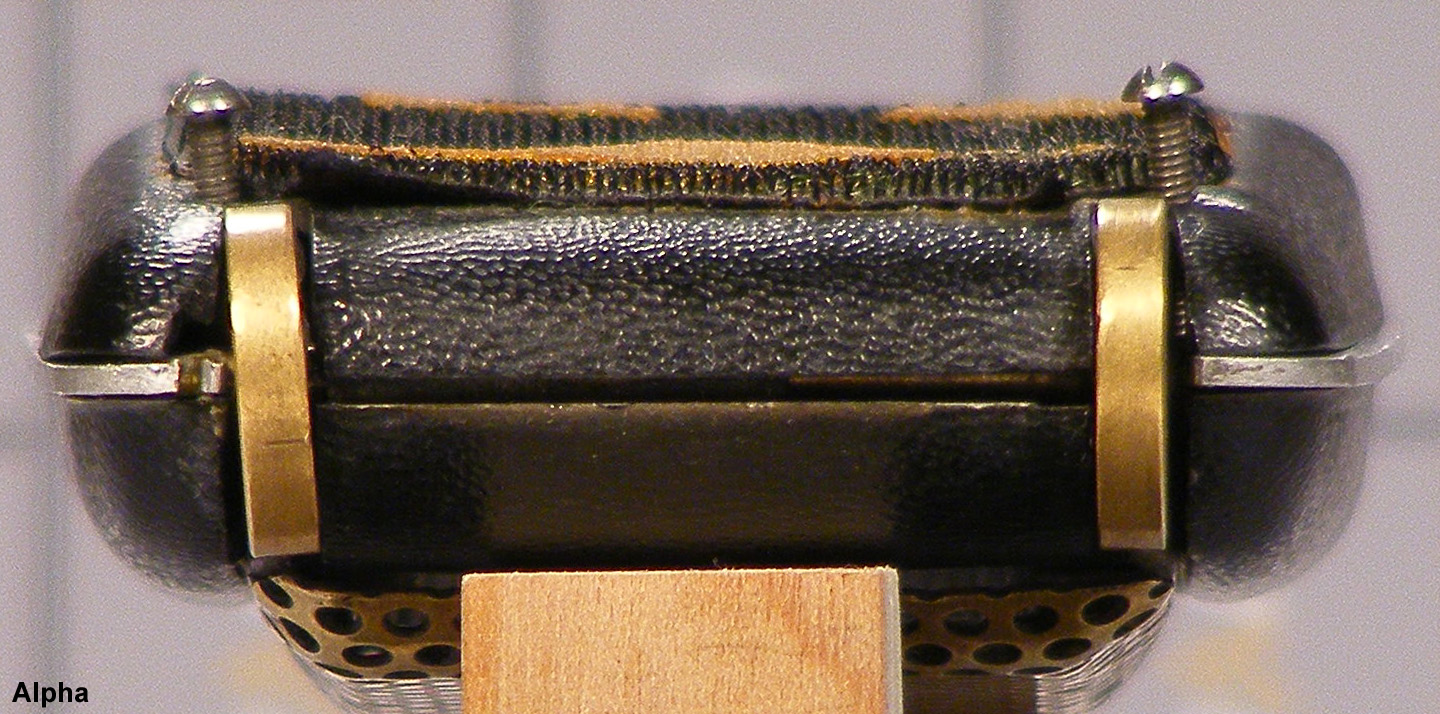
| The 30 second stopwatch is a Swiss-made one-jewel model from an obscure maker named the Temlex Trading Company, with a spherical-shaped rewind knob (not cylindrical) and no reset button on the side. The rounded back cover plate was removed by Wah to undoubtedly lessen the weight and ease height constraints, but the watch also has a thin secondary inner protective plate. The watch movement still works perfectly - being able to start, stop and rewind directly by the knob. The watch is held in with hot glue, which is still a bit pliable to the press of a fingernail. There is no evidence of any other glue residue from an early adhesion, so figure this is Wah's original installation. Using this type of glue, which is easily enough removed with a little pulling, makes sense in case the stopwatch needed to be replaced. Three different types of glues and epoxies were used on all other parts. The watch's wind-up knob and the brass tube that extends beyond the bottom shell are not actually rigidly connected; the two parts are smartly joined via a short segment of rubber hose, dark brown. The flexible joint was required since the stopwatch's wind-up knob has a different axis of rotation than the brass tube as it tilts to exit the shell. This change of angle ruled out a fixed soldered or glued connection with the stopwatch. That rubber hose, which essentially served as a universal joint, has since fully vulcanized (turned hard and brittle). As a result, the hose no longer grips the stopwatch knob - in fact it can be slid off the knob through a crack in the rubber. Back in the day, the watch was easily wound from the outside with the insertion of a small flat-head screwdriver, which caught the side of a 1/16" brass peg (likely cut from the same wire as the antenna wire) soldered just inside the mouth of the tube. |
||
 (1600 x 1307) |
 (1600 x 1437) |
 (1467 x 1023) |
 (1800 x 503) |
 (1321 x 1234) |
 (1435 x 1669) - stopwatch inner-plate removed - |
|
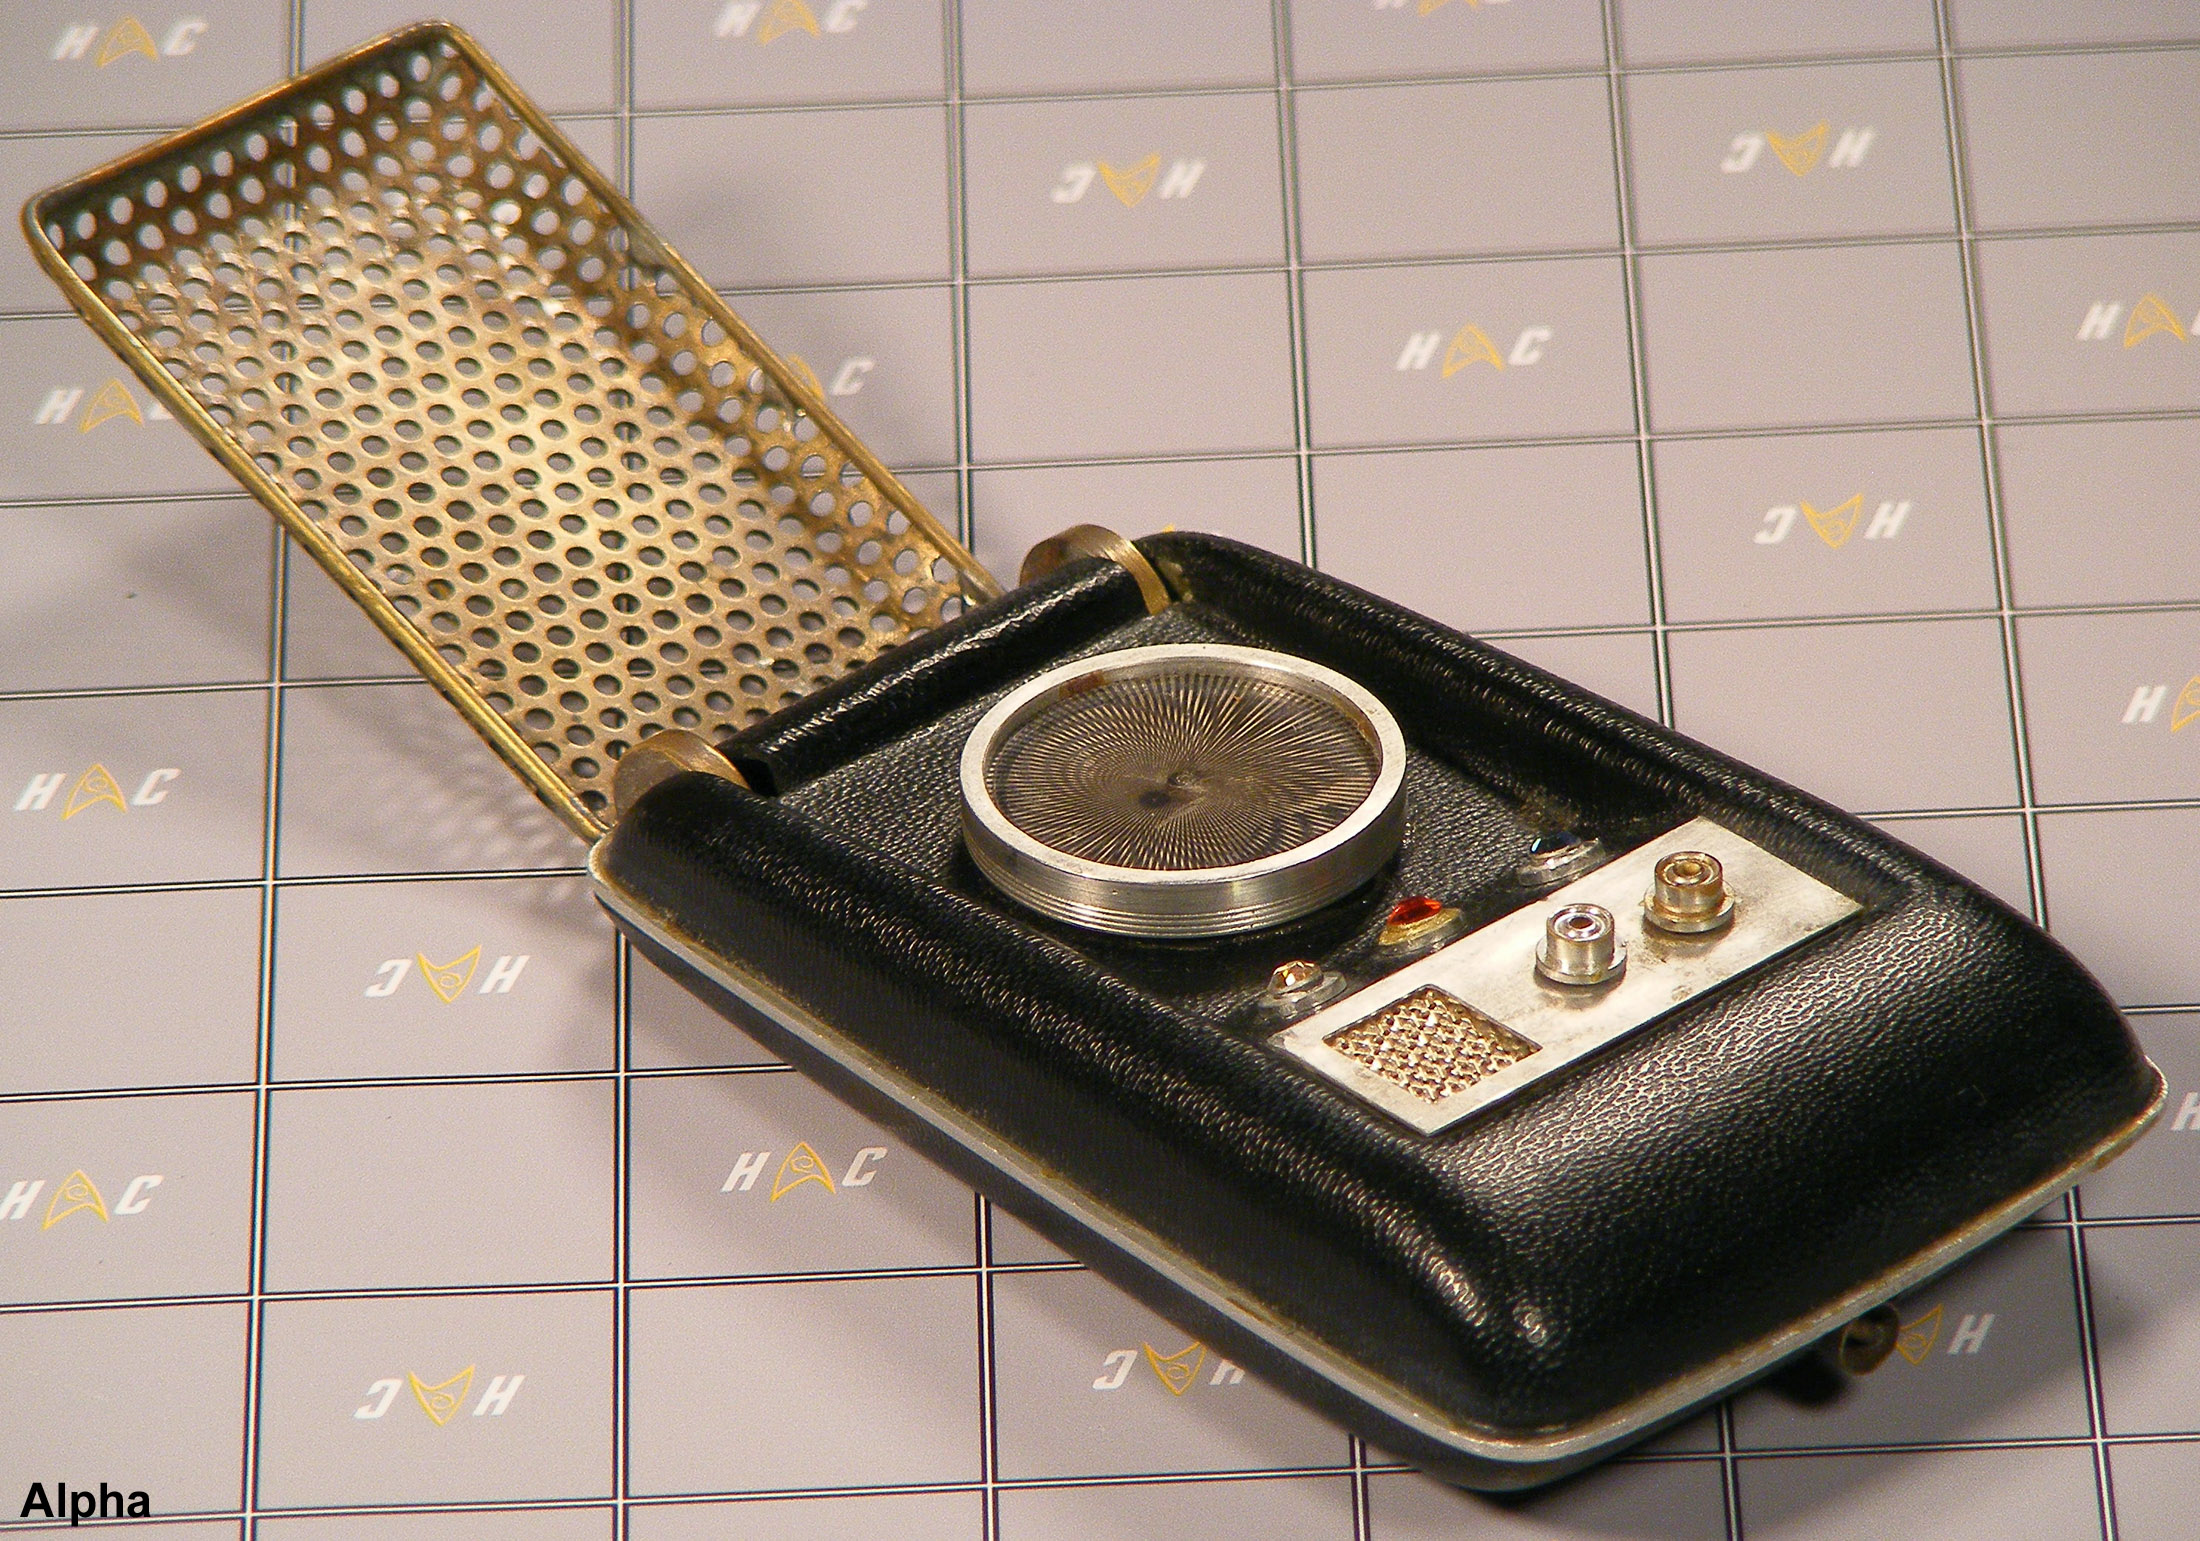
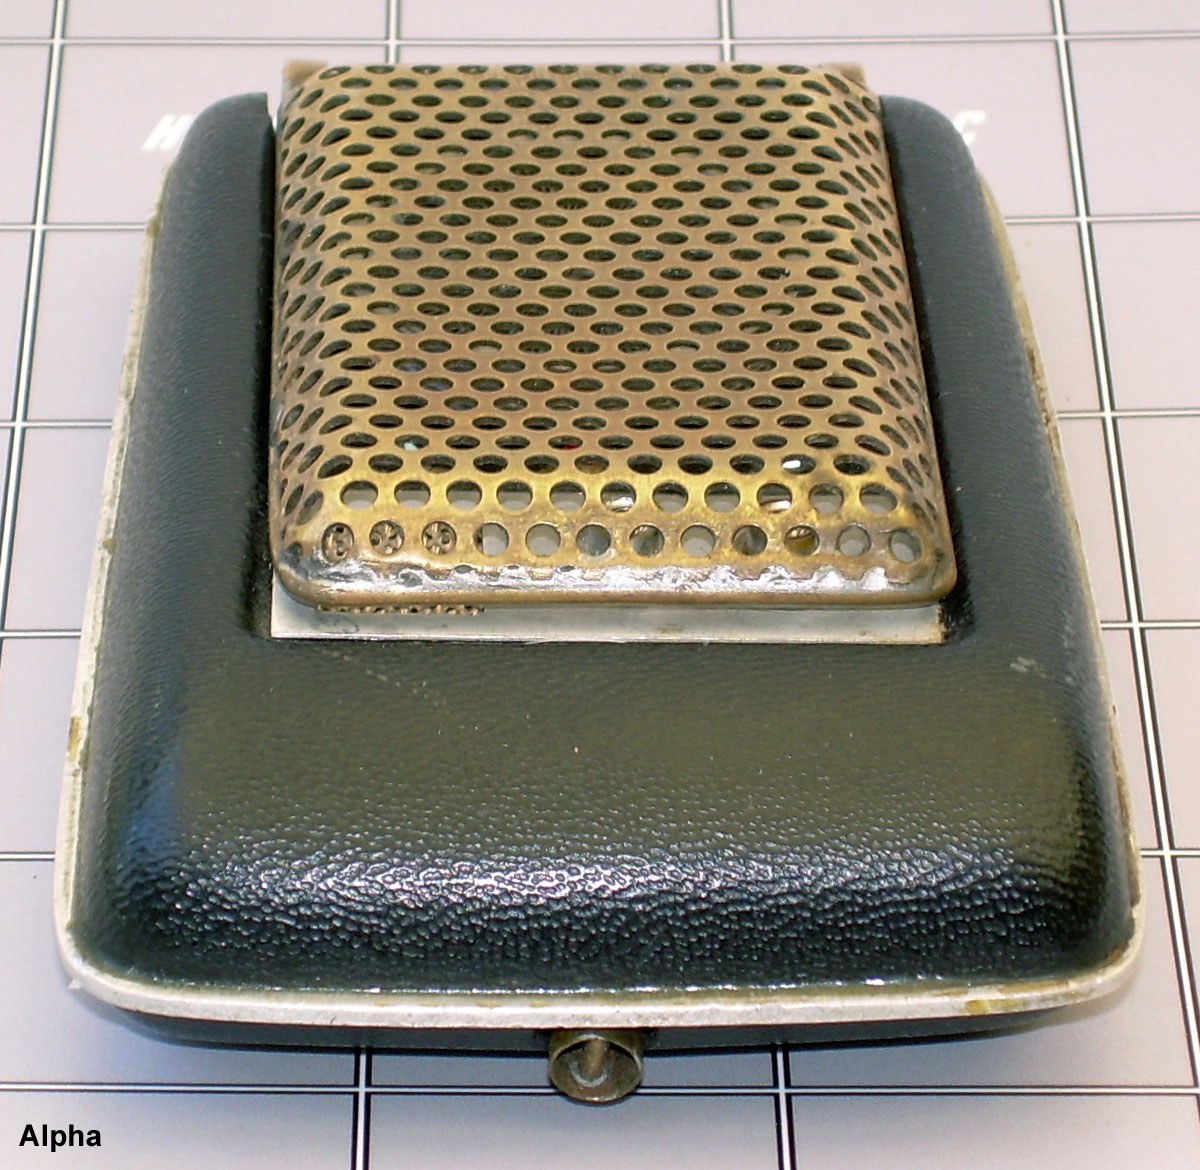
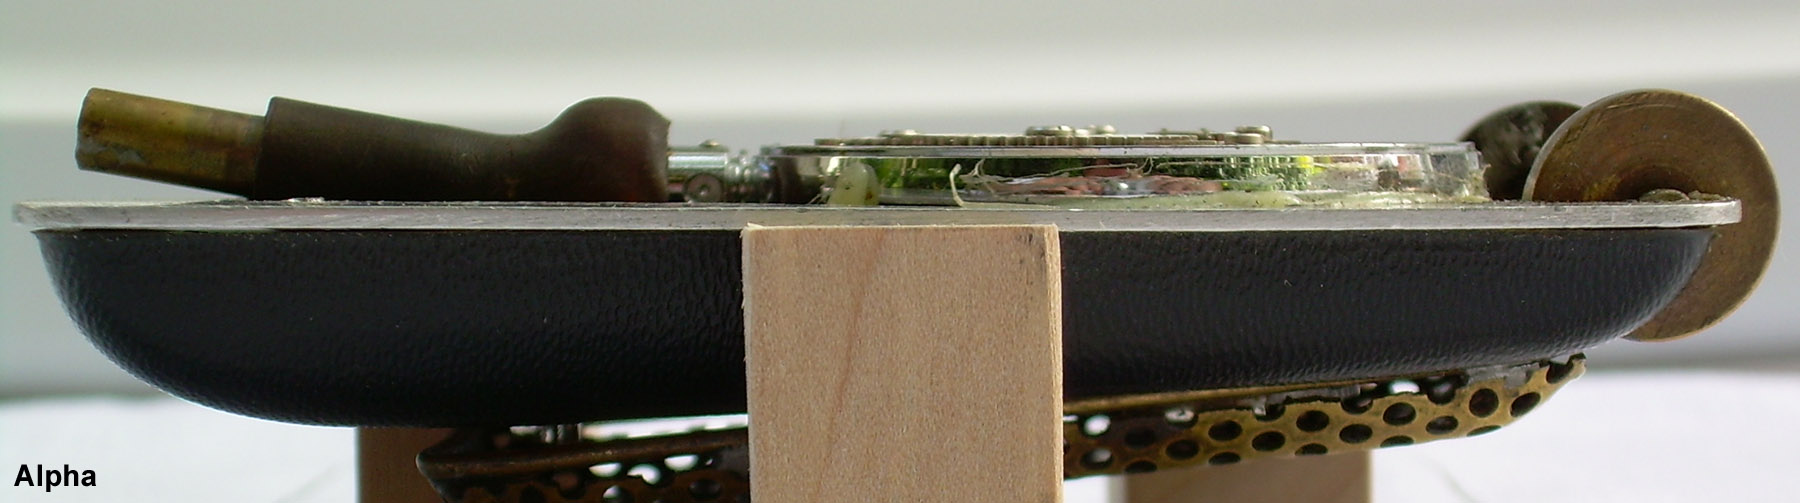
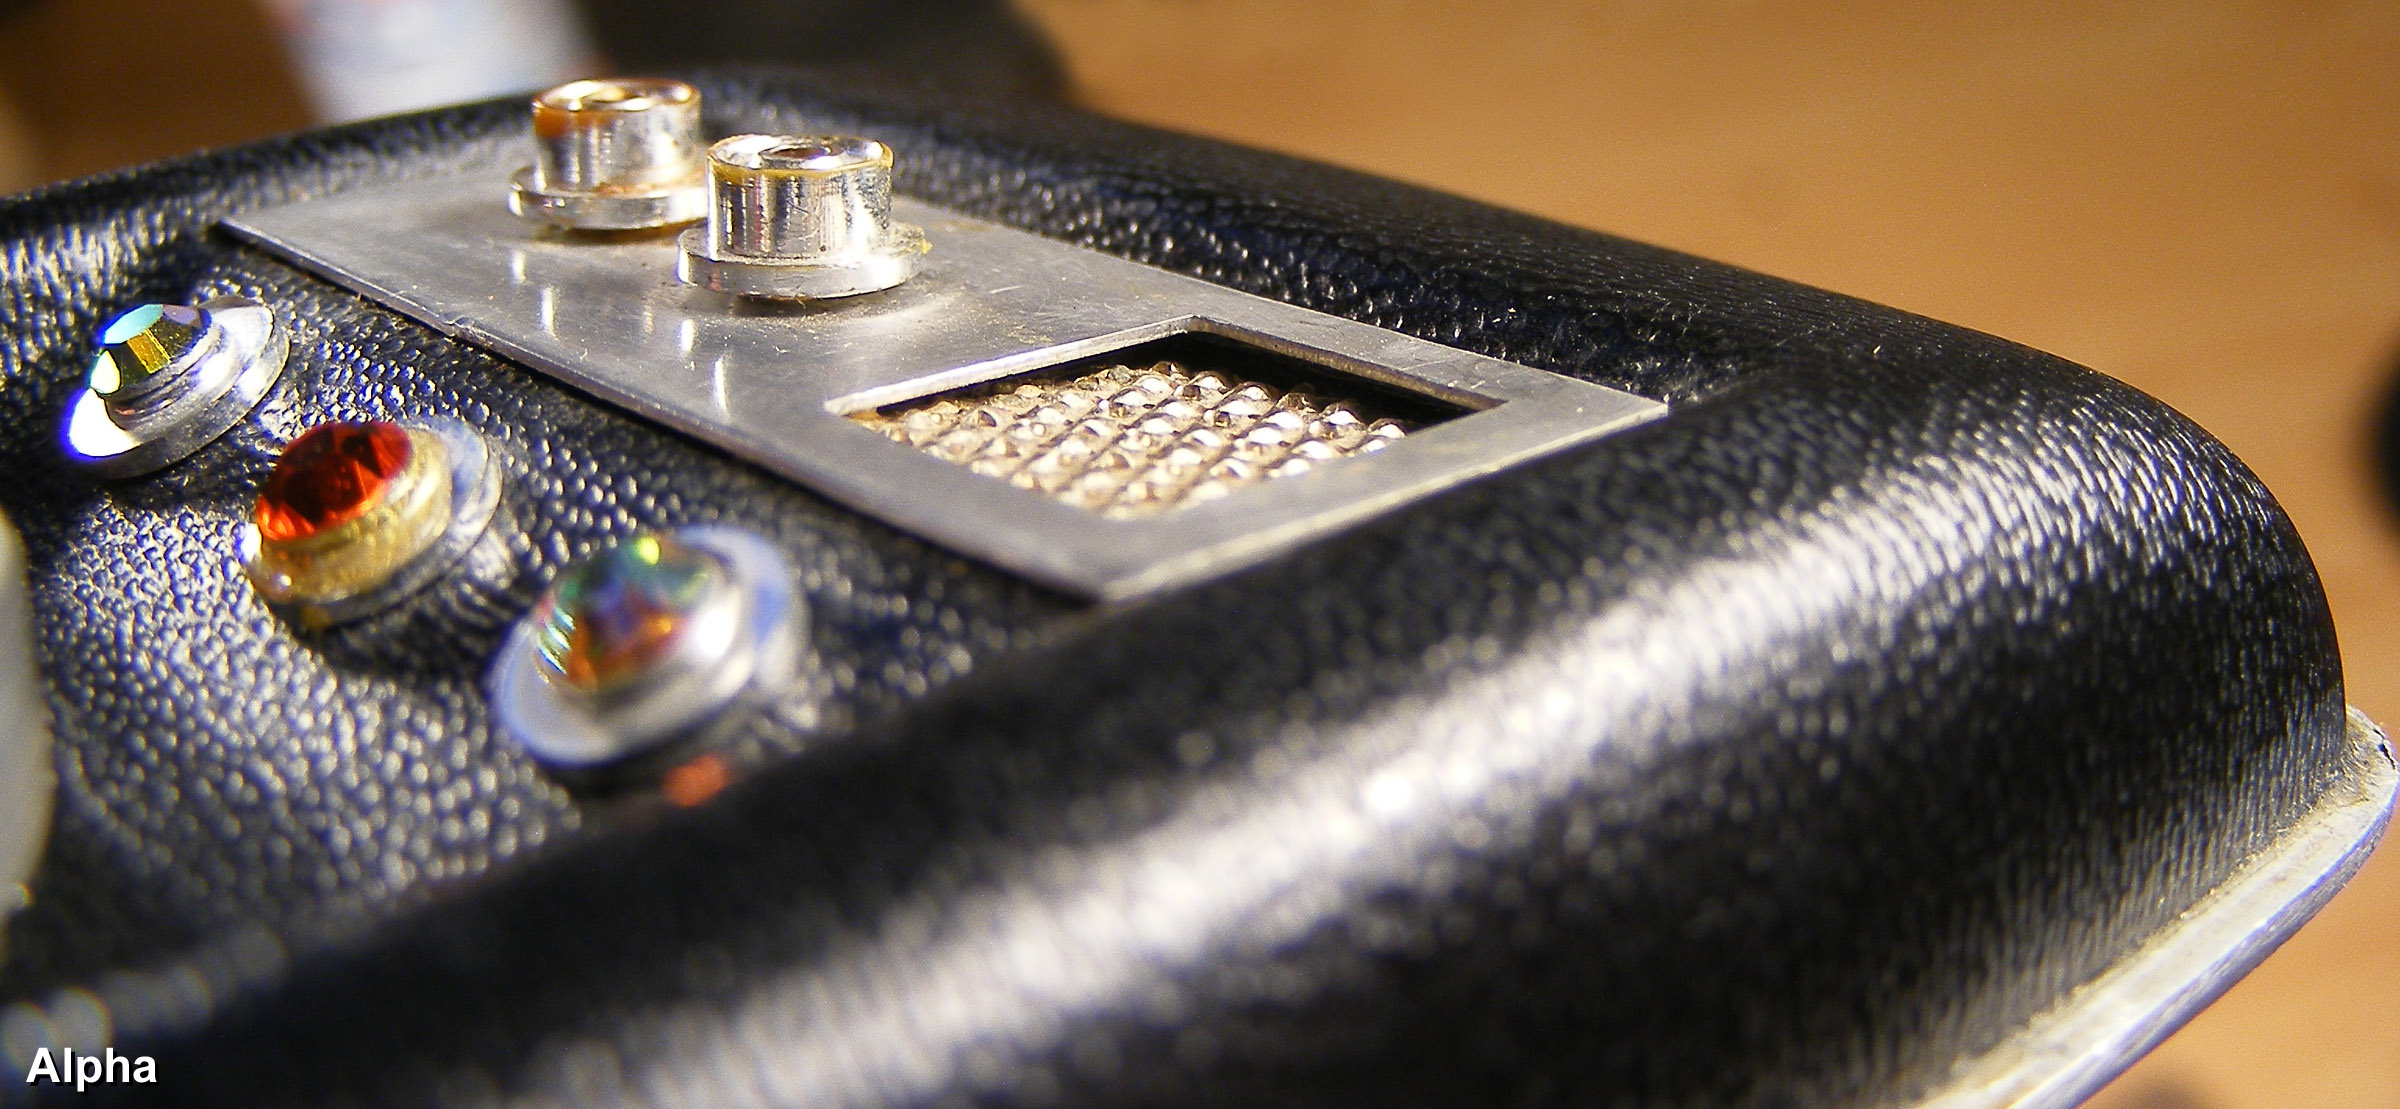
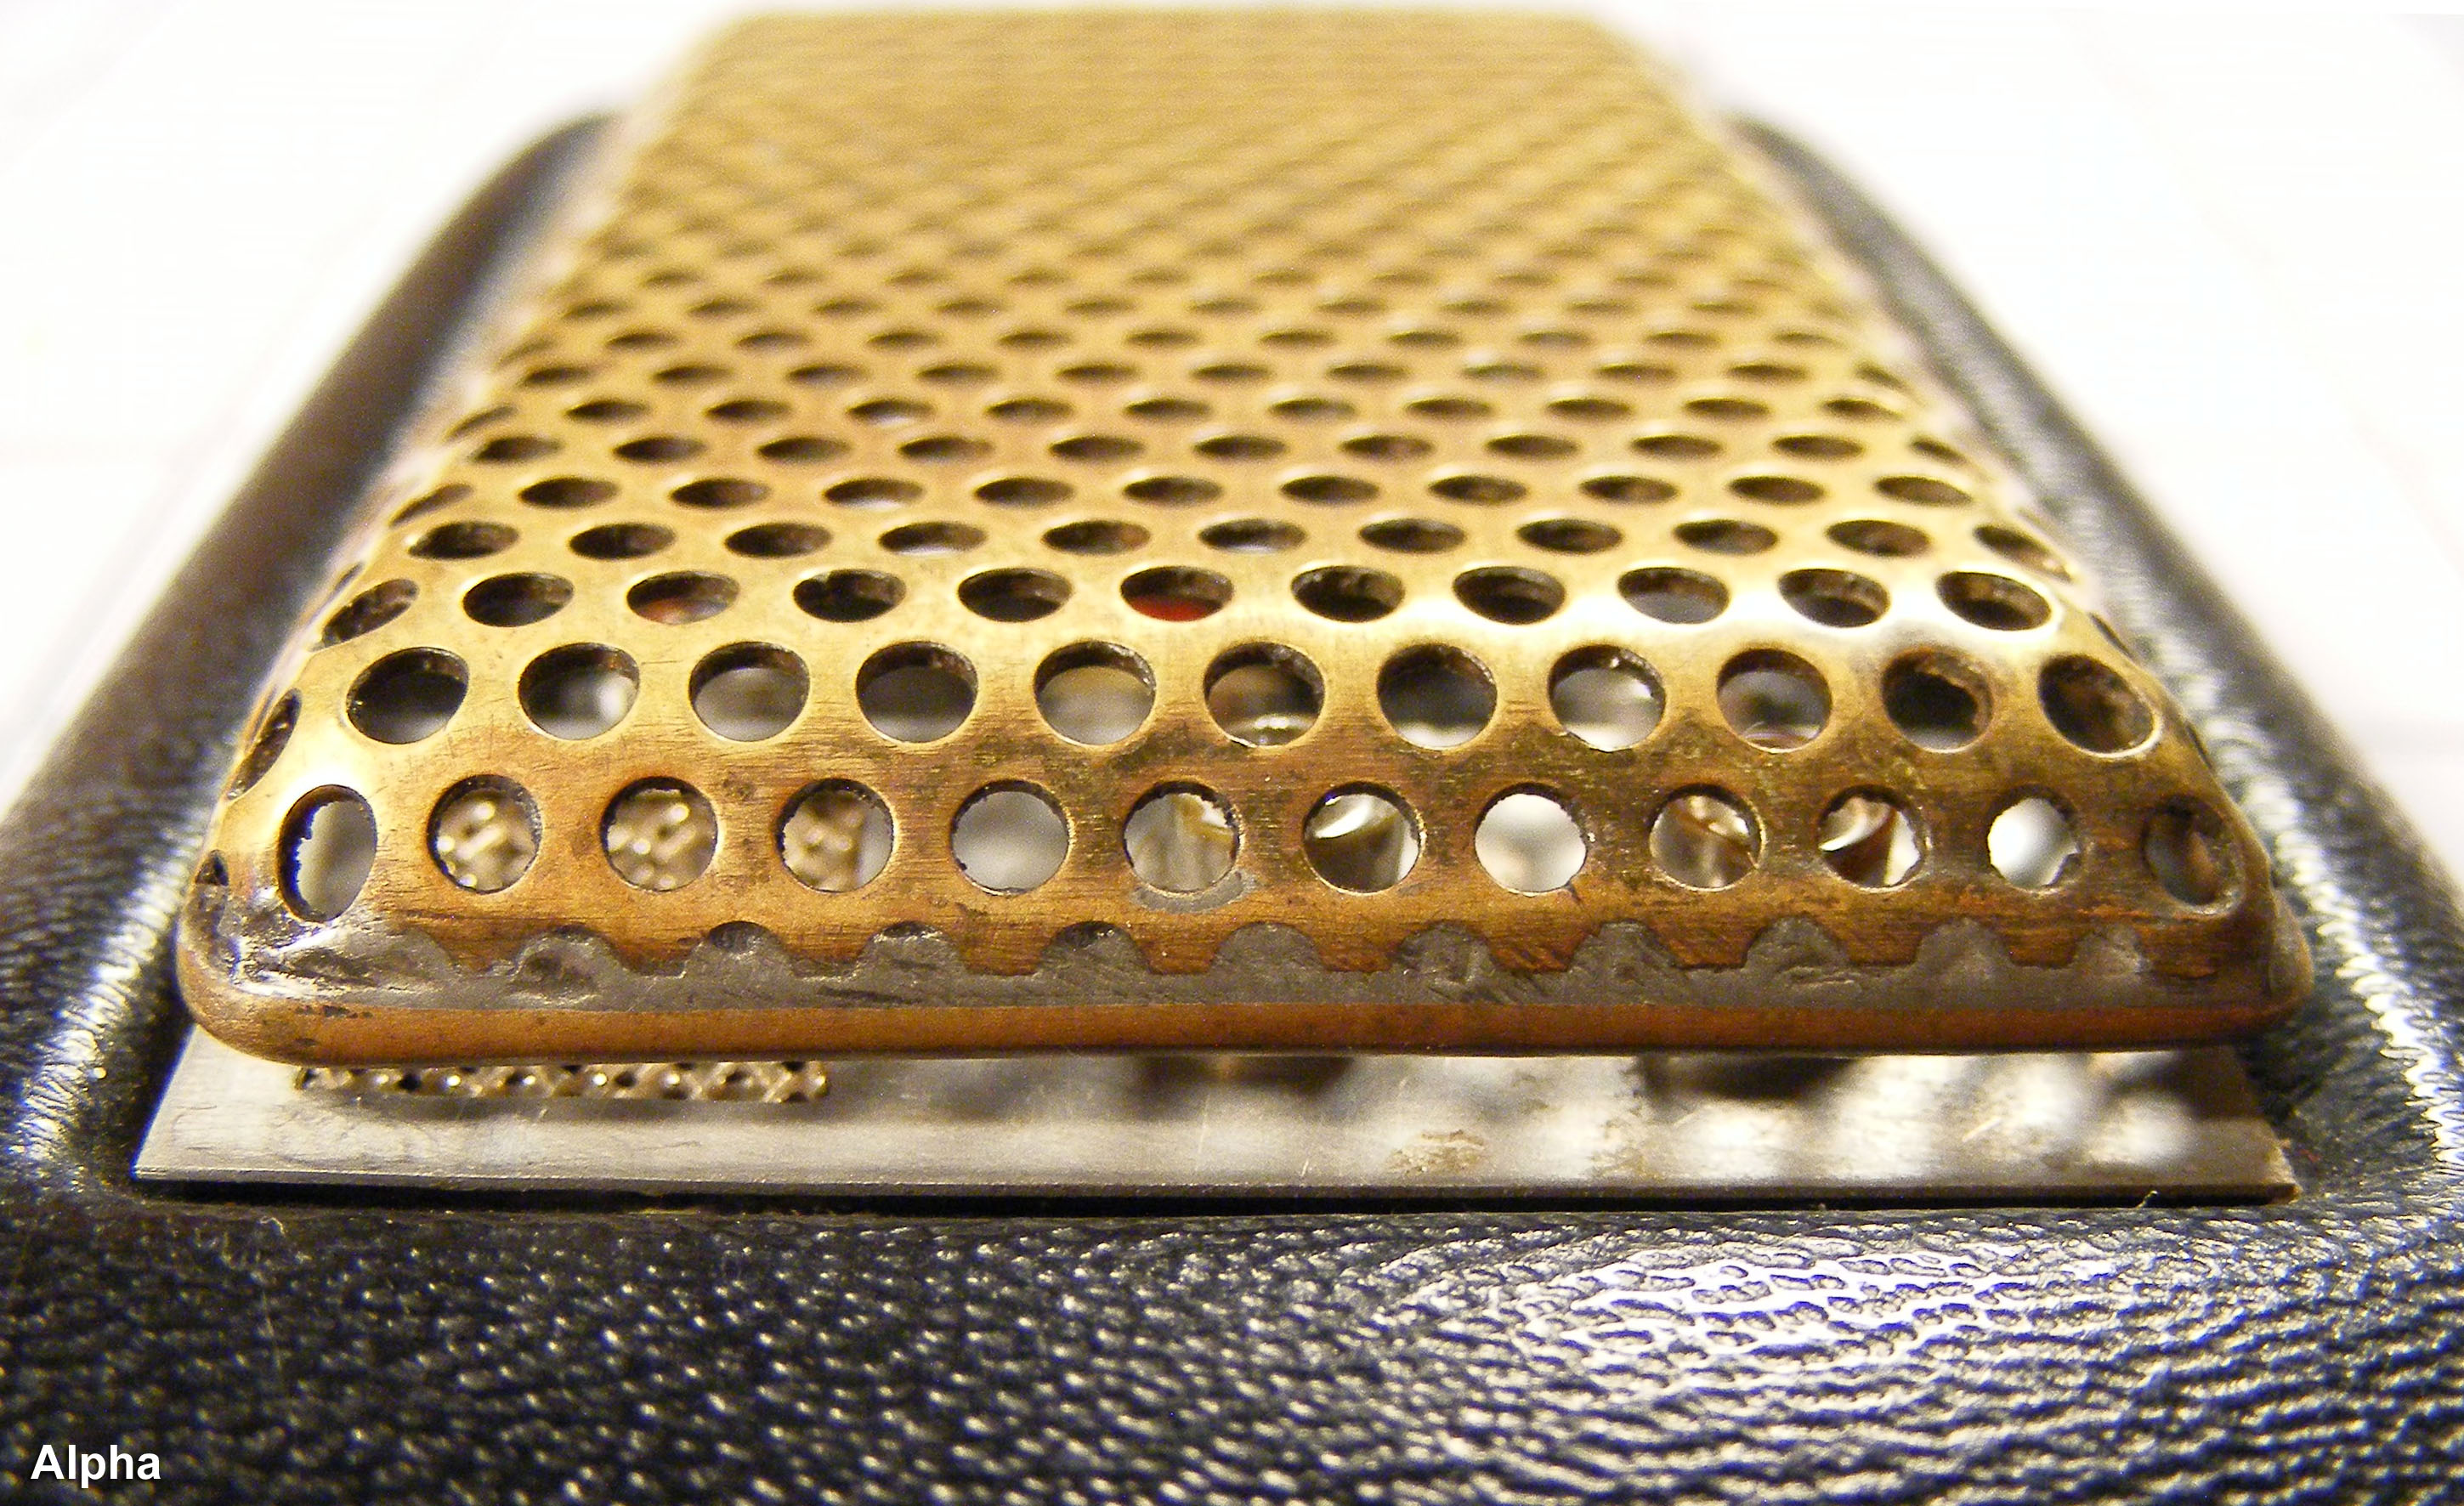
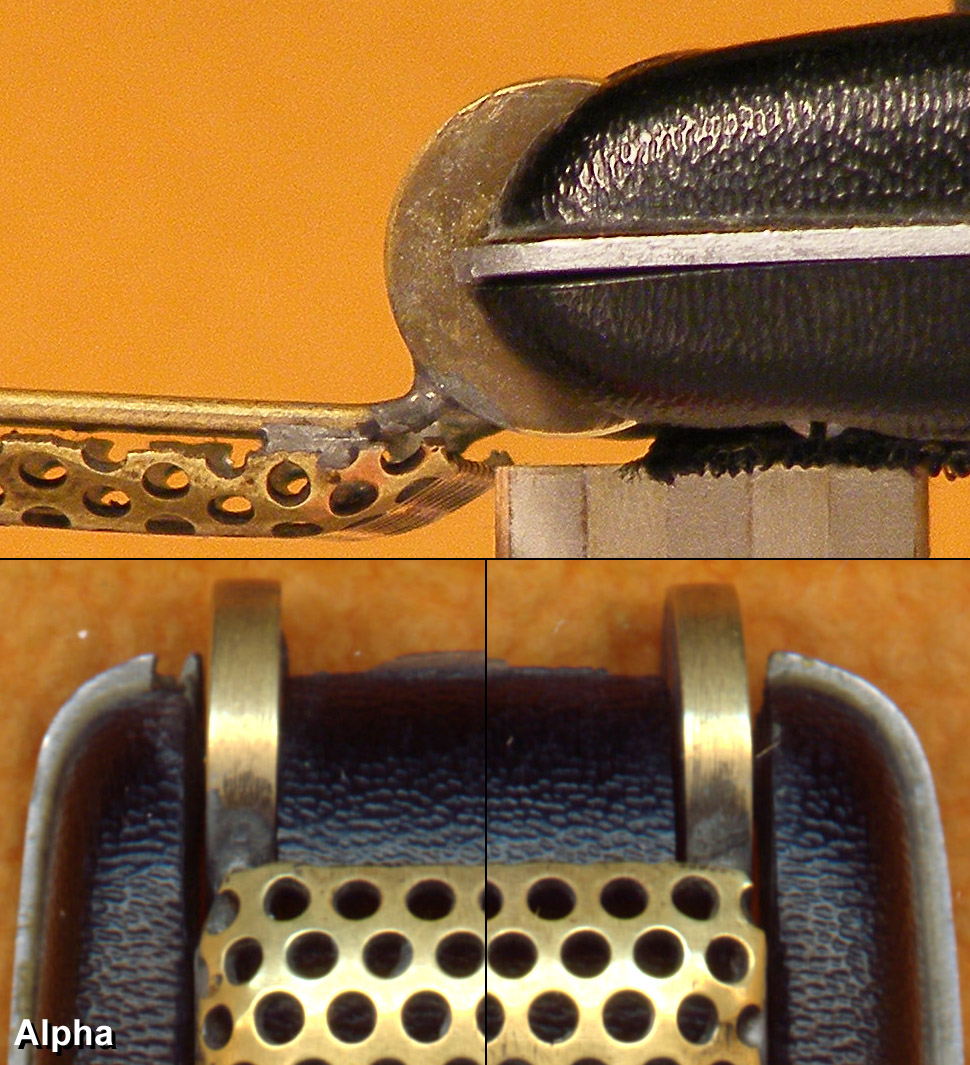
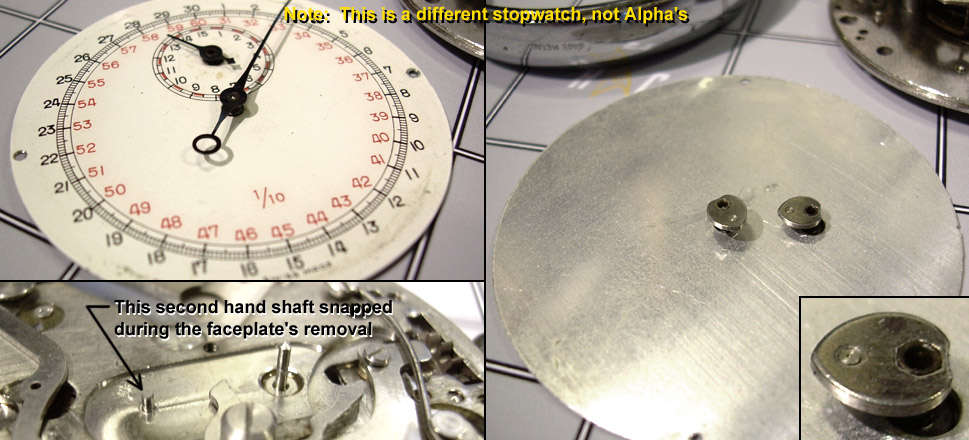
Wah made a very unexpected alteration to the stopwatch assembly - he removed the faceplate (with the captured second and minute hands) and inverted it, so that the numbers on the dial can only be read from the watch's inside through holes in the movement. Why did he do this? Undoubtedly to provide a larger surface area to adhere the bottom spinning layer. That's right... he did not actually glue the bottom layer spacer directly to the second hand! Below are photos of a similar faceplate (not Alpha's, this is a separate watch), showing the cam connected to the back side of each hand. The top dent in the heart-shaped cam is what creates the reset action. He removed the two miniscule screws that fasten the dial, carefully pried the two hands off their rotating axle shafts, flipped over the dial, and pressed the hands back onto their shafts through the holes in the reverse direction. He didn't reattach the dial with those tiny screws. Note to hobbyists - we DO NOT recommend you duplicate this procedure with your vintage stopwatch without special tools and practice on cheaper watch models. Ours below, done by hand, had the second axle snap before it would slip off its hole: What Wah used as a spacer / fastener between the stopwatch and rotating moiré layer remains the only unknown detail in the construction of this prop. Our one attempt to see what's under the watch movement (by gently lifting it out from the glued-in watch shell) was halted once it was realized the part - for some undeterminable reason - wouldn't budge from the glued-in watch case without considerable force. The top shell, as viewed from the underside, has holes drilled through it directly below the control knobs that penetrate the aluminum control plate. The hole's purpose is unknown; perhaps Wah first intended to used screws to secure the knobs. The mic grill material has its raised diamond peaks pointed the usual upward (convex). The control panel is actually cut too large to sit flat into its shell area, so while the aluminum is nearly flush against the shell at the far edge (closest to the jewels), it rides up at the near edge. This is why it looks like the mic grill is pushed in at one end - it isn't. It's the control panel that angles upward. |
||
 (2400 x 1256) |
 (1800 x 1136) |
 (2400 x 1098) |
 (2400 x 1109) |
 (2581 x 1320) |
 (1200 x 1060) |
|
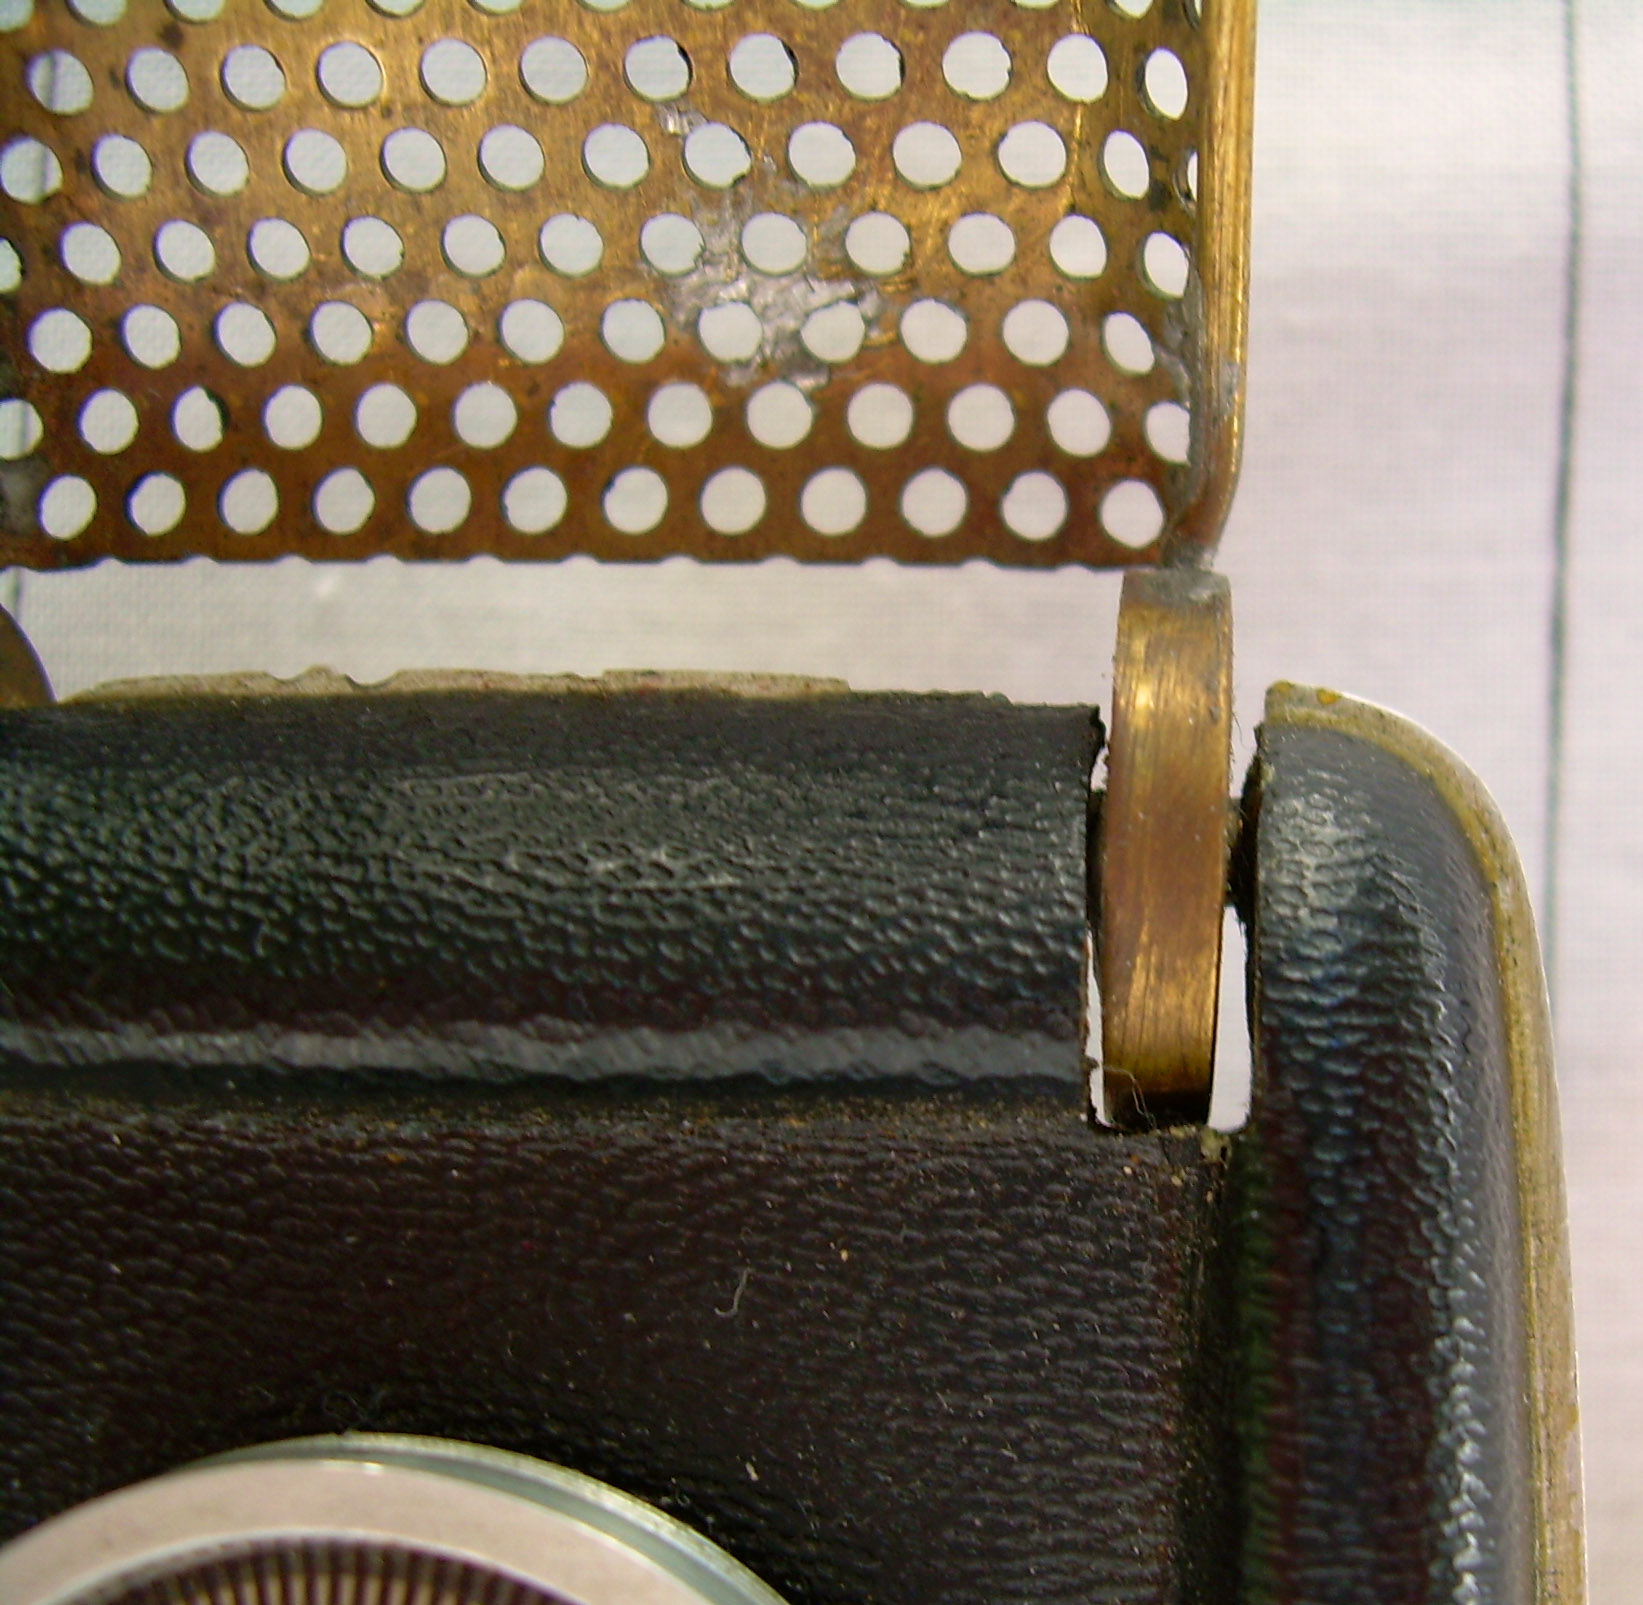
The
antenna still swings open, though not freely, and is best done by fingertip,
owing to the left hinge wheel being canted off-angle and rubbing on
the hinge axle. This resistance is enough to allow the antenna
to be held open all by itself at many angles, and there is evidence
from screen caps (Omega
Glory and For
the World is Hollow...) that it's always been that way. The
hinge stop peg, a small length of brass wire soldered in, protrudes
from the inward surface of the right wheel; hitting the inside of the
top shell to stop the antenna’s motion. |
||
 (2899 x 1772) |
 (1600 x 1041) |
 (1600 x 1041) |
 (970 x 1065) |
 (1800 x 1171) |
|
|
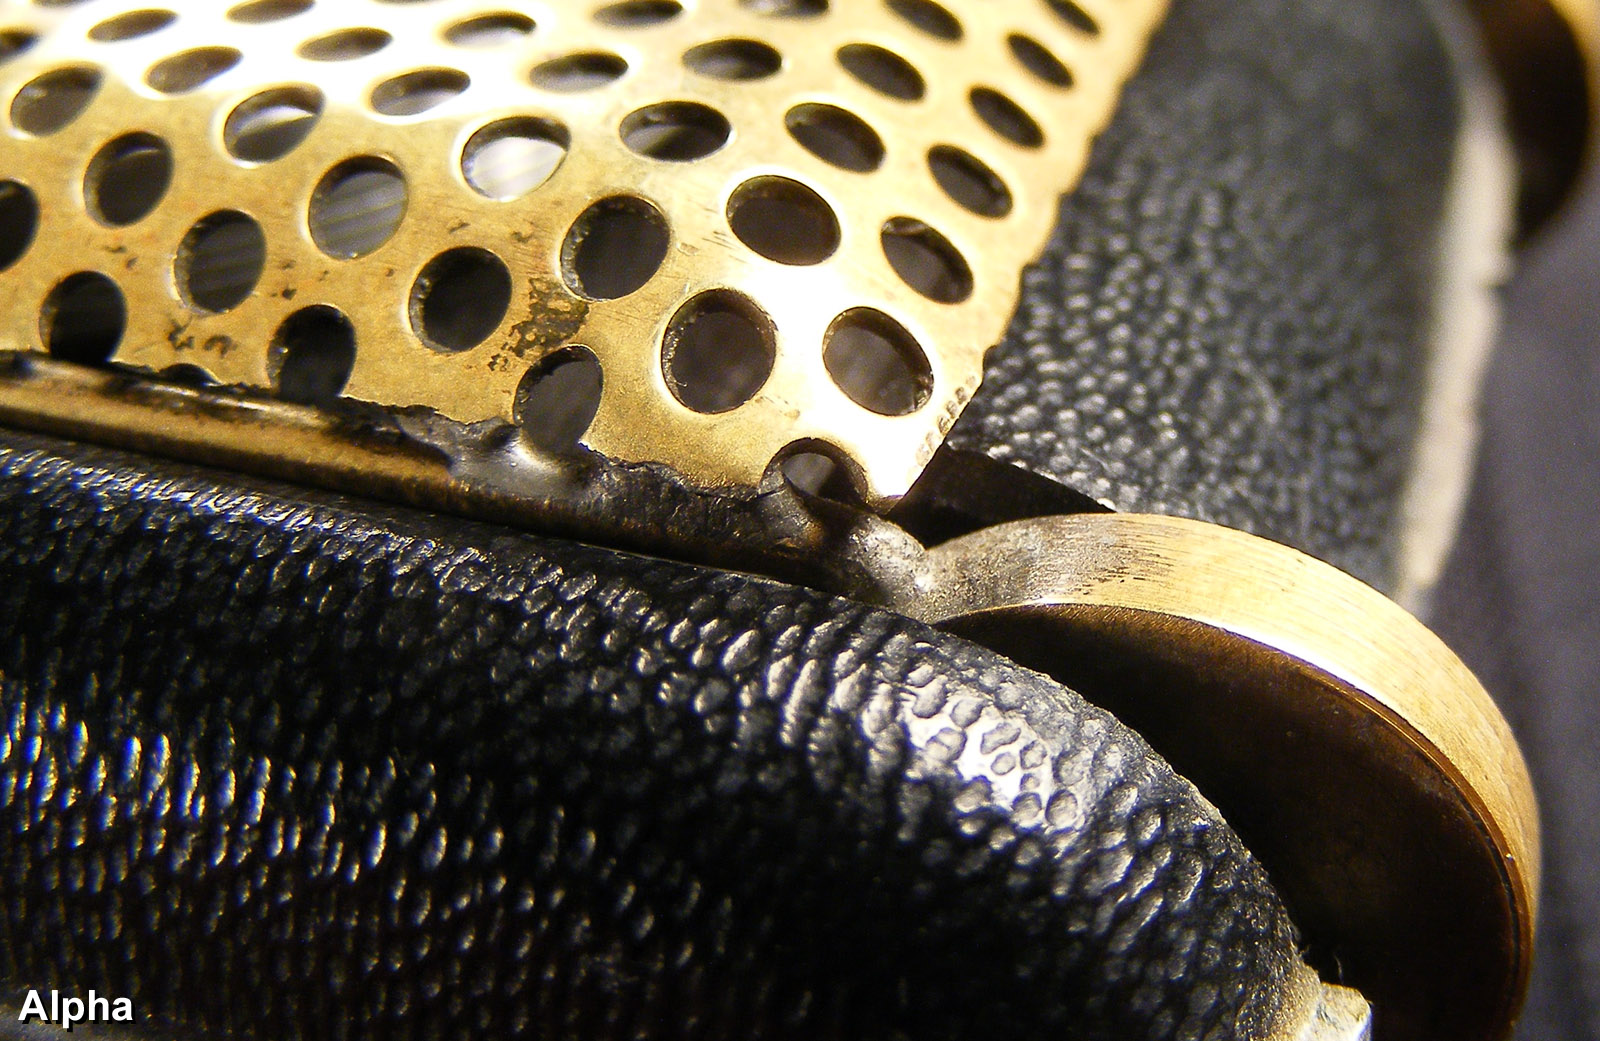
Two
aspects of the antenna are, to our knowledge, unique to this one comm.
First are the double bends in the antenna wire as each end enters its
hinge wheel; reducing the wire's width to match the narrower position
of the wheels. There's also a little accidental splatter of solder
on the underside near the right hinge wheel that's easily seen in screencaps. |
||
 (2430 x 1622) |
 (1643 x 1605) |
|
|
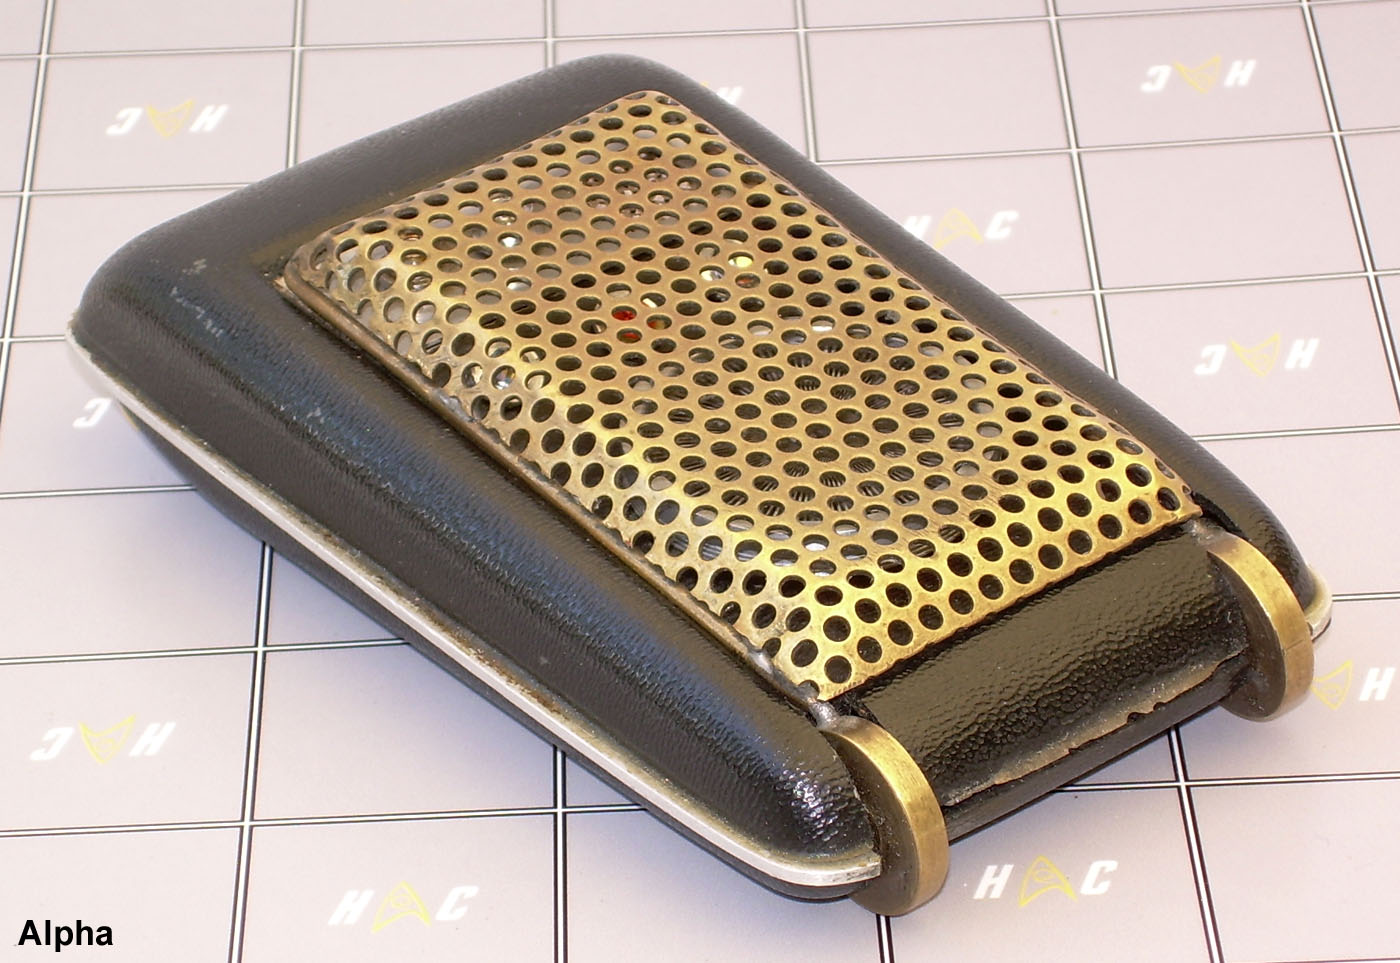
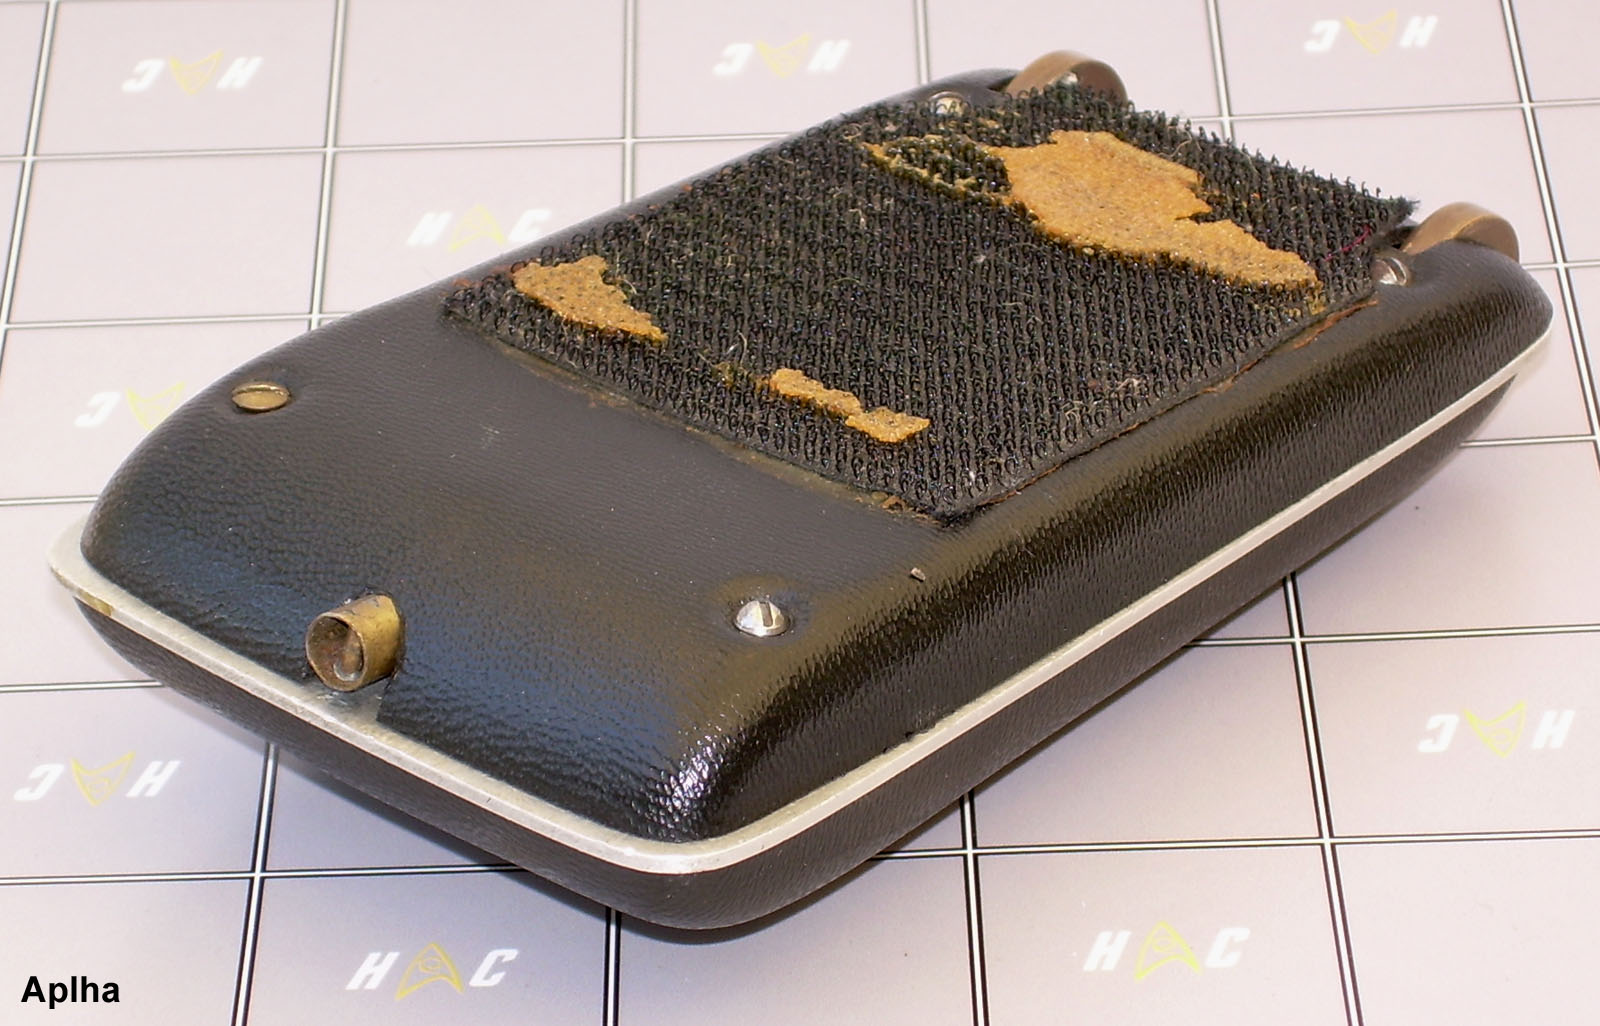
The midplate has hand-engraved into it nine digits - the original owner's Social Security number - that he put there decades ago as suggested by the police back then to help aid in the recovery of lost valuables (see link below for that story). The bottom shell exhibit a deep sag under the Velcro and an upward distortion between the hinge wheels, with it partially filling the empty slot that once held the mid-wheel midplate segment. This is evidence that the prop was poorly stored for a while in a hot environment under a weight load that would force a slow yielding of the plastic. Patches of old crusty glue obscure some of the Velcro. This was, according to the recollection of the first owner, his effort to affix a newer, stronger patch of Velcro to the back so he could wear the prop more securely on costumes. |
||
 (1600 x 1026) |
 (1600 x 1172) |
 (1400 x 1308) |
 (1156 x 636) |
 (1440 x 714) |
|
| . | ||
 (2200 x 1786 |
 (2400 x 1636) |
 (2115 x 1556) |
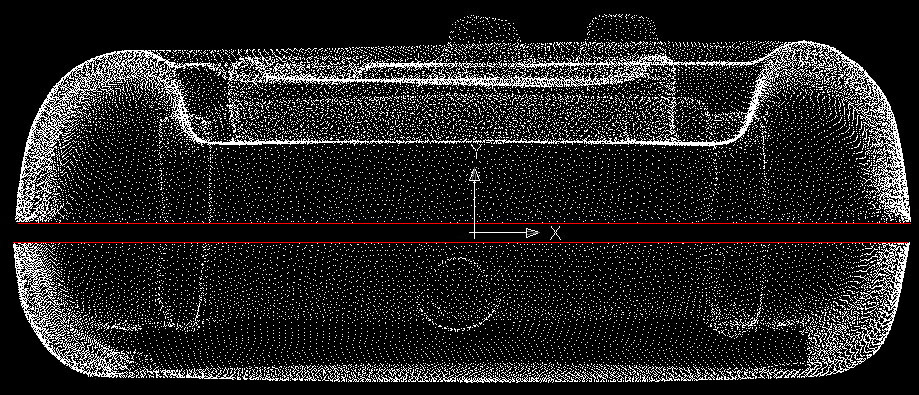 (919 x 395) 3D laser scan - transparent Front Elevation |
 (997 x 271) 3D laser scan - transparent Side Elevation |
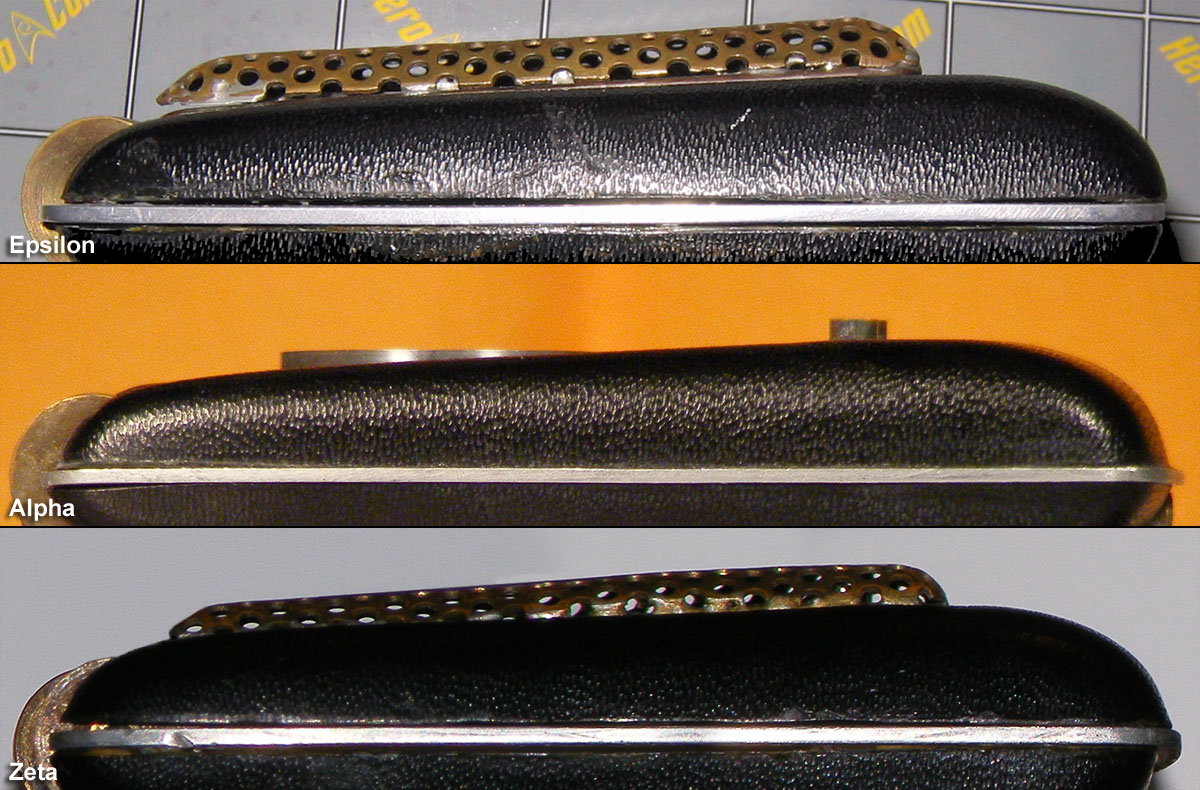 (1200 x 790) Top shell comparison with Epsilon & Zeta |
Alpha's
Jewels |
|
|
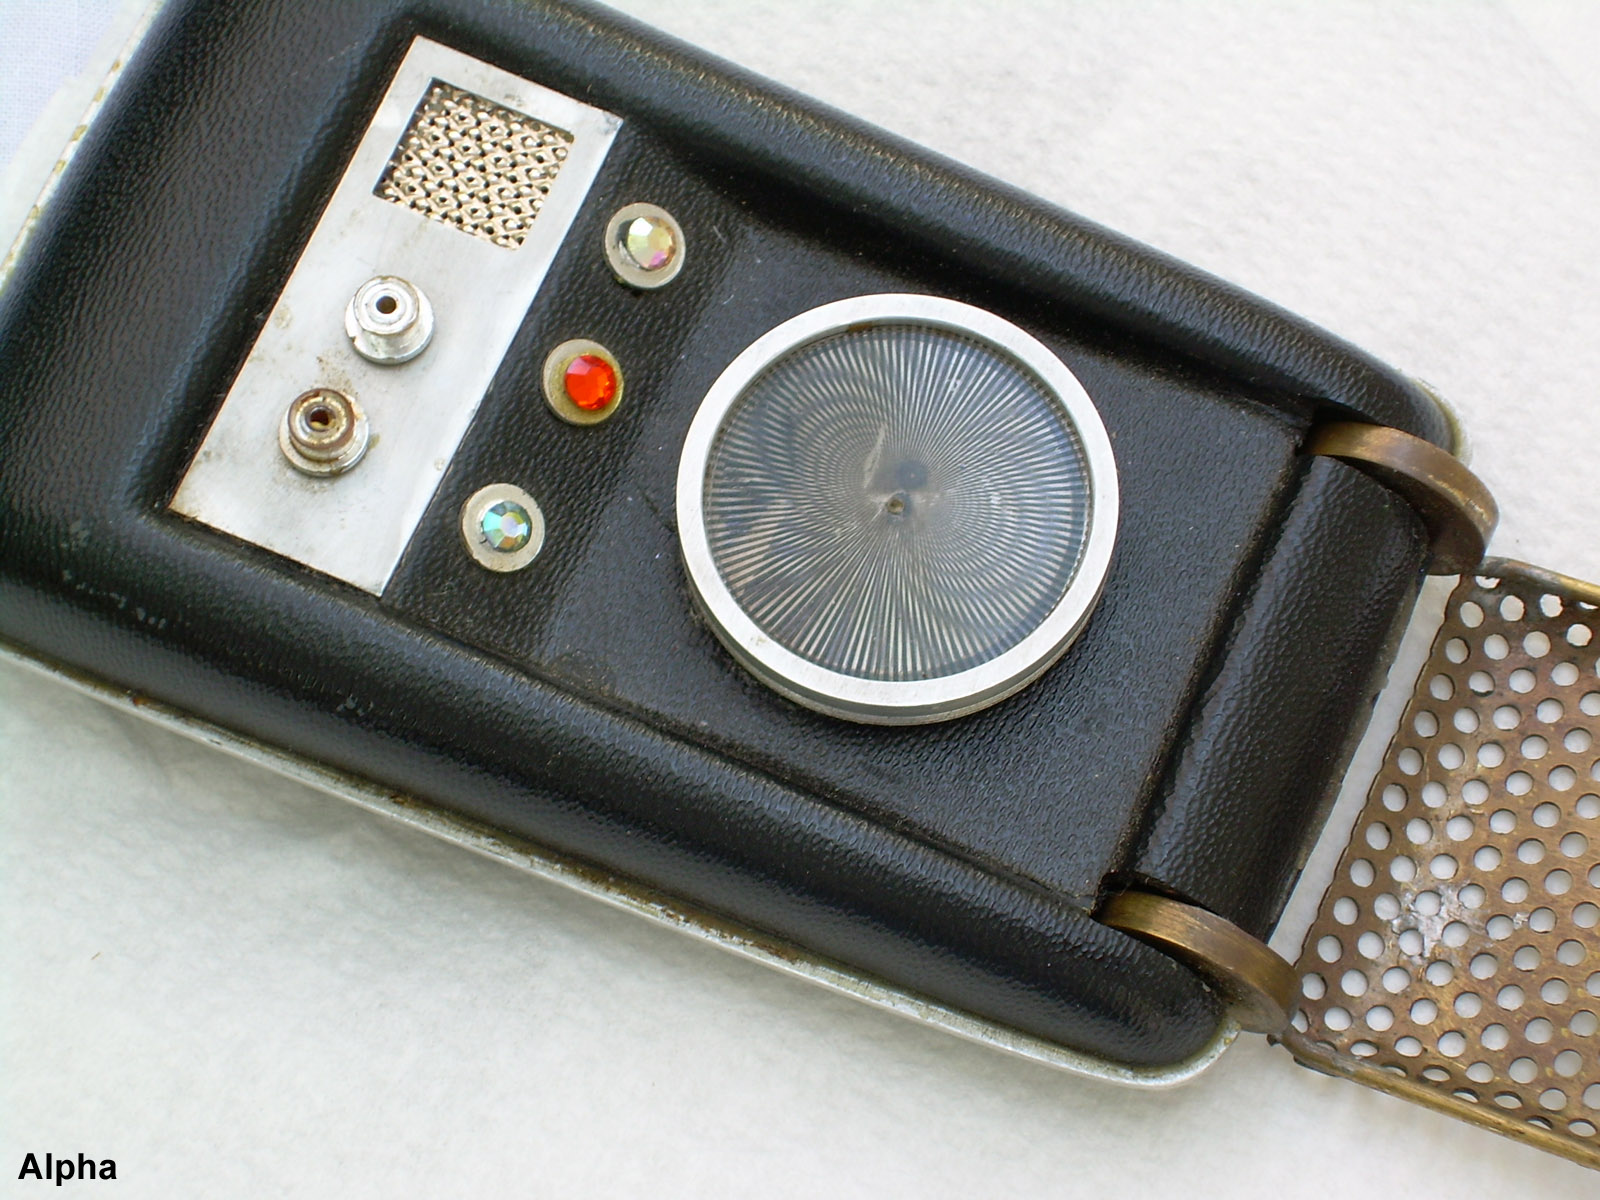
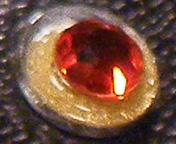
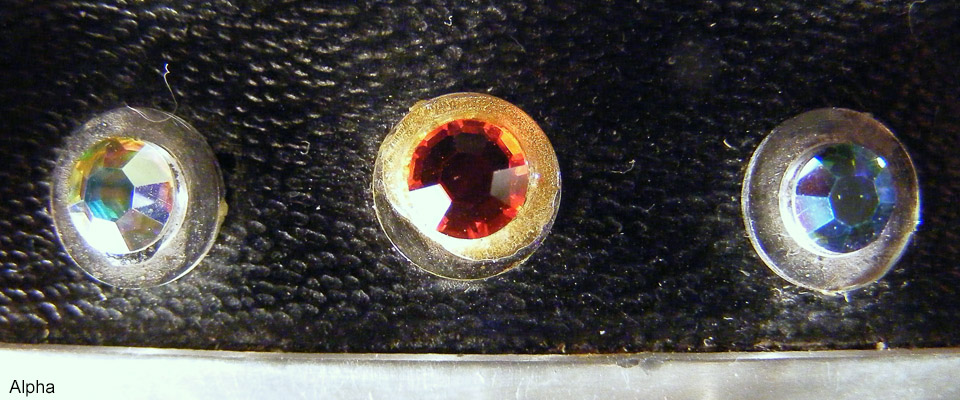
The rhinestone colors have been conclusively determined via direct comparison to a Swarovski sample chart to be (left to right) 16ss Crystal AB / 16ss Hyacinth / 15ss Olivine AB. Note the right Olivine AB is a slightly smaller size than the others, so figure it's a very uncommon 15ss (or possibly even 14ss).
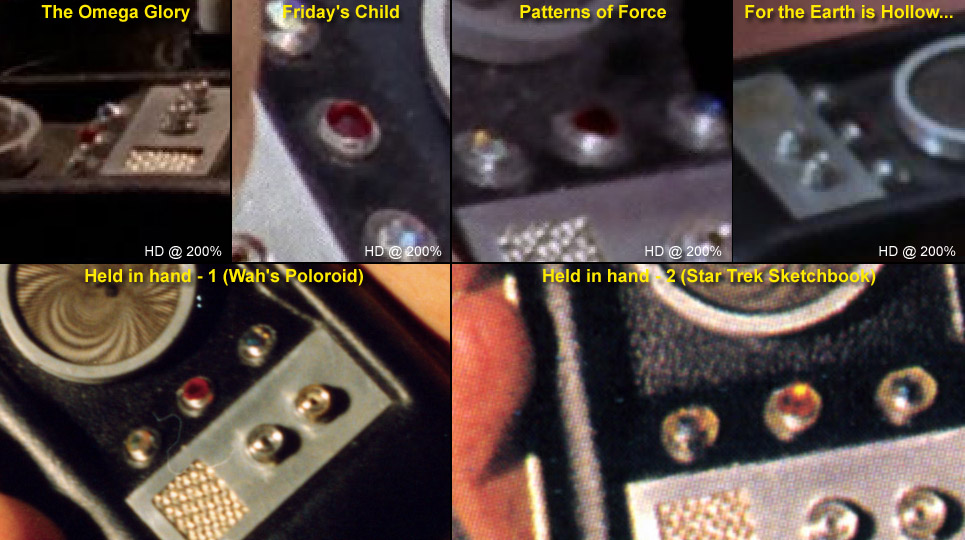
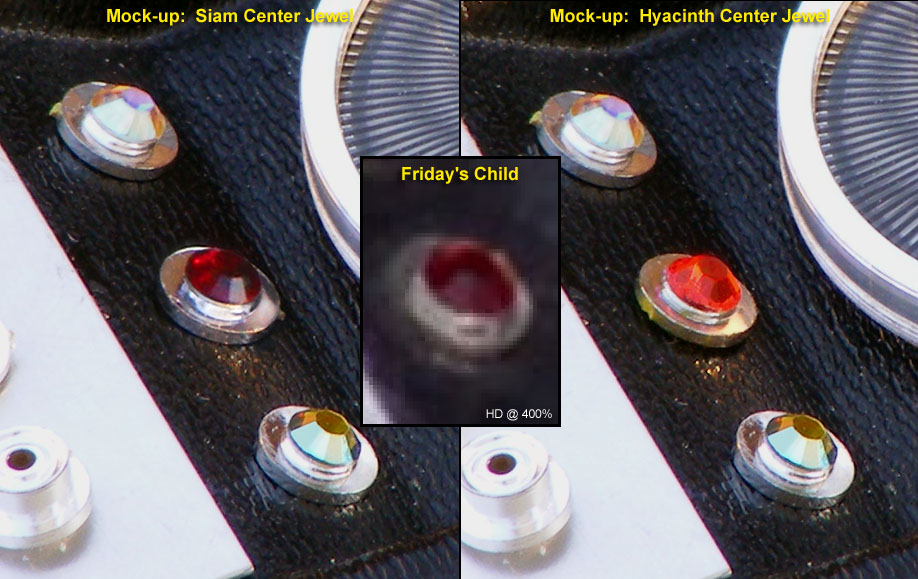
Curiously, screen caps from the prop's two best appearances, in Friday's Child and Patterns in Force, show the center jewel to be a much deeper red than what's there now - as in a 16ss Siam; the same as the surviving gem on Delta. But then certainly in the two backlot photos where it's held by a muscular hand and with its midwheel midplate now missing (so maybe during the 3rd season), the center stone is clearly a lighter orange-red. Is it just lighting, or was there a long-forgotten rhinestone switcheroo in Alpha's past? The best way to tell how much the lighting could play tricks on color is to experiment with both jewels where the conditions can be matched to a dated photo. Easily the best is the Friday's Child close-up, taken outside in the shade under a blue sky. While Alpha has already re-visited Vasquez Rocks to recreate the famous shot, both our lighting was not exact (some extra right fill light was added on Star Trek) and no Siam rhinestones were present for comparison. So we've done the next best thing by photographing a replica with vintage Swarovski rhinestones while in the shade on a sunny day where some diffuse sunlight could also be directed in. The results are definitive: |
|
Yes, it seems Alpha did have at first a 16ss Siam stone as its center jewel. That replacement nicely explains the current generous smear of yellowed glue on that one hub alone beneath the center jewel (>>). Given the lack of Swarovski gems available to the studio prop shop, it's very possible they robbed a Hyacinth from one of the other comms to maintain the hero in camera-ready shape. Of the five possibilities, Epsilon still has its, Theta's went missing too soon (in mid-Season 2, whereas Alpha didn't have a need until late Season 3) and Beta was likely spared (being the other hero), thus leaving either Eta or Iota as the probable source. So for your authentic-styled
replica, you now have a choice of colors! |
 |
| Left |
Center |
Right |
||
| |
|
|
||
| Originally
|
16ss Crystal AB |
16ss Siam |
15ss Olivine AB |
|
| Currently
|
16ss Crystal AB |
16ss Hyacinth |
15ss Olivine AB |
|
|
Alpha's
Moiré
Pattern |
||||
|
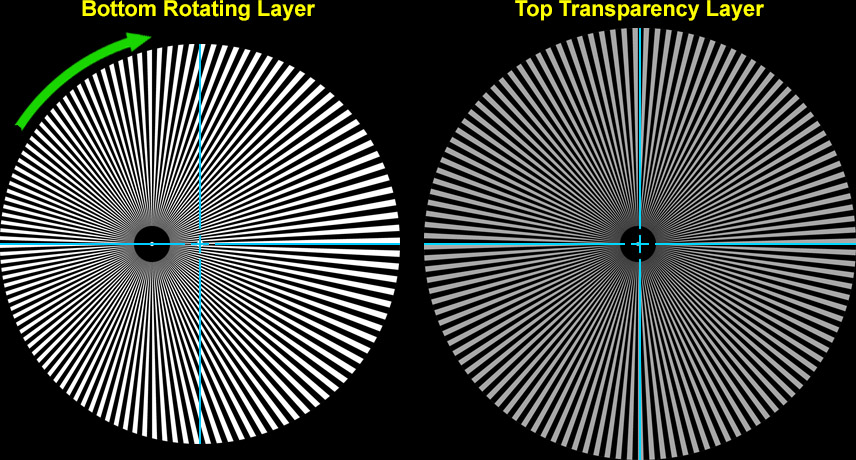
Both heroes used a stacking of two Edmund Scientific #4 radial line patterns; the transparent layer on top fixed in place while the white cardstock layer (1.01" diameter) rotated below, creating the famous "spider" swirl of growing and shrinking arcs. The top transparency was cut with a compass circle cutter, as evidenced by the small hole in the clear plastic (that almost looks drilled). Originally the bottom rotating disk had its center dot 0.118" off from the stopwatch axle, and the top transarency is a miniscule 0.005" off-center to the left (the cyan crosshairs mark the stopwatch axle beneath):
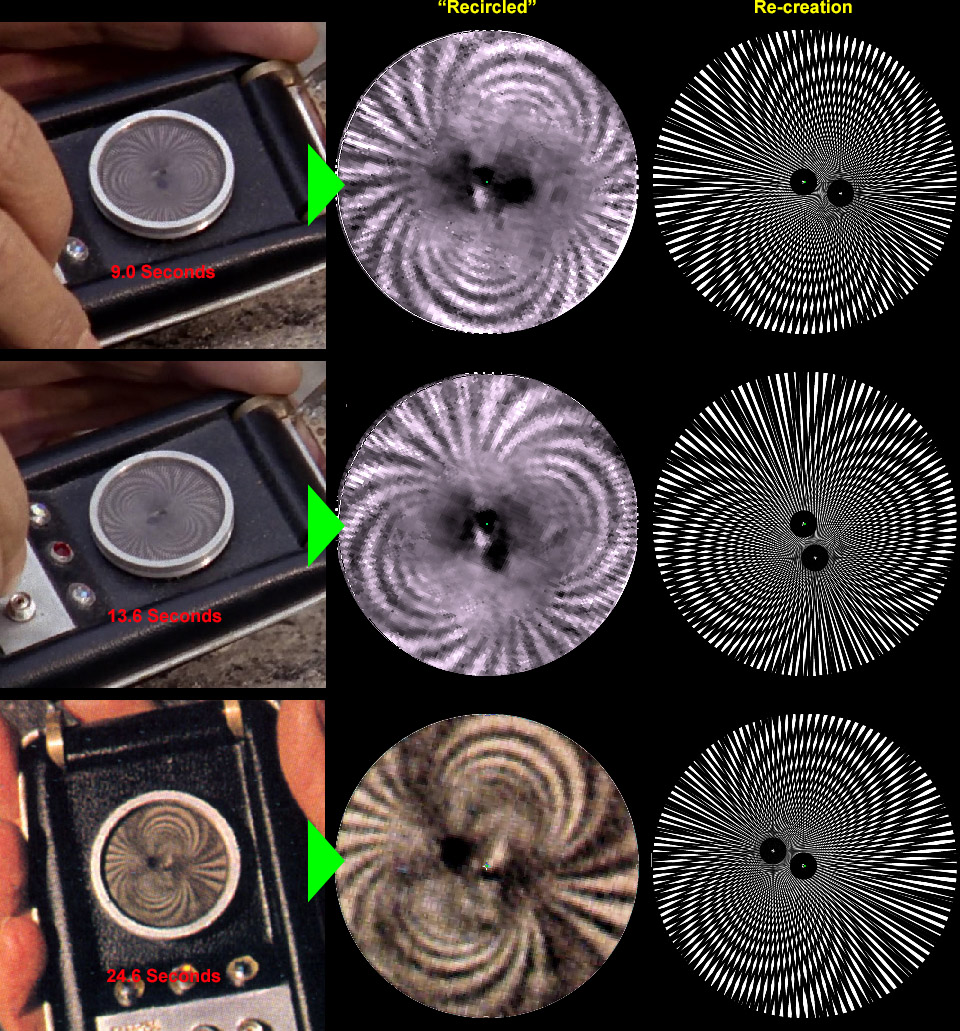
These dimensions create spider lines that precisely match what's seen during its full rotation (the seconds indicated below in the left pics are the elapsed time of the stopwatch from the pattern's straight-up "12 o'clock" position):
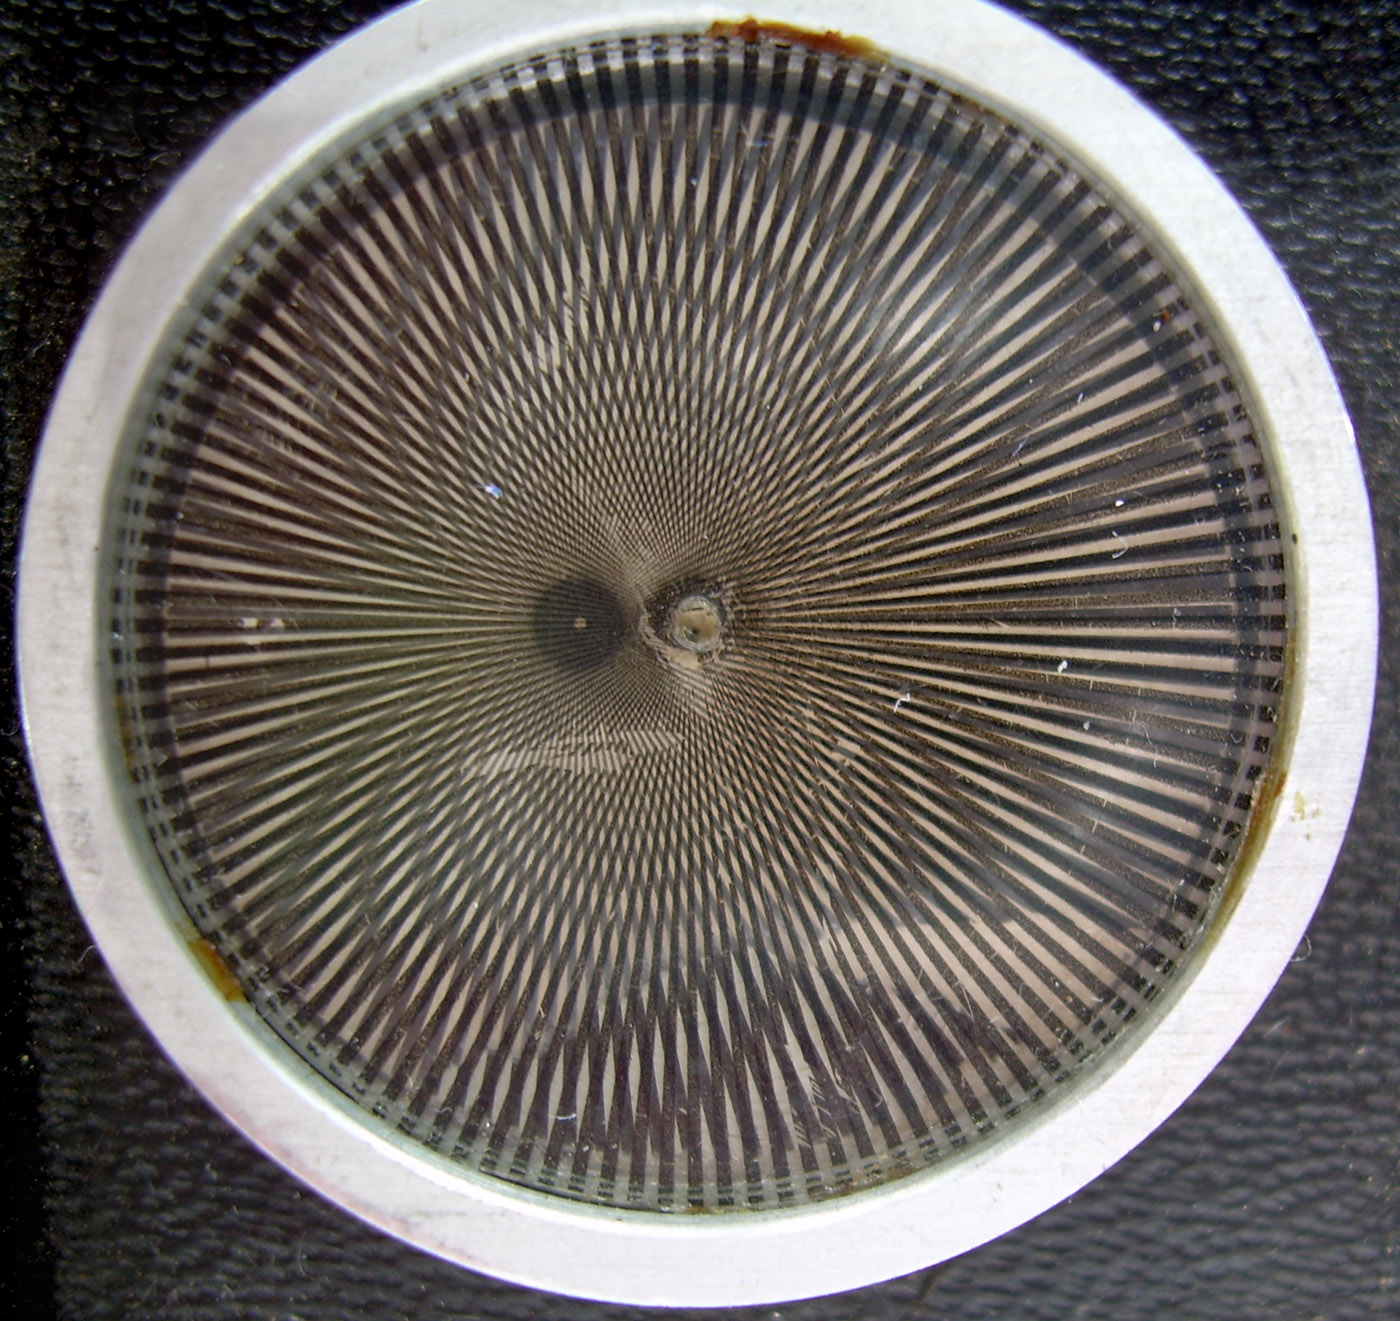
Currently, however, due likely to the detachment of the disk from the stopwatch, the bottom layer now sits 0.103" off-center: The
transparent layer, a fairly rigid 0.020 thick, is held captive between
the inner and outer bezel rings, and was installed with the printed
surface up (hence some lines in a few spots have been scratched off).
The transparency is glued to the bezel ring In three separate spots
(likely with contact cement) - this to probably prevent the transparent
layer from rotating along with the bottom paper layer, given their
possible glancing contact even when new. |
||||
 (2400 x 1702) |
|
The paper layer is now mostly tight up against - and parts even adhered to - the transparent layer. Long enough had the two layers been in partial contact with each other that when at some more recent time the paper pattern rotated a few degrees, a patch of the paper (at the 5 o'clock position) stuck to the underside of the transparency and tore off; damage that is clearly not evident in any screen caps. The
subject of moiré patterns is discussed in extensive detail on our A
Moiré Story page.
And means to print
out clear, accurate Pattern #4 images can be found here. |
|
|
Alpha's
Screws |
|
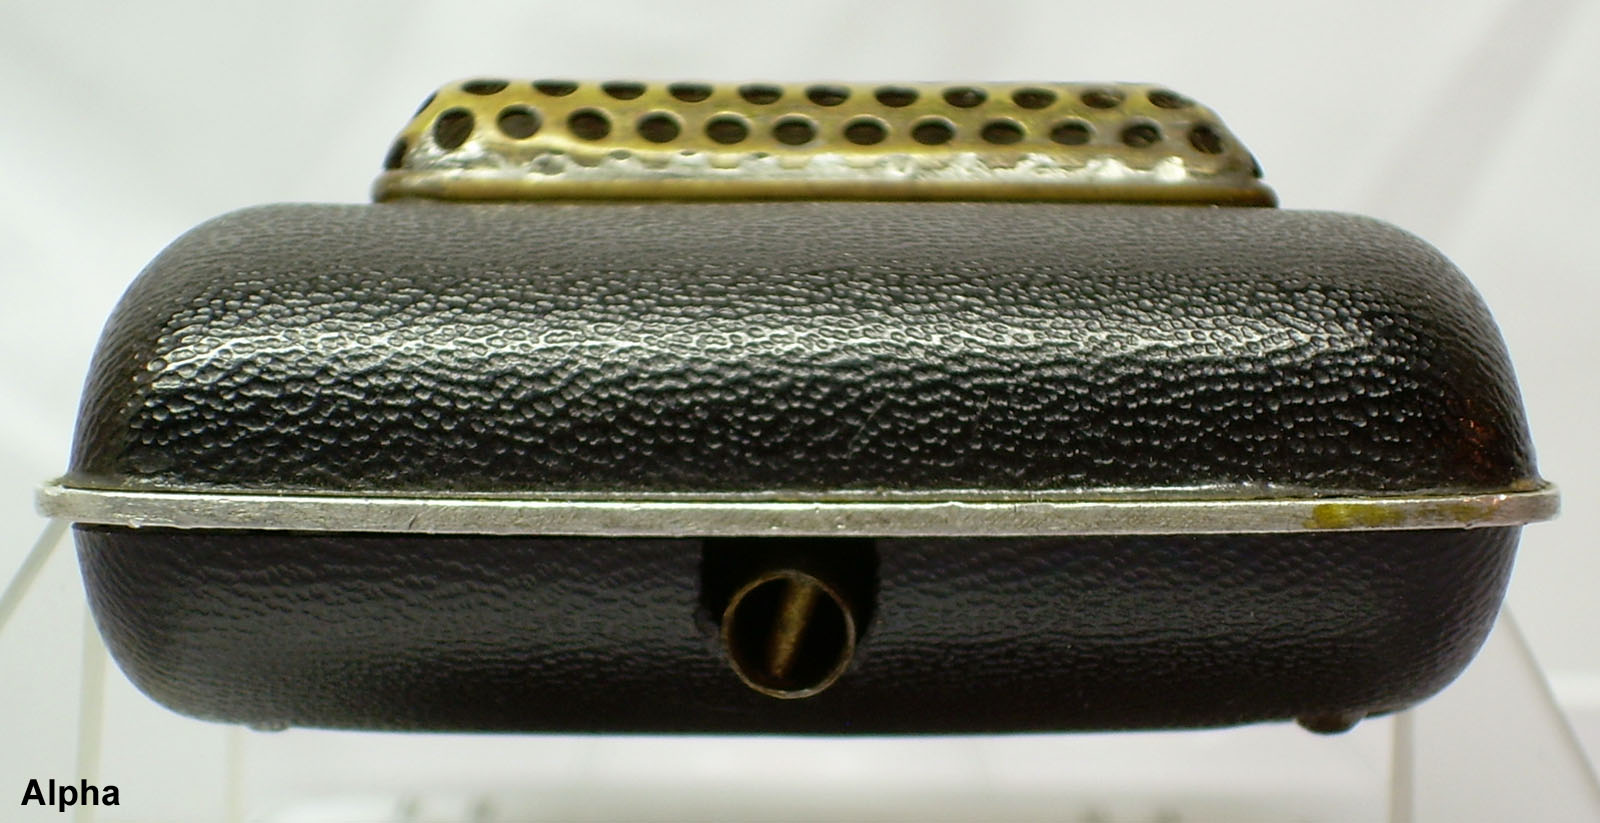
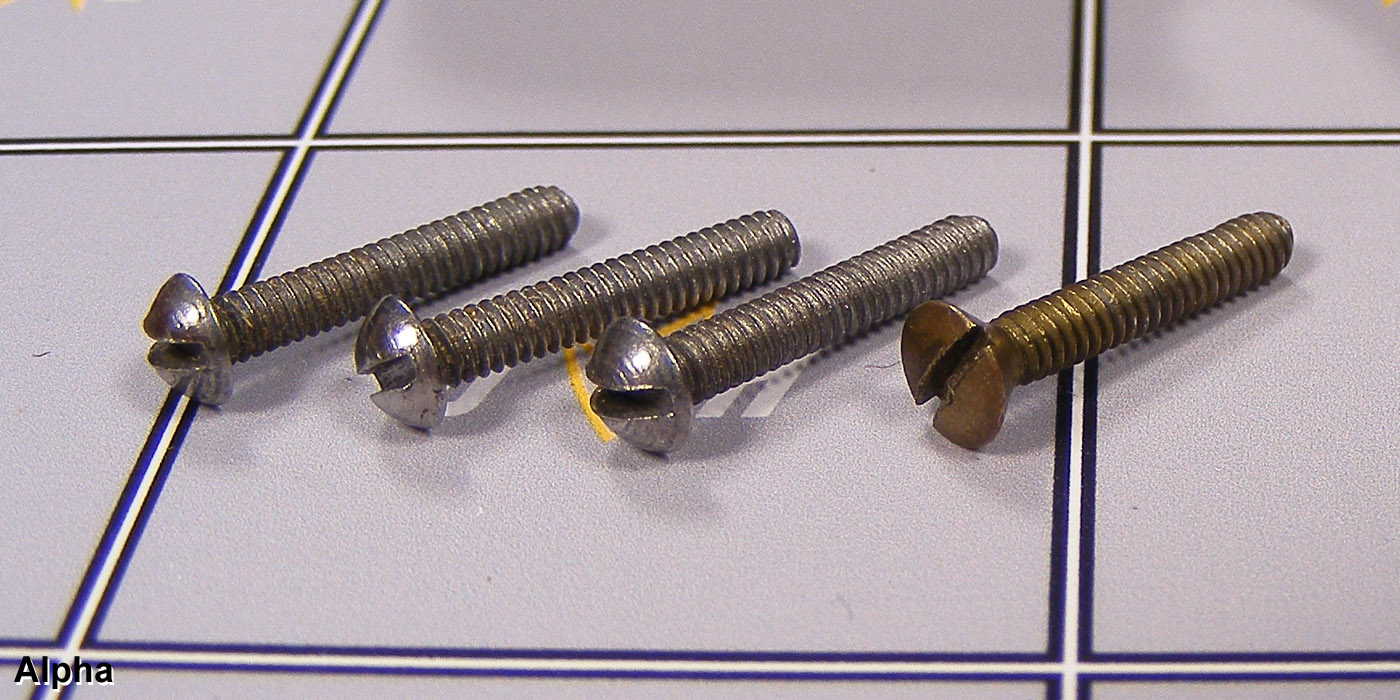
| This hero communicator has two different screw types, all 1/2" long - three 2-56 steel slotted round head and one 2-56 brass slotted oval head:
Note that the brass slotted oval head has been determined to be the most common screw type Wah used in his comms, and so this one has been measured and diagramed on our "Parts and Plans" Screws page. |
|
Miscellaneous
TIdbits |
|

|
<<< And see Alpha here next to Epsilon and Zeta. |
 |
<<< We also brought Alpha back to the same rock it rested on in Friday's Child to recreate the famous close-up. |
If you would like to know the major tells that clearly inform us that this is truly Alpha, follow this link: |
|
|
>
> >
>
The
Details - IDENTIFYING ALPHA
<
< <
< |
||
We study the 2007 assertion by a once well-regarded TOS prop expert that the Alpha we show is a forgery: |
||
|
>
> >
>
The Details -
AUTHENTIC OR NOT?
<
< <
< |
||
Also examined are yet more 2008 claims that our ID of Alpha is in error, this time with us focusing on the mic grill: |
||
|
>
> >
>
The Details -
COMPARE MIC GRILLS <
< <
< |
||
Next, evidence first revealed in September 2008 relates the discovery of an ultra-rare type of transistor radio speaker mesh in the found Alpha to other confirmed Wah-built communicators, further solidifying its authenticity: |
||
|
>
> >
>
The Details - A RARE
RADIO SPEAKER MESH CONFIRMS ALPHA
<
< <
< |
||
Here is the long-awaited story (first published September '09) of the original owner, who we traced via a Social Security number he carved decades ago into the comm's midplate: |
||
|
>
> >
>
The Details - ALPHA'S
ORIGINS -KNOWN! <
< <
< |
||
And finally actual proof (a word not used lightly around here) that this found prop is truly authentic (first published November '09): |
||
By request, all personal information regarding the owner is being kept private. |
||
| Star Trek is a Registered and Copyrighted Trademark of Paramount Pictures. All Rights Reserved. All subject matters referring to Star Trek are trademarks of Paramount Pictures. This website has not been produced or endorsed by Paramount Pictures. Any material belonging to Paramount’s Copyrighted Material that may appear on this site complies with fair and/or acceptable use for the purposes of review, study, criticism, or news reporting. |
