|
| |
Master Tracking List
|
|
||
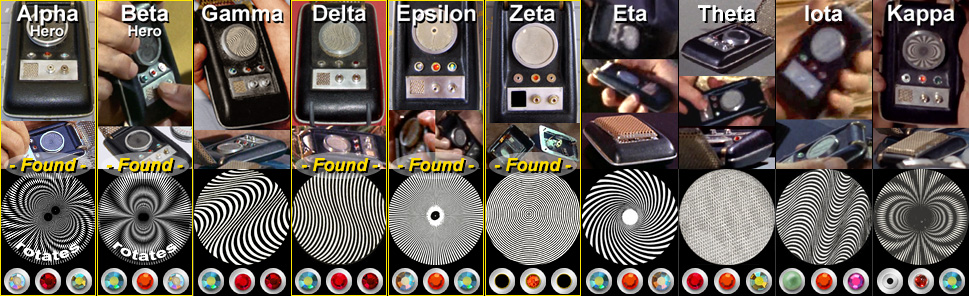
| Wah Ming Chang was paid for providing ten black-bodied communicator props; two working "heroes" and eight static "dummies." Here they are in detail, as best as can be tracked during the three seasons of Star Trek as well as after. The Greek naming is our means to provide a uniform scientifically-oriented nomenclature. In determining their order and to keep them in sensible groupings, we took into consideration their prominence and importance (heroes first), familiarity, current status and moiré pattern. In case you're wondering how we figure out which comm is which... |
||
| > > > > The Details - HOW TO "TELL" A MATCH < < < < |
||
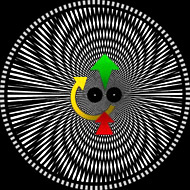
| We've included a graphic on the amount each antenna swings open... |
||
| > > > > The Details - ANTENNA HINGE ANGLES < < < < |
||
| Each comm has its own "Details" page with complete data on that one prop. Look for the link in the left title bar. |
||
|
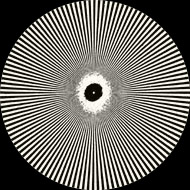
Alpha (hero) |
The most salivated-over and desired comm, owing to its gorgeous star turns in "Friday's Child" and "Patterns of Force," Alpha is the version from which nearly all replicas are based. When we think "communicator," we mostly think of this one. Now that it has been found and fully documented here, we have seen a whole new slew of ever-more accurate Alpha copies. Old alias: "Spock hero" Current status: private collection of an anonymous west coast collector
Seen in: Friday's Child, Patterns of Force, The Omega Glory, For the World is Hollow And I Have Touched The Sky |
|
| Moiré:
Description: 2-layer effect from a top Pattern #4 printed on clear .020" thick acetate (dot 0.005" off-center left) above an identical image on white cardstock (dot 0.118" off-center). The bottom is rotated via a 30 sec. stopwatch. The image has two motions: a slow growing./shrinking of many thin arcs and an overall rotation of the pattern. |
Mid-Wheel Midplate: Yes (now missing) Bottom Shell Screws: Yes Moiré Bezel side grooves: 4
|
|
|
Jewels: 1966-68
|
||
|
1968-now
The Siam rhinestone likely fell off during the third season and was replaced by a Hyacinth off of a dummy comm. |
||
|
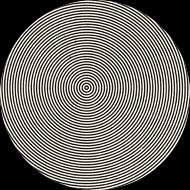
Beta (hero) |
Familiar mostly through its only close-up in "Day of the Dove," this lesser-known of the two heroes differs more from its famous sister than most people realize - most prominently with broader, faster "spider" moiré lines in a bezel mounted lower in the control well, and an antenna that opens up near only 45 degrees past vertical (less than any other comm). It was recently found in an L.A. home, missing some key parts, and was somewhat refurbished before it sold at auction in November 2024. Old alias: "Kirk hero" Current status: owned by unknown collector.
Seen in: Day of the Dove, Dagger of the Mind, Elaan of Troyius, Catspaw |
|
| Original Moiré:
Description: 2-layer effect from a top Pattern #4 on clear acetate (dot 0.023" off-center right) above an identical image on white cardstock (dot 0.008" off-center). The bottom is rotated via a 30 sec. stopwatch. The image has one main motion: a fast growing/shrinking of arcs (oscillating from a few to more and back to a few again). |
Mid-Wheel Midplate: Yes Bottom Shell Screws: Yes Moiré Bezel side grooves: Likely 2 |
|
|
Jewels: . originally: |
||
| when
sold: |
||
|
Gamma (dummy) |
Made famous by Stephen Whitfield Poe's book "The Making of Star Trek," this prop, perhaps the most quintessential of all the dummies, had a rare close-up for a non-hero in "Assignment: Earth." It was one of the most frequently-utilized comms, with appearances in far too many episodes to be listed here. Besides having its antenna wire likely made of steel instead of the usual brass, it has one unique feature in that the antenna is mounted further forward than the others, closing down just outside of the control well instead of over the control panel. The center Light Siam jewel was also glued on crooked. Old alias: "TMOST comm" Current status: unknown
Seen in: Assignment: Earth, The Enemy Within |
|
| Moiré:
Description: black ink on matte white paper. |
Mid-Wheel Midplate: Yes Bottom Shell Screws: Yes Moiré Bezel side grooves: 3 |
|
|
Jewels: . |
||
|
Delta (dummy) |
A true workhorse, this comm was used all over the place. It fell to the ground in "This Side of Paradise," where the antenna bounced open from a rubber band wrapped around the wire near the hinge wheels. Those wheels curiously have a groove cut partially around their midlines - for reasons unknown. Delta is easy to ID in screen caps because of its wide moiré bezel and the empty screw holes on the bottom. The hinge axle broke loose from its glue inside, likely during Third Season filming, so now the antenna sits crooked and cannot easily swing open. It was originally owned by set decorator John Dwyer and then sold through a 2001 Profiles in History auction. The comm lost its left jewel early first season, and the center red rhinestone fell off somewhere between the auction house and the museum. Old alias: "Dwyer comm" Current status: owned by the Paul Allen estate, currently on display at the MoPOP museum in Seattle, WA
Seen in: The Doomsday Machine, This Side of Paradise, Bread and Circuses, Spock's Brain, The Paradise Syndrome |
|
| Moiré:
. Description: black ink on matte white cardstock. |
Mid-Wheel Midplate: Yes (now missing) Bottom Shell Screws: No, but with undrilled dimples to receive the screws. Moiré Bezel side grooves: 0 |
|
|
Jewels: .
|
||
|
Epsilon (dummy) |
Control knobs placed widely apart, a pushed-in upper left edge of the moiré pattern and a large dark distinct tarnish blotch on the antenna were the key id features when finding this often-used comm in screencaps. However those traits were removed by then-owner Greg Jein during a refurbishment once the prop was acquired from set decorator John Dwyer. It's the only one of the five found comms that has no recessed screw dimples on the back, and also whose antenna is known to freely swing open like you're used to seeing on the show. Current status: owned by unknown collector, formerly part of the Greg Jein estate.
Seen in: This Side of Paradise, Spock's Brain, The Apple, A Taste of Armageddon |
|
|
Moiré:
Description: black ink on matte white paper. |
Mid-Wheel Midplate: No Bottom Shell Screws: No Moiré Bezel side grooves: 5 (or 6 - a tiny hint of a sixth groove is seen)
|
|
|
Jewels: . |
||
|
Zeta (dummy) |
We see in the show this comm open only a few times; for a blink in "Obsession" and "Bread and Circuses," and disassembled on a barrel in "Patterns of Force." Its antenna hinge today has very restricted motion, and if this problem has been present in some fashion all along, it would explain why it was rarely used in action on set. Then-owner Greg Jein took it apart again and stored separately the Velcro, screws and mic grill, which, since those parts are not on the prop as re-assembled for its 2023 auction sale, have never been seen by us and are now presumed lost. Current status: owned by unknown collector, formerly part of the Greg Jein estate.
Seen in: Obsession, Bread and Circuses, Patterns of Force, Spock's Brain |
|
|
Moiré:
Description: black ink on matte white paper. |
Mid-Wheel Midplate: No Bottom Shell Screws: Yes Moiré Bezel side grooves: 3 |
|
|
Jewels: . |
||
|
Eta (dummy) |
The control well of this seldom-used comm is seen in entirety only from a distance. The moiré pattern is likely a distinct logarithmic spiral set into a bezel ring mounted low in the control well toward the jewels, like in Theta. The center rhinestone is probably hyacinth, but the left and right AB stone colors are a crude guess at best. A few of the external tells are an antenna with some distinct tarnish blotches, and the midplate has generous exposure on the left. Current status: unknown
Seen in: The Conscience of the King, Tomorrow Is Yesterday, Shore Leave, Spock's Brain, Metamorphosis |
|
| Moiré:
. Description: black ink on white Kromokote cardstock. |
Mid-Wheel Midplate: No Bottom Shell Screws: No Moiré Bezel side grooves: Unknown |
|
|
Jewels: . |
||
|
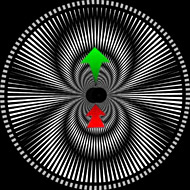
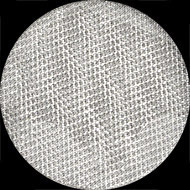
Theta (dummy) |
While this prop is easy to spot in its handful of appearances, given it's the only comm with a red jewel in the left position, the moiré pattern posed a deep conundrum - always looking blank, and bizarrely switching in Season 2 from grey to black. Intensive study confirms the comm originally had a two-layer static moiré insert of thin prismatic sheets that create changeable effects depending on the lighting and viewing angles. The bezel ring then came off (likely while filming "Bread and Circuses") and was reattached, but with a plain black disk as the insert, adhered with a smear of excess glue. Current status: unknown
Seen in: Bread and Circuses, Mirror, Mirror, Mudd's Women, Tomorrow Is Yesterday, The Omega Glory |
|
|
Moiré:
Description: Two-layer static effect from stacked 0.009" thick clear thermoplastic sheets with 10,000 parabolic lenses per square inch, as made by Rowlux. Mid-Season 2, the bezel ring came off and during the repair, this moiré insert was replaced by a matte black disk, heavily glued in. |
Mid-Wheel Midplate: No Bottom Shell Screws: No Moiré Bezel side grooves: Probably 2 |
|
|
Jewels: . |
||
|
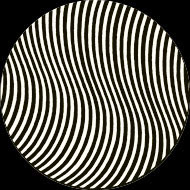
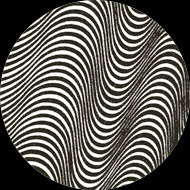
Iota (dummy) |
This comm started out with a full flip-back antenna which was fixed mid-Season 1 by a rare internal repair job, when the back shell was pried off, the stop pin reinstalled, and the shell then reglued. A little later the right jewel and hub looks to have fallen out and replaced by a large-ish white lump (a Swarovski 34ss White Opal rhinestone?). The wavy moiré pattern has a parallel pair of "bunching lines" that are easily visible even at a distance. All these features, plus the Velcro angled high by the hinge wheels, makes this prop easy to spot from just about any angle. Current status: unknown
Seen in: Miri, A Piece of the Action, Shore Leave, The Mark of Gideon, The Way To Eden, The Savage Curtain |
|
| Moiré:
. Description: black ink on matte white cardstock. |
Mid-Wheel Midplate: Yes Bottom Shell Screws: No Moiré Bezel side grooves: Probably 2 |
|
|
Jewels: .. By mid-Season 2 the left jewel had fallen off and the entire right jewel/hub was replace with some type of large white rhinestone. |
||
|
Kappa (dummy) |
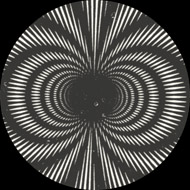
This comm got the best close-up of any dummy, in "The Omega Glory." It too was used aplenty throughout. It also has the most unique (and easiest to see from a distance) moiré pattern - a static printing of the "spider" Pattern #4, plus it's got some highly distinctive antenna solder marks on its left side. The center jewel is not a faceted flatback but a tiny garnet cabochon gem likely harvested from a wristwatch crown (like those Wah also used whole on his two tricorders). The antenna's stop pin fell out early, and so it swung fully back. This prop's bold look and frequent appearances are why we have it bringing up the rear of the list. Current status: unknown
Seen in: The Omega Glory, Assignment: Earth, The Enterprise Incident, Tomorrow is Yesterday, A Piece of the Action |
|
|
Moiré:
Description: black ink on matte white paper. |
Mid-Wheel Midplate: No. Bottom Shell Screws: Yes Moiré Bezel side grooves: At least 2 |
|
|
Jewels: . |
||
| Star Trek is a Registered and Copyrighted Trademark of Paramount Pictures. All Rights Reserved. All subject matters referring to Star Trek are trademarks of Paramount Pictures. This website has not been produced or endorsed by Paramount Pictures. Any material belonging to Paramount’s Copyrighted Material that may appear on this site complies with fair and/or acceptable use for the purposes of review, study, criticism, or news reporting. |